Do you find yourself struggling to achieve clean and precise cuts when working with wood chisels? Worry not, because we’ve got the perfect solution that won’t put a dent in your wallet. Sharpening your wood chisels with sandpaper is an inexpensive and effective way to maintain the sharpness of your tools. Not only does it prolong the lifespan of your chisels, but it also saves you the financial burden of having to replace them frequently.
In this blog post, we’ll guide you through the step-by-step process of sharpening your wood chisels with sandpaper, and provide you with useful tips and tricks on how to achieve professional-quality results. So take out those old and dull chisels and let’s get started!
Gather Materials
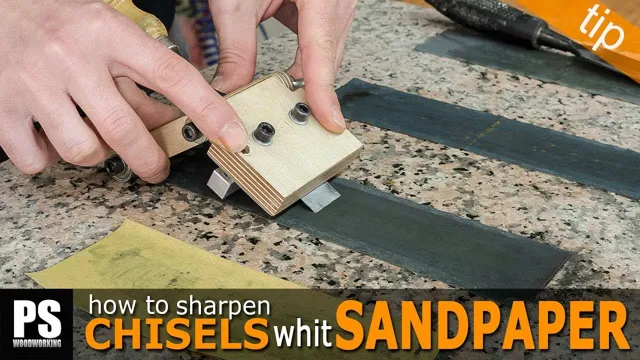
Before you can begin to sharpen your wood chisels with sandpaper, you’ll need to gather a few essential materials. First and foremost, you’ll need the chisels themselves – ideally, you should have a set of various tip sizes so that you can work on a variety of different projects. You’ll also need sandpaper in a few different grits, ranging from coarse to fine.
To keep your workspace clean, it’s a good idea to have a sturdy workbench or table covered with a drop cloth or plastic sheet. Additionally, you may want to consider a honing guide to help you keep the angle consistent while you’re sharpening. With all of these materials at the ready, you’re well on your way to sharpening your chisels to a razor-sharp edge.
Sandpaper, Honing Guide, Chisels
When it comes to sharpening your chisels, you’ll need to gather a few materials before you get started. First things first, you’ll need sandpaper of various grits. It’s best to start with a coarse grit, around 120 or 150, to remove any nicks or chips from the blade.
Then gradually move up to finer grits, such as 320, 400, or even 600, to polish the edge. Next, you’ll want to invest in a honing guide. This handy tool will keep your chisel at the correct angle while you sharpen, which is essential for maintaining a sharp and consistent edge.
Finally, you’ll need your chisels. Make sure they’re clean and dry before you start sharpening. With these materials in tow, you’re ready to tackle any dull chisel and turn it into a precision cutting machine.
Prepare Chisel
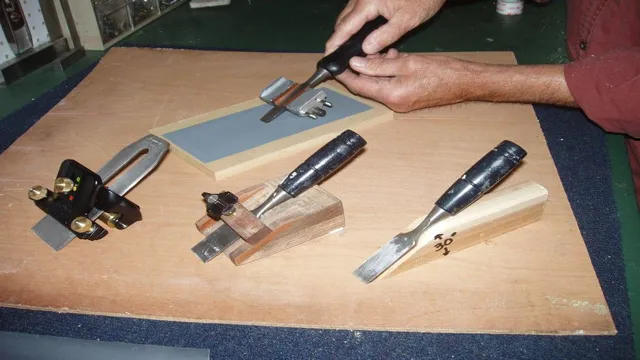
If you want to get precise and clean cuts when carving or woodworking, it’s essential to keep your chisels sharp. One effective method of sharpening wood chisels is using sandpaper. First, clean the chisel and remove any rust or dirt using sandpaper or a wire brush.
Then, take a piece of coarse grit sandpaper and lay it on a flat surface. Hold the chisel perpendicular to the sandpaper and rub the bevel back and forth in circular motions. Keep an eye on the angle and keep the chisel level as you work.
After a few passes, switch to a finer sandpaper and repeat the process until the edge is sharp. Once finished, strop the cutting edge by rubbing it across a piece of leather or stropping compound to remove any burrs. With these steps, you’ll have sharpened and ready chisels for your next woodworking project, making carving and cutting tasks a breeze.
Clean, Mark Edge, Secure in Honing Guide
Before honing your chisel with the help of a honing guide, it is important to prepare it properly. Start by cleaning it thoroughly to eliminate any dirt, grime, or rust that may affect its cutting performance. You can use a steel wool or sandpaper to restore the surface of the chisel and ensure it is free from any debris or scratches.
Once you have cleaned your chisel, it’s time to mark the bevel with a felt-tip marker to check its progress while honing. This is an important step that helps you keep track of the areas that need to be worked on and ensures a consistent angle throughout the sharpening process. Finally, make sure your chisel is securely placed in the honing guide before starting to hone it.
This will help you maintain the correct angle and prevent wobbling or slipping that could result in an uneven edge. Following these steps will not only help you achieve a sharp and durable edge but also prevent any damage to your honing guide, stone or chisel.
Choose Sandpaper
When it comes to sharpening wood chisels, using sandpaper is an effective and affordable option. However, it’s important to choose the right type of sandpaper for the job. You want to select sandpaper that is specifically designed for sharpening tasks, such as fine-grit sandpaper.
Look on the packaging for the grit level and opt for a grit between 1000 and 3000 for a good edge. It’s also helpful to have a range of grits available, starting with the lowest grit and working your way up to the finer grits as you sharpen the chisel. Remember to use a lubricant, such as water or honing oil, to prevent the sandpaper from clogging and to ensure a smoother sharpening process.
With the right sandpaper and technique, you’ll be able to sharpen your wood chisels to a razor sharp edge in no time.
Coarse to Fine Grit, Starting with 220
When choosing sandpaper for a project, it’s important to know which grit to start with. For most projects, starting with a coarse grit like 220 is a good choice. This type of sandpaper is great for removing rough spots, scratches, and other imperfections on the surface you are sanding.
As you progress through the sandpaper grits, you will actually refine the surface, making it smoother and smoother. So, starting with a coarse grit like 220 is important in order to get the best results later on. Once you have finished with the 220 grit, you can move on to finer grits like 320, 400, and beyond.
Each successive grit will smooth the surface further, until you have the desired finish. So, when choosing sandpaper, always start with a coarse grit and work your way up to the finer grits for optimal results. Remember, taking the time to select the right grit for your project will make a big difference in the end result.
Begin Sharpening
If you’re looking to start sharpening your wood chisels with sandpaper, the first step is to gather the necessary materials. You’ll need a variety of sandpaper grits, ranging from coarse to fine, a flat surface to work on, and possibly a honing guide to help maintain the angle of the blade as you sharpen. First, start with the coarse grit sandpaper to remove any nicks or burrs on the blade.
Then gradually work your way up to finer grit sandpaper, which will give you a sharper edge. Be sure to maintain a consistent angle throughout the sharpening process to ensure an even and effective result. Don’t forget to periodically clean your chisels during the sharpening process to remove any metal debris that could interfere with the sharpening action.
With practice, sharpening your wood chisels with sandpaper can become a quick and easy task that will keep your tools performing at their best.
Lay Sandpaper on Flat Surface, Make Circular Motions
When it comes to sharpening tools, one of the best approaches is to use sandpaper. But where to begin? First, lay the sandpaper on a flat surface, making sure it is securely in place. Then, take the tool you want to sharpen and hold it at a 20-degree angle to the sandpaper.
Make circular motions with the tool while applying a small amount of pressure. This will help to sharpen the edges and remove any nicks or burrs. Keep in mind that the coarseness of the sandpaper will determine how rough or smooth the sharpened edge will be.
For a very dull tool, start with a coarser grit and work your way up to a finer grit. With a little bit of practice, you’ll be able to sharpen your tools quickly and efficiently. So, the next time you need to sharpen your tools, give sandpaper a try!
Check Progress
If you’re wondering how to sharpen wood chisels with sandpaper, it’s important to first check your progress frequently to ensure that you’re on the right track. While sandpaper can be an effective tool for sharpening chisels, it may take some trial and error to get the hang of it. One way to gauge your progress is to periodically test the sharpness of your chisel by making a simple cut in a piece of wood.
If the cut is clean and smooth, your chisel is probably sharp enough. Another helpful tip is to inspect your chisel frequently for any signs of wear or damage. If you notice any chips or cracks in the blade, it may be time to replace or repair the chisel.
By keeping an eye on your progress and making adjustments as needed, you can ensure that your chisels are always in top condition for your woodworking projects. And remember, with a little practice and patience, anyone can learn how to sharpen wood chisels with sandpaper effectively.
After Each Grit, Test Cut or See Light Reflection
When working on any project that involves sanding or polishing, it’s essential to check your progress regularly. The best way to do this is after each grit level or test cut, or by examining the light reflection on the surface. The reason for this is that it can be challenging to gauge the progress that you’ve made by just looking at the material alone.
You may have sanded or polished the material down, but the changes may not be visible without the help of proper lighting. By checking the progress after each grit level, you can adjust the pressure, pace, or technique if necessary. Continuously examining your work is crucial to ensure that you are not wasting time and resources on an incorrect method.
It also helps you to achieve a higher quality finish and a consistent look throughout the project. So, remember to take a step back every now and then to observe your work and make the necessary adjustments to achieve the desired results.
Polish
If you’re a woodworking enthusiast, you know that keeping your tools sharp is essential for achieving a clean and precise finish. Sharpening your wood chisels with sandpaper is a cost-effective and straightforward method that can be done easily at home. Begin by choosing sandpaper with a grit of around 200 to 400.
Next, lay the sandpaper flat on a hard surface and use a honing guide to hold the chisel blade at the correct angle. Move the chisel blade back and forth across the sandpaper, applying even pressure. After a few passes, turn the chisel over and repeat the process on the other side.
Once you’ve achieved the desired sharpness, use a leather strop to refine the blade even further. While this method may take a bit of practice to master, it can save you money on expensive sharpening equipment and give you a sense of satisfaction in keeping your tools in excellent condition.
Use Leather Strop and Honing Compound
Polishing a blade is an essential step to ensure the edge is razor-sharp and performing at its best. Using a leather strop and honing compound is a great way to achieve the perfect, polished edge. A leather strop is a flexible piece of leather that is used to smooth and refine the edge of a blade.
Honing compound is a special abrasive paste that is applied to the strop to aid in polishing the blade. The way to use these two materials is to apply the honing compound to the smooth side of the strop, and then begin stroking the blade across the strop at a consistent angle. This motion will work to hone and smooth the edge of the blade.
Using a leather strop and honing compound together is a simple and efficient method that will provide professional-level results. Your blade will be sharper than ever and ready for whatever task you put it to. So, the next time you need to polish and refine your blade, reach for your leather strop and honing compound to achieve the perfect edge.
Maintain Sharp Edge
If you’re wondering how to sharpen wood chisels with sandpaper, you’ve come to the right place. Sharpening chisels is a crucial skill that every woodworker needs to master. Dull chisels can cause frustration and ruin your projects, while sharp ones can make your work faster, easier and more precise.
To sharpen your chisels using sandpaper, you’ll need to follow a few simple steps. Begin by clamping your chisel securely onto your workbench, then use progressively finer grits of sandpaper, starting with a heavy grit and working your way to a finer one. Apply even pressure, making sure to maintain the chisel’s original bevel angle.
After a few passes with each grit, you should notice a significant improvement in your chisel’s sharpness. Keep going until you’re satisfied with the results, and then give your chisels a final honing with a leather strop to ensure a razor-sharp edge. With a little practice, you’ll be sharpening your chisels like a pro in no time.
Regularly Hone and Sharpen as Needed
Maintaining a sharp edge on your tools is an essential part of honing your craft, whether you’re a woodworker or a chef. Just like a dull blade can make a tough job even tougher, trying to work with dull tools can be frustrating and inefficient. The key to maintaining a sharp edge is to make it a regular part of your routine, and to do it with care and attention.
Depending on the tool, you might use a sharpening stone, a honing rod, or a specialized sharpener. Use caution and follow the manufacturer’s instructions to avoid damaging the tool or injuring yourself. With a little bit of practice, you’ll get the hang of honing and sharpening, and your tools will be ready to tackle any task you throw their way.
Conclusion
If you’re tired of dull chisels giving you a headache, fear not – all you need is sandpaper! With a few simple steps and a bit of elbow grease, you can turn your blunt tools into razor-sharp marvels. Just remember to choose the right grit for the job, keep the chisel well-lubricated with oil, and enjoy the satisfaction of slicing through wood like butter. Who needs a fancy sharpening machine when sandpaper can do the trick? It’s a DIY hack that even MacGyver would approve of.
So grab your sandpaper and get ready to chisel like a pro!”
FAQs
What grit sandpaper is best for sharpening wood chisels?
Typically, a 320-grit sandpaper works well for sharpening wood chisels.
Can sandpaper be used to sharpen other woodworking tools?
Yes, sandpaper can also be used to sharpen other tools such as plane blades, chisels, and gouges.
How often should wood chisels be sharpened with sandpaper?
It depends on how frequently the chisels are used. Generally, regular sharpening is recommended to maintain the sharpness of the blade.
Is it necessary to use a honing guide when sharpening wood chisels with sandpaper?
No, a honing guide is not necessary when sharpening wood chisels with sandpaper, but it can help ensure a consistent angle.
What is the proper technique for sharpening wood chisels with sandpaper?
The chisel should be placed on the sandpaper and moved in a circular motion until a burr is formed on the opposite side. Then, flip the chisel and repeat until the burr is removed.
How can I tell if my chisel is sharp enough after sharpening with sandpaper?
Meticulously observe the sharpness of the chisel. If the blade cuts through wood without difficulty, then it is sharp enough.
Is it possible to over-sharpen wood chisels with sandpaper?
Yes, if you continually sharpen a chisel with sandpaper, you can eventually create a weak, thin edge. It’s important to sharpen until you can feel a burr, and then stop and hone the edge.
