How to Use a Car Polisher Correctly: Tips and Tricks for a Flawless Finish
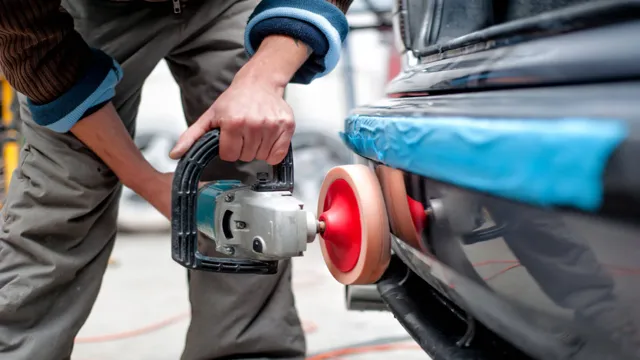
Are you tired of spending hours polishing your car by hand, only to find that it still doesn’t have that showroom shine? Well, fear not my friend, because using a car polisher correctly can make all the difference. By incorporating this handy tool into your car detailing routine, you can achieve professional results in a fraction of the time. But where to start? With the array of car polishers available on the market, it can be overwhelming to know which one to choose.
And once you have your polisher in hand, how do you use it without damaging your paintwork or creating excessive swirls? In this blog, we will guide you through the ins and outs of using a car polisher correctly, from choosing the right type of polisher for your needs, to perfecting your technique to achieve that brilliant shine. We’ll cover the do’s and don’ts of using a polisher, as well as common mistakes to avoid. So if you’re ready to take your car detailing game to the next level and achieve that coveted showroom shine, join us as we delve into the world of using a car polisher correctly.
Understanding the Basics
Using a car polisher correctly can be a bit daunting at first, but it’s much easier than you might think! First, make sure your car is clean and dry before you begin. Next, apply a small amount of polish to the pad and spread it over a small area of the car using low speed and light pressure. As you work on each section, gradually increase the speed and pressure until you achieve the desired level of shine.
Be careful not to apply too much pressure, or you may damage the paint. It’s also important to work in small sections and avoid letting the pad get too hot. By following these simple guidelines and taking your time, you’ll be able to achieve a professional-looking finish on your car in no time!
Ensure the car is clean and dry
If you want to make sure your car is in tip-top shape, it’s important to understand the basics of car care. One of the most important things you can do is to ensure that your car is clean and dry. This may seem like a no-brainer, but it’s actually more important than you might think.
Dirt and debris can cause scratches and other damage to your car’s paint job, while moisture can lead to corrosion and other problems. So, before you hit the road, take a few minutes to give your car a thorough cleaning. Use a high-quality car shampoo and a microfiber towel to gently scrub away dirt and grime.
Then, dry your car off with a chamois or another highly absorbent towel. By taking these simple steps, you can ensure that your car stays looking great for years to come.
Choose the right polish
When it comes to keeping your nails looking beautiful and well-groomed, choosing the right polish is key. But with so many options available, it can be overwhelming to decide which one to go for. Understanding the basics of polish can make all the difference in achieving the look you want.
The first thing to consider is the finish. Do you want a glossy, shiny look, or are you after something more subdued? Some polishes also include additional benefits like strengthening or fast-drying properties, so it’s worth considering those as well. Ultimately, the right polish for you will depend on your individual needs and preferences, so don’t be afraid to experiment until you find your perfect match.
Preparing the Car and Polisher
Before jumping into using a car polisher, it’s important to make sure the car and the polisher are ready for the job. Firstly, wash the car thoroughly to ensure that there isn’t any dirt or debris on the surface. A clean surface is key for producing the best results.
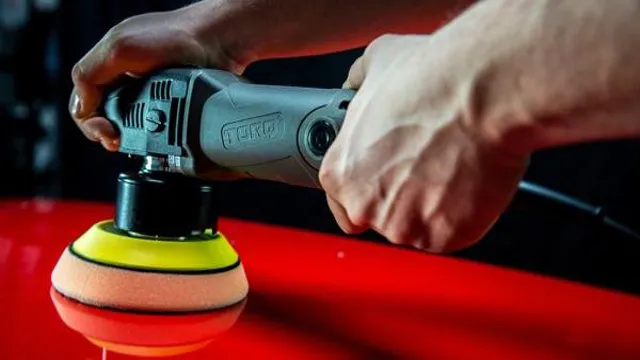
Next, it’s time to prepare the polisher. Make sure the polisher is fitted with the correct pad for the job you’re undertaking – for example, a cutting pad for removing scratches and defects, or a finishing pad for enhancing the gloss of your paintwork. It’s also important to ensure that the polisher is set at the appropriate speed for the task at hand.
A higher speed will be needed for cutting, while a lower speed is appropriate for finishing. Taking the time to prepare your car and polisher correctly will ensure you achieve the best possible results from your car polishing.
Set up your work area
To start polishing your car, the first step is to set up your work area. Find a shaded area where you can park your car and have access to electricity. It’s important to ensure that your work area is clean and free of debris that could damage the car’s paint.
Next, you’ll need to prepare the car and polisher. Start by washing the car thoroughly with soap and water and drying it off completely. Then, inspect the paint for any imperfections such as scratches or swirl marks.
Once the car is cleaned and prepped, attach the appropriate polishing pad to your polisher. It’s always a good idea to test the polisher on a small section of the car to make sure you have the right pad and setting. With your work area set up and car prepped, you’re ready to start polishing! The main keyword used: polisher.
Attach the right polishing pad
When it comes to preparing your car and polisher for polishing, it’s important to attach the right polishing pad to achieve the desired results. Polishing pads come in different colors and materials, and each one is designed for a specific purpose. For example, a foam pad is best for applying polish or wax, while a microfiber pad is ideal for removing scratches or swirl marks.
To determine which pad to use, consider the condition of your car’s paint and what areas you want to polish. Once you have the right pad, attach it to your polisher securely to ensure it doesn’t fly off during use. By taking the time to attach the right polishing pad, you’ll be on your way to a beautifully polished car that looks like new.
Polishing the Car
Polishing your car can be a daunting task, especially if you’ve never used a car polisher before. But don’t fret! With a little bit of practice, you can easily achieve that shiny, showroom look you’ve been dreaming of. To begin, it’s important to choose the right type of polish for your car’s exterior.
There are two main types of polishes: abrasive and non-abrasive. Abrasive polishes are designed to remove heavy scratches and swirl marks, while non-abrasive polishes are better suited for maintaining your car’s shine. Once you’ve selected the appropriate polish, you can start by applying a small amount of it to the polisher pad.
It’s important to work in small sections, covering about a 2×2 foot area at a time. Start the polisher on a low setting and make sure to keep it moving at all times to avoid any damage to your car’s paint. As you work your way around the car, be sure to check your progress frequently and adjust the amount of polish as needed.
With a little bit of patience and practice, you can achieve a perfectly polished car that will turn heads on the road.
Start with a small section
Polishing the car is a task that can make a big difference in the overall appearance of your car. If you’re thinking about polishing your car for the first time, it’s a good idea to start with a small section to get a feel for the process. Begin by washing your car thoroughly and drying it off completely.
Then, apply a small amount of polishing compound onto a foam applicator pad and apply it to the test section. Use circular motions to rub the polish into the paint, making sure to cover the entire section. Once you’ve finished, wipe off the excess polish with a microfiber cloth.
Using this method, you can evaluate the results and adjust your technique before moving on to the entire car. With a little practice, you’ll have your car looking like new in no time!
Apply the polish to the pad
When it comes to polishing your car, one important step is to apply the polish to the pad correctly. To begin, choose a high-quality polishing pad that fits your polishing machine. Then, put a small amount of polish onto the pad.
It’s important not to use too much polish, as this can cause buildup or streaks on your car’s surface. Spread the polish evenly across the pad using your fingers, making sure it covers the entire surface area. Once you have applied the polish to the pad, you’re ready to begin polishing your car! Using a quality polishing pad and ensuring you apply a sufficient amount of polish to it will help you achieve the best results when polishing your car.
With the right tools and technique, you can give your car a flawless finish that will make it shine like new. Remember to always work in small sections when polishing your car, and never apply too much pressure to the pad. By taking your time and giving your car the attention it deserves, you can achieve a beautiful, professional-looking finish that will turn heads on the road.
Set the speed and pressure
When it comes to polishing the car, it is essential to set the speed and pressure accurately. This process can be done either by hand or with a machine polisher. If you are using a machine polisher, it’s vital to choose the right speed setting and pressure to prevent damaging your vehicle’s paintwork.
Typically, the speed ranges between 1,500 and 6,000 OPM (Orbits Per Minute), and the pressure applied should be light to moderate. Applying too much pressure may lead to swirls and scratches on the paint surface, which can be challenging to remove. Hand polishing requires less technical expertise, but it also takes more time and effort.
Regardless of the method used, it’s crucial to be aware of the speed and pressure applied to avoid causing harm to your car’s exterior. So, take your time and start with a low pressure to test the results before increasing it gradually. With a little trial and error, you’ll master the art of car polishing in no time.
Move the polisher in circular motions
Car polishing is a task that requires focus, commitment, and a lot of effort. One of the most important tips for polishing a car is to move the polisher in circular motions. This movement ensures that the polishing process is even and consistent.
Circular motions also help to avoid the formation of swirl marks, which can be unsightly and difficult to remove. When polishing your car, it’s important to start with a clean surface to achieve the best results. Begin by washing your car thoroughly, ensuring that all dirt and debris have been removed.
Next, choose the appropriate polishing compound and apply it to the polishing pad. Move the polisher in circular motions without applying too much pressure. It’s important to keep the pad moving at all times to avoid damaging the paintwork.
Take your time and work in sections until the entire surface of the car has been polished to your satisfaction. Remember, practice makes perfect, and with time, you’ll be able to achieve a mirror-like shine on your vehicle with confidence.
Finishing Touches
If you’re looking to give your car a shiny, polished finish, using a car polisher can be a great option. But it’s important to use it correctly to avoid causing damage to your car’s paint job. First, start by thoroughly washing and drying your car to remove any dirt or debris that can scratch the surface.
Next, apply a polishing compound to the pad on the polisher, making sure to only use a small amount and avoiding any plastic or rubber parts. Turn on the polisher and begin working in small sections, using a circular motion and applying light to medium pressure. Remember to keep the pad well-lubricated with the polishing compound.
Once you’ve finished, wipe off any excess compound with a microfiber cloth. With these tips, you’ll be able to achieve a flawless, high-shine finish on your car.
Wipe off excess polish
After polishing your shoes to perfection, it’s essential to wipe off any excess polish for that finishing touch. The excess polish can look unsightly and may cause damage to your shoes in the long run. Use a clean, dry cloth to wipe off the excess polish, moving in gentle, circular motions.
Be sure to get all the corners and crevices to ensure that your shoes look clean and polished all over. Over time, the polish can accumulate and form a layer, which may cause the shoes to crack or peel. Wiping off the excess polish after each polishing session can prevent this from happening.
So don’t forget this essential step, as it could make all the difference in how your shoes look and last.
Inspect and repeat if necessary
Inspect and repeat if necessary – this is the golden rule for anyone looking to achieve a perfect finish on their project. Don’t assume that your first attempt will be flawless. Take the time to review your work and identify any areas that need improvement.
This could be as simple as sanding down a rough patch or applying a second coat of paint in areas that need it. By inspecting your work and making adjustments, you can achieve a professional-grade finish that will look great for years to come. Remember, it’s always easier to tackle any issues before the final product is complete, so don’t be afraid to take your time and make sure everything is perfect.
Whether you’re painting a room, building a piece of furniture, or working on any other home improvement project, following this rule will help you achieve the best possible results.
Conclusion
In conclusion, using a car polisher correctly is not rocket science, but it does require attention to detail and a willingness to learn. Think of your car polisher as a dance partner, requiring a gentle touch and a steady rhythm to coax out the best performance. Follow the steps outlined above, listen to your machine, and let the products do their magic.
With a little practice, you’ll be polishing your car like a pro, and turning heads wherever you go! So, polish on my friends, polish on!”
FAQs
What is a car polisher used for?
A car polisher is used to remove scratches and swirl marks on the surface of a car, resulting in a polished and glossy finish.
What are the different types of car polishers available in the market?
The two most common types of car polishers are dual action and rotary polishers. Dual action polishers are more beginner-friendly and rotary polishers are more powerful and suited for professional use.
Can a car polisher damage the paint on a car?
Yes, if not used correctly, a car polisher can damage the paint on a car. It is important to use the correct speed and pressure, and to make sure the surface is clean before polishing.
How often should I use a car polisher on my car?
It depends on the condition of the paint on your car. If it has scratches and swirl marks, you may need to use a car polisher more frequently. Generally, once or twice a year is enough to maintain the shine on your car’s surface.
Do I need to use a specific type of polish with my car polisher?
Yes, it is important to use the correct type of polish for your car polisher. Consult the manufacturer’s instructions or a professional for advice on which type of polish to use.
How long does it take to polish a car with a car polisher?
The time it takes to polish a car with a polisher depends on the size of the car, the severity of any scratches or marks, and the experience of the user. Generally, it can take a few hours to polish a car to a high standard.
Can I use a car polisher on other surfaces besides cars?
Yes, car polishers can be used on other surfaces such as boats, RVs, and motorcycles. However, make sure to use the correct polish and technique for each surface.

