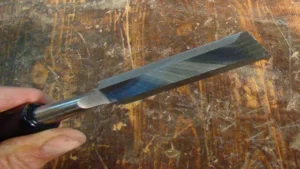
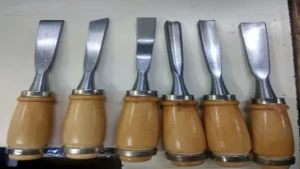
Are you looking to sharpen your wood carving chisels but don’t know where to start? Sharpening your chisels is an essential aspect of wood carving, as it can improve the quality and precision of your work. Whether you’re a beginner or a seasoned wood carver, this step-by-step guide will show you how to sharpen your chisels like a pro. Think of a dull chisel like a worn-out pencil.
You could attempt to write with it, but the marks would be faint and imprecise. Similarly, a dull chisel won’t create the fine details and clean edges that you need for a stunning wood carving. The good news is that sharpening your chisels isn’t as daunting as it may seem.
To begin, you’ll need a set of sharpening stones. These come in various grits, which determine the coarseness of the stone. You may want to start with a coarse stone and work your way up to a finer grit for a sharper edge.
Additionally, consider investing in a honing guide, which can help you maintain a consistent angle while sharpening. Once you have your tools ready, it’s time to begin the sharpening process. The first step is to assess the current state of your chisel’s edge.
If it’s severely damaged or chipped, you may need to grind it down before moving on to sharpening. However, if it just needs a touch-up, you can start with the sharpening process. Using a lubricant, such as oil or water, apply it to the sharpening stone and begin to move your chisel back and forth along the stone, maintaining a consistent angle.
Continue this process until you have a sharp edge, and then move on to the finer grits to polish and refine the edge. Sharpening your wood carving chisels is an essential skill for any wood carver. With this step-by-step guide, you’ll be able to sharpen your chisels with ease and precision, allowing for more intricate and impressive carvings.
Tools and Materials You Will Need
If you want to master the art of wood carving, sharpening your chisels is an essential skill that you need to learn. Here are the tools and materials you will need for the job. First, you will need a sharpening stone, which comes in various types and grits.
A coarse grit is great for reshaping the edge, while a fine grit is ideal for honing the edge. You will also need a honing guide, which helps you maintain a consistent angle. Additionally, you will need some lubricant, such as oil or water, to keep the stone and your chisel clean and prevent overheating.
Lastly, some safety gloves and eyewear are essential to protect yourself from accidental cuts or flying debris. Once you have gathered these materials, you are ready to sharpen your wood carving chisels and achieve sharper, more precise cuts.
Sharpening stone
When it comes to sharpening a knife or any other tool, having the right tools and materials can make a big difference in the end result. For sharpening a knife, the main tool you will need is a sharpening stone. This is a rectangular block of abrasive material which can be made from different materials like ceramic, diamond, or natural stones like quartz and slate.
These come in different grits or coarseness levels, from coarse to fine. You will also need a lubricant to ensure a smooth sharpening process, which could be water, oil, or just saliva. A honing guide is also recommended for beginners as it helps maintain the angle of the blade.
Lastly, a leather strop is useful for honing and polishing the blade after sharpening to remove any burrs or rough edges. By having these tools and materials, you can achieve a sharp and efficient tool that will last you a long time.
Protective gloves
When it comes to protecting your hands while working with potentially harmful materials, using the right gloves is essential. But with so many different types of gloves available, it can be confusing to figure out which ones you need. Here are a few tools and materials that can help you choose the right protective gloves for your needs.
First and foremost, consider the material of the gloves. Latex gloves are a common choice for many applications, but they may not be suitable for those with latex allergies. Nitrile gloves are a good alternative, as they are hypoallergenic and provide excellent protection against many types of chemicals and oils.
You’ll also want to consider the thickness of the gloves, with thicker gloves providing better protection against sharp or abrasive materials. But remember, thicker gloves may also be less dexterous, so it’s important to find a balance between protection and usability. By taking these factors into account, you can find the right protective gloves to keep your hands safe on the job.
Small brush
When it comes to painting miniatures, having the right tools and materials is crucial to achieving the best results. One important tool you will need is a small brush. A small brush will allow you to paint finer details without accidentally smudging or ruining areas that you have already painted.
The size and shape of the brush will depend on the size of the miniature and the type of detail you are painting, so it’s a good idea to have a variety of small brush sizes on hand. When choosing a brush, look for one with soft bristles that can hold a point, as this will give you more control over your strokes. Overall, investing in a good quality small brush can make a big difference in your miniature painting results.
Honing compound
If you want to achieve the perfect edge on your tools, you will need a honing compound. This compound is a paste-like substance that is applied to a leather strop, polishing wheel or buffing pad to give tools a razor-sharp edge. The honing compound is usually made of abrasive particles, such as aluminum oxide or chromium oxide, mixed with a binder to create a paste that adheres to the strop.
In addition to a honing compound, you will need a few other tools and materials to get started. First and foremost, you’ll need the tool you want to sharpen, whether it’s a knife, chisel, or plane blade. You’ll also need a strop, which can be made of leather or a synthetic material like nylon.
A strop is an essential tool for finishing the edge of a sharpened tool, and it helps to smooth out any small nicks or roughness. Other tools you might need include a sharpening stone, which you can use to grind away any major chips or dents in the blade. You might also need a honing guide, which helps to keep the tool at the correct angle as you sharpen it.
Finally, you’ll need some lubricant or oil to help prevent the blade from overheating or becoming damaged during the sharpening process. Overall, honing compounds are an essential tool for any craftsman or DIY enthusiast who wants to achieve the perfect edge on their tools. By following the steps above and using the right tools and materials, you can achieve a razor-sharp edge that will last for years to come.
Leather strop
If you’re a beginner in the field of sharpening, don’t worry – you don’t need a lot of fancy equipment. For sharpening with a leather strop, there are only a few things you’ll need: a strop, a honing compound, and a straight razor or other blade you want to sharpen. A strop is essentially just a strip of leather, often backed with a wooden paddle for stability.
Honing compound, which is a fine abrasive paste, is applied to the leather to help sharpen the blade and remove any residual burrs. When you’re ready to strop, simply lay the leather flat on a surface, add the honing compound, and drag your blade along the leather, making sure to maintain a consistent angle. With a little bit of practice, a leather strop can take your dull blades from blah to razor-sharp in just a matter of minutes.
So don’t be intimidated, give it a try!
Preparing the Chisels for Sharpening
If you’re an aspiring woodcarver, one of the most essential skills to master is sharpening your chisels. Before you begin sharpening, you’ll need to prepare your chisels by cleaning them thoroughly. Use a cloth or brush to remove any dirt, dust, or rust that may have built upon the blades.
Next, check the edges of your chisels for any nicks or chips using a magnifying glass. Any imperfections to the blade’s edge can cause damage to your workpiece while carving. Honing oil or a slipstone can be used to grind down small nicks or burrs.
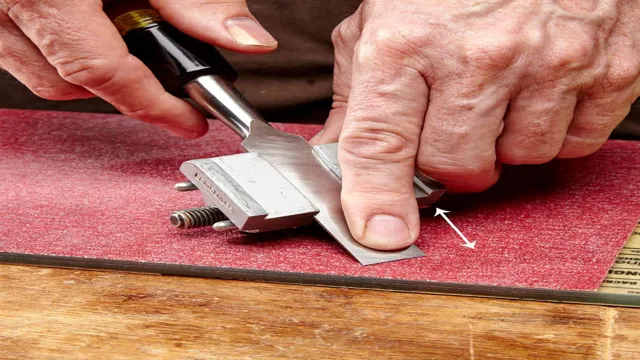
Once your chisel blades are clean, straight and damage-free, it’s time to fit them into a honing guide or clamp that will hold them securely in place while sharpening. A honing guide will make sure that your sharpening angle remains consistent throughout the process. Using a honing guide with a jig ensures maximum efficiency and precision when sharpening wood carving chisels, leading to a professional-looking final product.
Cleaning the chisels
Cleaning and preparing your chisels before sharpening is an essential step in getting the best results from your woodworking projects. It’s also essential in ensuring that your chisels will last you a long time. Before anything, you’ll want to make sure that your chisels are free of any dirt, grime, or rust.
You can start by using dish soap and warm water to remove any surface dirt. You don’t want to let the chisels soak for too long. Once rinsed, dry the chisels using a clean cloth.
Afterward, use a wire brush with brass bristles to remove any remaining dirt and rust from the metal parts. Ensure that all the parts are thoroughly cleaned, including the handle. You can then use a cloth with a small amount of mineral spirits to remove any leftover adhesive from the handle.
With all these steps done, you’re now ready to sharpen your chisels and start on your woodworking project.
Removing nicks and chips
Before you can properly sharpen your chisels, it’s important to remove any nicks or chips that may be present in the blade. These defects can hinder the blade’s ability to cut smoothly and efficiently. The first step in removing nicks and chips is to assess the severity of the damage.
Small nicks can often be removed with a fine honing stone, while larger chips may require more extensive work with a coarse stone or file. It’s important to take your time and be patient during this process, as rushing can lead to further damage or uneven results. Additionally, it’s important to maintain a consistent angle while removing nicks and chips to ensure that the blade is still properly shaped for sharpening.
By taking the time to prepare your chisels properly, you’ll be able to achieve a sharper, smoother cut and prolong the lifespan of your tools.
Sharpening the Chisels
Sharpening wood carving chisels is a crucial skill for any woodworker. A dull chisel can cause frustration and inconsistency as it makes it difficult to make precise cuts. Here’s how to sharpen your chisel correctly.
First, use a honing stone to remove any nicks or burrs from the blade’s edge. Once the blade is smooth, sharpen it by rubbing it against the stone, making sure to maintain the angle of the bevel. Use an angle guide to ensure the proper angle is maintained consistently.
Go through the grits of the stones, starting with a coarse grit and working your way to a fine grit until the blade is sharp. Make sure to remove any burrs on the edge when you’re done sharpening, either by gently rubbing the flat side of the chisel’s blade or using a strop. Remember to sharpen your chisels regularly and keep them protected to ensure they stay sharp for longer.
Start with the coarse stone
Sharpening chisels is an important part of woodworking, and it all starts with the coarse stone. To begin, first ensure that your chisel is clean and free from oil or any other debris that may hinder the sharpening process. Then, place the chisel blade flat on the coarse stone and apply pressure.
Use a circular motion to ensure that the whole blade receives an even amount of attention. Be sure to work slowly and methodically, checking the angle and sharpness of the blade frequently. Once you feel like the blade is sharp enough, move on to a finer stone to refine the edge.
Remember, taking your time with this process will result in a sharper and more effective chisel in the end. So don’t rush it!
Maintain the angle of the bevel
When it comes to sharpening chisels, the key is to maintain the angle of the bevel. This angle is what gives the chisel its sharp edge, and if you don’t maintain it properly, you’ll end up with a dull chisel that won’t cut anything. The angle you need to maintain will depend on the type of chisel you have, but generally speaking, you’ll want to aim for a 25-degree bevel.
To maintain this angle, you’ll need to use a honing guide, which will help you keep the chisel at the right angle as you sharpen it. It’s also important to use a slow and steady motion as you sharpen, making sure to apply even pressure to the blade. If you rush or apply too much pressure in one area, you’ll end up with an unevenly sharpened blade that won’t cut properly.
So take your time, be patient, and maintain that bevel angle – your sharp chisel will thank you!
Use both sides of the stone
When it comes to sharpening your chisels, it’s important to use both sides of the stone to ensure a sharp and even edge. Many people make the mistake of only using one side and end up with an uneven and ineffective chisel. To avoid this, begin by moistening your sharpening stone with water and placing it on a stable surface.
Next, position your chisel blade perpendicular to the stone and apply even pressure as you slide it back and forth along the stone. Be sure to use both sides of the stone, alternating between them to keep the edge evenly sharpened. Take your time and remember to keep the blade at a consistent angle to avoid any nicks or chips.
By using both sides of the stone, you’ll create a sharp, precise edge on your chisel that will make your woodworking projects a breeze.
Move on to a finer grit stone
When it comes to sharpening chisels, it’s important to start with a coarse grit stone to grind away any dullness or nicks. But once you’ve progressed through several grits and have a nice edge established, it’s time to move on to a finer grit stone. This will help refine the edge and give it a polishing touch.
A finer grit stone will eliminate any roughness left behind from the coarser stones, resulting in a sharp and smooth edge. Not only will this improve the quality of your work, but it will also save you time and effort in the long run by reducing the need for constant resharpening. So, the next time you’re sharpening your chisels, don’t forget to progress through the grits and finish with a finer stone.
Your chisels and your woodworking projects will thank you!
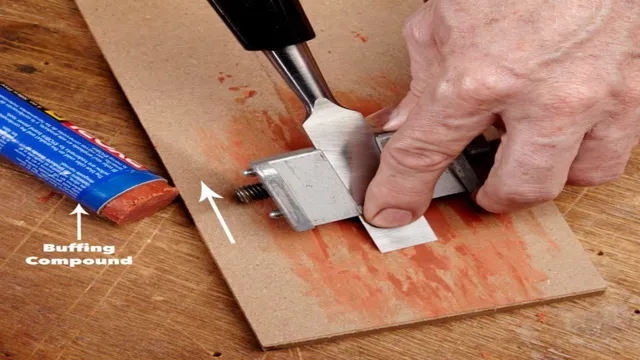
Use honing compound on a leather strop
Sharpening chisels is a vital step in achieving the perfect cut. After all, a dull chisel will create a jagged or uneven finish, making it nearly impossible to carve or cut accurately. One important aspect of sharpening chisels is using honing compound on a leather strop.
The honing compound is an abrasive paste that contains fine particles of grit designed to sharpen the blade and remove any burrs that have formed. Applying the honing compound to a leather strop provides a perfect surface for maintaining the chisel’s edge. Simply lay the strop flat on a work surface, apply a small amount of honing compound to the leather, and then run the chisel blade back and forth along the strop.
With each pass, the honing compound will refine the edge, resulting in a razor-sharp cutting surface. Remember to maintain consistent pressure as you guide the chisel across the strop and to focus on achieving an even bevel. With practice, you’ll be sharpening your chisels like a pro in no time!
Tips and Tricks for Sharpening
Sharpening wood carving chisels can be a challenging task, but with practice and patience, you can master it. The first step is to ensure that your sharpening tools are in good condition and properly aligned. Next, sharpen the chisel blades with a coarse grit stone, first grinding out any nicks or burrs.
Once the blade is smooth, move on to a fine grit stone to create a sharp edge. Remember to maintain the same angle throughout the sharpening process, and to use even pressure and consistent strokes. Lastly, hone the blade with a leather strop, using a polishing compound for a razor-sharp edge.
Regular maintenance and honing will keep your wood carving chisels in top condition and ready for use.
Regular maintenance is key
Regular maintenance is the key to keeping your tools in top shape, and one of the essential aspects of maintenance is sharpening. Regularly sharpening your tools not only keeps them working efficiently, but it also extends their lifespan. When it comes to sharpening tips and tricks, there are a few things to keep in mind.
First and foremost, it’s important to use the right sharpening tools and techniques. Whether it’s a whetstone, grinding wheel, or honing steel, you need to ensure you’re using the correct tools for the job. Secondly, it’s important to maintain the correct angle while sharpening.
This is where the angle guide comes in handy. Without it, it can be challenging to maintain the correct angle. Finally, it’s essential to use even pressure while sharpening.
Avoid applying too much or too little pressure, as this can affect the sharpness and overall quality of your tool. Regular sharpening with the right tools and techniques can help keep your tools in top shape for years to come, saving you time and money in the long run. So, don’t overlook regular maintenance and sharpening, as it’s the key to ensuring your tools remain in excellent condition.
Avoid overheating the chisel
When it comes to sharpening your chisel, there are a few tips and tricks you can follow to get the best results. One of the most important things to keep in mind is to avoid overheating the chisel. This can happen if you apply too much pressure or remove too much material at once.
Overheating can cause the metal to become brittle and lose its hardness, which can ultimately lead to a dull edge that won’t hold up well over time. To avoid this, take your time while sharpening and use a consistent, controlled motion. You can also periodically dip the chisel in cool water to keep it from getting too hot.
By following these simple steps, you can ensure that your chisel stays sharp and effective for years to come.
Test the sharpness on a piece of scrap wood
If you’re looking to sharpen your tools or knives at home, there are a few tips and tricks to keep in mind. One of the most important things to do is to test the sharpness on a piece of scrap wood. This will give you an idea of how sharp the tool or knife is and whether it needs further sharpening.
Simply make a shallow cut into the wood and observe the results. If it cuts cleanly and easily, then the blade is sharp enough. However, if the cut is rough and jagged, then it needs more work.
Remember, the key to sharpening is to take your time and go slow. Rushing the process can result in a dull blade or even injury. With these tips, you’ll be able to sharpen your tools and knives with ease, ensuring they work efficiently and effectively.
Conclusion
In conclusion, sharpening wood carving chisels is an art form in itself that requires patience, precision, and practice. With the right tools, techniques, and mindset, you can transform dull and blunt chisels into razor-sharp instruments of creativity. Whether you’re a seasoned woodworker or a curious beginner, sharpening your chisels is the key to unlocking your potential and unleashing your creativity one chip at a time.
So, sharpen up, Chiselholics, and carve your way to glory!”
FAQs
What are the different methods for sharpening wood carving chisels?
The different methods for sharpening wood carving chisels include using honing stones, diamond stones, sharpening jigs, and sharpening machines.
How do you use honing stones to sharpen wood carving chisels?
To use honing stones to sharpen wood carving chisels, start with a coarse grit stone and move to a finer grit stone. Place the blade flat on the stone and move it in a circular motion while maintaining an angle of 20-25 degrees. Repeat the process on each side until the blade is sharp.
Can diamond stones be used to sharpen wood carving chisels?
Yes, diamond stones can be used to sharpen wood carving chisels. They are known for their durability and ability to sharpen blades quickly.
What is a sharpening jig and how is it used to sharpen wood carving chisels?
A sharpening jig is a tool used to hold the blade at a consistent angle while it is being sharpened. To use a sharpening jig, attach the blade to the jig and adjust the angle as needed. Then, use a sharpening stone or diamond stone to sharpen the blade, moving the stone in a circular motion.
Are sharpening machines effective for sharpening wood carving chisels?
Yes, sharpening machines can be effective for sharpening wood carving chisels. They use grinding wheels or belts to sharpen the blade and can be adjusted to specific angles. However, they are often more expensive than other sharpening methods.
How often should wood carving chisels be sharpened?
The frequency of sharpening wood carving chisels depends on how often they are used and the type of wood being carved. As a general rule, chisels should be sharpened when they start to feel dull or when the carver notices that they are not cutting as smoothly.
What are some tips for maintaining sharp wood carving chisels?
To maintain sharp wood carving chisels, clean them after each use and store them in a dry, safe place. Avoid putting them in contact with other metal tools or surfaces, which can cause nicks or dings in the blade. Additionally, avoid using excessive force when using the chisels, as this can cause the blade to dull more quickly.
