How to Use Huepar 360 Laser Level: A Comprehensive Guide for Accurate Results
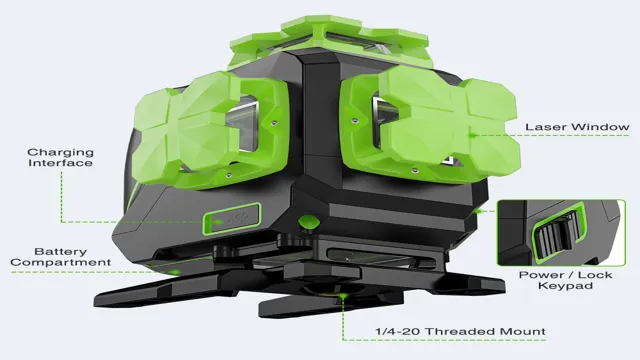
Are you tired of using traditional levels that only work on one plain? Do you need a tool that can help you complete a wide range of leveling and alignment tasks in one simple device? Look no further than the Huepar 360 laser level. This versatile tool is perfect for professionals and DIYers alike, allowing you to easily level and align anything from shelves to tiles to electrical wiring. In this blog post, we’ll explore how to use the Huepar 360 laser level effectively and efficiently for all your leveling needs.
So, let’s dive right in and take a closer look at this amazing tool!
Introduction
If you’re new to using a laser level, don’t worry, it’s easier than you might think! Specifically, if you own a Huepar 360 laser level, then you’re in luck. To begin, make sure the device is calibrated and leveled before use. Once that’s done, set it up on a steady surface or tripod.
To use it, simply power it on and choose the desired mode (360-degree or vertical/horizontal lines). From there, adjust the angle and position as needed, and the device will project a straight and accurate laser beam. One of the greatest benefits of the 360-degree capability is that it can provide a complete layout of a room or area, allowing for efficient and precise measurements.
Whether you’re an experienced craftsman or a DIY enthusiast, the Huepar 360 laser level is a tool worth exploring.
Explanation of the Huepar 360 Laser Level
The Huepar 360 Laser Level is a powerful tool that can revolutionize the way you approach tasks that require precision and accuracy. This laser level comes with a built-in 360-degree rotary base that provides full coverage and allows you to work at any angle. Whether you’re laying tile, installing shelves, or hanging pictures, the Huepar 360 Laser Level helps you to get it done quickly and accurately.
The best part is that it is user-friendly, making it perfect for both DIY enthusiasts and professionals. With its advanced technology, this tool projects laser lines that are crisp, sharp, and clear so you can count on it being perfect every time. So if you’re looking for an efficient and reliable laser level that can make your work easier, choose the Huepar 360 Laser Level!
Preparing for Use
If you’ve recently purchased a Huepar 360 laser level and are eager to put it to use, there are a few things you should know to make sure you’re getting the most out of it. Before you begin, it’s important to ensure that the device is fully charged or that you have fresh batteries installed. Next, calibrate the laser level by adjusting the horizontal and vertical lines to ensure they are level.
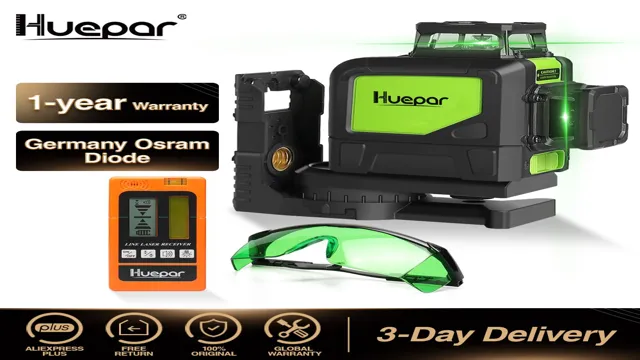
Additionally, use the device indoors to verify that it is functioning correctly and the laser lines appear accurately. Once you’re ready to use the device outdoors, keep in mind that the laser may be less visible in bright sunlight, so plan accordingly. For best results, ensure the laser level is securely mounted and use the included remote to adjust the lines as needed.
Don’t forget to store your device properly and always follow safety guidelines while using it. By taking these steps, you can confidently use your Huepar 360 laser level for all your leveling and alignment needs.
Battery Installation and Charging
Before you can start using your new battery, it’s crucial to prepare and install it correctly. First, check the manufacturer’s instructions to make sure you have everything you need for the installation. Most batteries require a designated area to be installed due to the potential for heat and electrolyte emissions.
The installation area should be well-ventilated, away from flammable materials, and easily accessible for maintenance. Once you have the location sorted, make sure to wear protective gear such as gloves and goggles. Safety always comes first! Before connecting, it’s important to clean the battery terminals and cables thoroughly with a wire brush and a cleaning solution.
Once everything is set up, it’s time to start charging. A new battery will have some charge, but it’s best to give it a proper charge before use. Consult the instructions for recommended charging time and voltage settings.
Remember, a well-prepared battery will give optimal performance and last longer.
Mounting and Leveling the Laser
Mounting and leveling the laser is an essential step to ensure accurate and efficient operation. The first and most critical step is selecting a location for the laser that facilitates a clear view of the entire workspace. Once you’ve chosen the spot, it’s time to mount the laser securely, preventing any unintended movement during use.
Afterward, begin the leveling process, which involves adjusting the laser to minimize any slope. A leveled laser will ensure the accuracy of the measurements taken from it. Remember, precision is key, and when the laser is fixed at an even level, it will provide consistent and reliable readings every time.
Take care when adjusting the laser, and if necessary, use a tripod or stand to ensure it remains level. Performing these simple preparation steps will result in enhanced accuracy and overall efficiency when using the laser.
Using the Huepar 360 Laser Level
If you’ve just gotten your hands on the Huepar 360 laser level, you may be wondering how to properly make use of it. This laser level is a versatile and powerful tool that can make any leveling or alignment task a breeze. To begin, ensure that the laser level is properly charged or has fresh batteries installed.
Then turn it on and set it up on a stable surface or mount it to a tripod for added stability. You can use the Huepar 360 laser level to create both horizontal and vertical lines, as well as cross lines for more complex tasks. Adjust the level to your desired height and lock it in place to maintain accuracy.
With the Huepar 360 laser level, you’ll be able to take on any project with ease and precision.
Selecting the Laser Mode
When using the Huepar 360 laser level, selecting the appropriate laser mode is crucial for your project’s success. The Huepar 360 laser level has two available modes, pulse mode and continuous mode. If your project requires the laser level to be used outdoors or in bright environments, then the pulse mode is recommended.
The pulse mode sends out rapid laser pulses that are easier to see in bright light conditions. Conversely, for indoor projects, the continuous mode may be more appropriate. It emits a continuous laser beam that makes it easier to detect precise vertical and horizontal lines.
To switch between the two modes, adjust the button on the Huepar 360 laser level to the desired mode. Remember, selecting the right mode maximizes the effectiveness of the laser level and ensures accurate results.
Adjusting the Height and Angle of the Laser
If you own a Huepar 360 Laser Level and want to adjust its height and angle, here are some helpful tips to assist you. First, locate the locking knob on the device and loosen it to release the base. Adjust the height by sliding the base up or down to your desired position and then lock it in place by tightening the knob.
Secondly, to adjust the angle, release the lock button located on the side of the laser and gently tilt the device to your desired angle. Once you find your desired angle, press the lock button to secure it. Moreover, you can also use the fine-tuning knob on the side of the device for fine adjustments.
By following these steps, you can ensure that your Huepar 360 Laser Level produces accurate and precise results in your projects, making your work simpler and faster.
Navigating the Laser Control Panel
If you’re using the Huepar 360 Laser Level, you might be wondering how to navigate the control panel. Don’t worry, it’s actually quite simple! The control panel features a variety of buttons, each with a specific function. For example, the on/off button is pretty self-explanatory, but what about the mode button? This button allows you to switch between horizontal, vertical, and cross line modes.
Additionally, the control panel features separate buttons for adjusting the brightness and pulse mode. Adjusting these settings can help you get the perfect level of visibility for your specific work environment. Overall, while the control panel may seem overwhelming at first, once you know what each button does, you’ll be able to use your Huepar 360 Laser Level with ease.
Advanced Features
If you’re looking to take your leveling game to the next level, look no further than the Huepar 360 laser level. This advanced tool is packed with features that will make any job faster and more accurate. One of the most impressive features is its ability to project a full-circle laser line that covers every inch of a room.
But the real game-changer is the Huepar’s remote control function, which allows you to adjust the angle and position of the laser without ever touching the unit itself. This means you can work more efficiently and avoid having to constantly climb up and down ladders. Another handy feature is its self-leveling function, which automatically adjusts the level based on the angle of the surface it’s placed on.
Plus, the Huepar is built to last, with a rugged construction and a rating of IP54 waterproof and dustproof. For those who demand the best, the Huepar 360 laser level is a must-have tool.
Remote Control Functionality
Remote control functionality is a feature that enables users to operate their devices from a distance. It is an essential aspect of modern technology that offers convenience and flexibility to users. With remote control functionality, you can easily control your TV, sound system, air conditioner, and many other devices from anywhere in the room.
Advanced features like voice control, gesture control, and mobile app integration have made remote control functionality more intuitive and user-friendly. Voice control allows you to control your devices using verbal commands, while gesture control allows you to use hand movements to control them. Mobile app integration, on the other hand, enables users to control their devices from their smartphones or tablets.
These advanced features have made remote control functionality more accessible and engaging to users. As technology continues to advance, we can expect more innovative features that will enhance remote control functionality even further.
Ability to Lock Laser Lines in Place
When it comes to leveling and layout tasks, having a laser level with advanced features can make all the difference. One such feature is the ability to lock laser lines in place, which can save you time and hassle when trying to ensure that your lines are straight and accurate. This feature allows you to fix the laser beam in place, so you can move the level or adjust other settings without the laser line moving.
Whether you’re working on a DIY project or a professional construction job, having this feature can help elevate your work and improve your precision. So, if you’re in the market for a new laser level, be sure to check out models with the ability to lock laser lines in place – it’s a game changer!
Conclusion
So there you have it, folks! Using the Huepar 360 Laser Level is as easy as pie. With its intuitive interface and powerful laser beams, achieving a perfectly level surface for your next project has never been easier. So don’t let uneven surfaces weigh you down – grab yourself a Huepar 360 Laser Level and start leveling up your DIY game today!”
Final Thoughts on Using the Huepar 360 Laser Level
After using the Huepar 360 Laser Level extensively, I am impressed with its advanced features. The self-leveling mode is particularly impressive, as it automatically adjusts its horizontal leveling within 4 degrees, even if the surface it’s placed on isn’t completely level. Plus, the pulse mode allows it to be used with a detector for outdoor applications, extending its range up to 196 feet.
Additionally, the Huepar 360 Laser Level has a dual power supply, meaning it can function with either a rechargeable battery or AA batteries, so you’re never stuck without power. Overall, this laser level has exceeded my expectations with its advanced features and versatility, making it a great investment for both amateur and professional DIYers.
FAQs
What is the range of the Huepar 360 laser level?
The Huepar 360 laser level has a working range of up to 130 feet indoors and 196 feet outdoors when using a detector.
Can the Huepar 360 laser level be mounted on a tripod?
Yes, the Huepar 360 laser level comes with a 1/4 inch thread mount that can be attached to most standard tripods.
How do I calibrate the Huepar 360 laser level?
To calibrate the Huepar 360 laser level, place it on a level surface and use the manual mode to adjust the laser until it is level. You can also use the self-leveling mode for quick and easy calibration.
Does the Huepar 360 laser level have a pulse mode?
Yes, the Huepar 360 laser level has a pulse mode for use with a laser detector, which allows for use in bright outdoor conditions.
What is the battery life of the Huepar 360 laser level?
The Huepar 360 laser level has a battery life of approximately 8-10 hours when using the pulse mode, and up to 16 hours when using the horizontal and vertical modes.
Is the Huepar 360 laser level water-resistant?
Yes, the Huepar 360 laser level has an IP54 water-resistant rating, meaning it can withstand being splashed with water or exposed to light rain.
How do I switch between horizontal and vertical modes on the Huepar 360 laser level?
To switch between horizontal and vertical modes on the Huepar 360 laser level, simply press the mode button on the side of the device until the desired mode is selected.

