Do you have a pole saw that’s just not cutting it anymore? Perhaps you’ve noticed it’s becoming more difficult to make a clean cut or maybe the blade is starting to dull. No need to worry! Sharpening your pole saw may be easier than you think. With the right tools and a bit of know-how, you can get your saw back to like-new condition in no time.
In this step-by-step guide, we’ve got you covered. We’ll take you through the process of how to sharpen a pole saw, and give you tips along the way. Whether you’re a seasoned professional or a beginner, we’ve got the information you need to get your saw sharpened and ready for action.
So, grab your tools and let’s get started!
Understanding the Different Parts of a Pole Saw
So you’ve got yourself a pole saw and you’re ready to start pruning those branches, but do you understand all the different parts of your new tool? Let’s break it down. The pole itself is made up of several sections that allow you to adjust the length of the tool. The blade is attached to the end of the pole and should be sharp for efficient cutting.
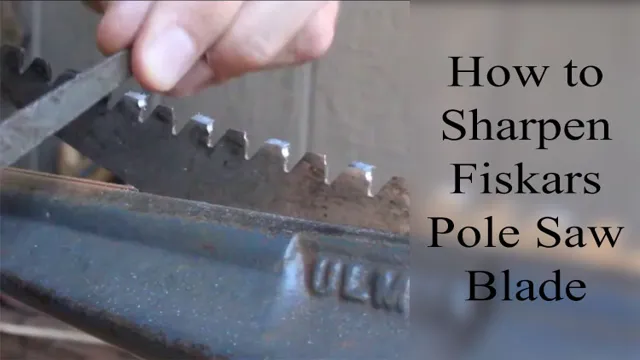
Speaking of which, let’s dive into our main topic: how to sharpen a pole saw. First, you’ll want to ensure the blade is clean and free of any debris that could affect the sharpening process. Next, use a file or sharpening stone to carefully file the blade at a 30-degree angle.
Remember to wear gloves for safety and to try to maintain the original angle of the blade. With a little practice, you’ll be able to keep your pole saw in top shape and tackle any pruning job with ease.
Blade
When it comes to pole saws, understanding the different parts that make up the tool is essential. One of the most important components is the blade. The blade is what actually cuts through branches and limbs, so it’s vital to choose the right blade for the job at hand.
Different blades are designed for different purposes, such as pruning, trimming, or sawing thicker branches. The length of the blade is also a significant factor to consider, as longer blades can reach higher branches, but shorter blades offer greater precision and control. Additionally, blade materials vary, with some being made from steel, while others are made from carbon or titanium coatings to enhance durability.
Overall, understanding the nuances of blade selection can make a significant impact on the success and safety of your pruning efforts.
Teeth and Gullet
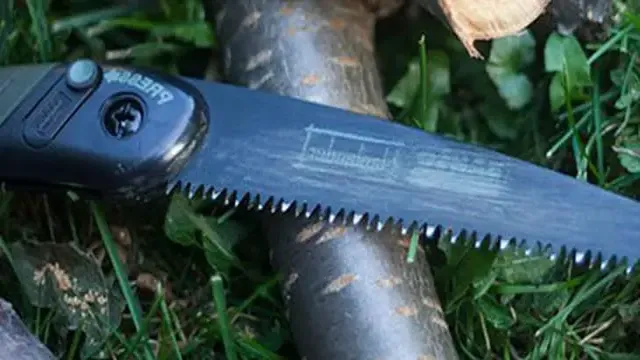
One important thing to understand about pole saws is the different parts that make up the tool. The teeth and gullet are two specific parts that play a crucial role in the performance of a saw. The teeth are the sharp edges found on the blade that help cut through branches and limbs.
Generally, the more teeth a blade has, the smoother the cut will be. On the other hand, the gullet is the curved area between each tooth. It acts as a channel for sawdust and debris to escape from the cut, preventing it from getting stuck and reducing the amount of resistance when cutting.
When choosing a pole saw, it’s important to pay attention to the size and shape of the teeth, as well as the depth and width of the gullet, to ensure optimal performance for the job at hand.
Tools Needed for Sharpening a Pole Saw
If you own a pole saw, you’ll eventually need to sharpen its blade. Sharpening a pole saw can be easy if you have the necessary tools. The most important tool you’ll need is a round file that matches the size of the saw teeth.
You’ll also need a file guide to keep the file at the right angle while sharpening. Additionally, a flat file is useful for filing down any nicks or burrs on the blade. Lastly, a vise will come in handy for holding the saw in place while you work.
Remember to wear gloves and safety goggles while sharpening and follow the manufacturer’s instructions for the best results. By keeping your pole saw’s blade sharp, you can ensure it cuts smoothly and safely, allowing you to tackle any tree-trimming job with ease.
Flat File
When it comes to sharpening a pole saw, having the right tools is crucial. One of the most essential tools is a flat file. This tool is used to sharpen the teeth on the pole saw blade.
The flat file has a long, flat surface that is used to make a straight edge along the saw teeth. When choosing a flat file for sharpening your pole saw, you’ll want to make sure it is the correct size for your blade. The teeth on most pole saw blades are between 5/32 and 7/32 inches, so you’ll want to choose a file that matches that size range.
It’s also important to choose a high-quality file that will stay sharp and not wear down quickly. With the right flat file, you can ensure that your pole saw is sharpened and ready to tackle any pruning or trimming job that comes your way.
Round File
When it comes to sharpening your pole saw, there are a few tools that you’ll need to get the job done right. The first tool is a round file, which is used to sharpen the teeth on your saw blade. You’ll also need a flat file to remove any burrs or nicks on the blade, as well as a sharpening stone to give the blade a razor-sharp edge.
Other helpful tools include a vise to hold the blade securely in place while you work, and a cleaning brush to remove any dirt or debris that may be stuck to the saw blade. Using a pole saw with a dull blade is not only frustrating, but it can also be dangerous. A dull blade can cause the saw to bind up in the wood, making it difficult to cut through branches and causing the saw to kick back.
This is why it’s important to sharpen your saw blade regularly. By using the right tools and techniques, you can keep your pole saw in top condition and ensure that it’s always ready to tackle your next pruning job. In summary, sharpening a pole saw requires a round file, flat file, sharpening stone, vise, and cleaning brush.
With these tools, you can maintain your saw blade and ensure that it stays sharp and effective for years to come. Don’t let a dull blade slow you down – invest in the right tools and keep your pole saw at its best.
Vise
If you have a pole saw, you know how important it is to keep the blade properly sharpened for optimal performance. One crucial tool you will need for this task is a vise. A vise is an essential piece of equipment that helps stabilize the saw, making it easier for you to sharpen the blades accurately.
Different types of vises are available in the market, and choosing the right one depends on your preference, saw size, and personal requirements. A typical vise has two jaws that keep the saw in place while you work on it, allowing for precision sharpening. It’s crucial to ensure that the saw is clamped securely in the vise to avoid any accidents while sharpening.
Using a vise will help you achieve a consistent result in your blade sharpening, making your pole saw much more effective and efficient in its cutting capabilities. So, if you’re planning to sharpen your pole saw, make sure you have a reliable vise at hand.
Gloves and Safety Glasses
When sharpening a pole saw, there are few important tools that you will need, including gloves and safety glasses. These are essential tools that will protect you from any potential injuries while working with a sharp blade. It’s important to wear gloves that fit securely so they won’t come off while you’re working.
Safety glasses will protect your eyes from any flying debris or sawdust while sharpening. When working with a pole saw, the blade can be very sharp, and if not used properly, can cause serious injury. You want to ensure that you have complete protection, so you can work safely and confidently.
Overall, gloves and safety glasses are two essential tools that you should always have on hand when sharpening a pole saw to keep you safe and protected while you work.
Steps for Sharpening a Pole Saw
Sharpening a pole saw is an important task to keep it performing at its best. Here are the steps for sharpening a pole saw: First, check the saw to see what type of sharpening file you need. Then, secure the pole saw blade in a vice or clamp.
Next, use the file to sharpen the teeth on one side of the blade at a time. Remember to use a smooth, consistent motion when filing. Use a saw vice to hold the blade steady while sharpening.
It’s important to sharpen each tooth at the same angle for consistent cutting performance. Make sure to take your time with this process to avoid damaging the teeth or blade. After sharpening the teeth, use a round file to sharpen any hooks or protrusions on the blade.
Finally, remove any debris from the blade and use a lubricating oil to keep the blade moving smoothly. With these steps, you can keep your pole saw performing at its best. Remember to always follow the manufacturer’s recommendations when sharpening your pole saw for the best results.
Step 1: Secure the Saw in a Vise
Sharpening a pole saw can seem daunting for those who haven’t attempted it before. But with a little bit of patience, it’s a task that can be accomplished easily with the right tools. The first and foremost step is to secure the saw in a vise.
A vise will hold the saw blade securely in place, allowing you to work on it without worrying about it moving around. Once the saw blade is secure, it’s time to take a closer look at the blade teeth. In order to sharpen them effectively, it’s important to file them at the same angle they were originally sharpened.
Using a file guide is an excellent way to ensure that you’re filing at the correct angle, as it will help keep the file steady as you work. It’s also important to file the teeth in a consistent manner, moving the file back and forth across each tooth until it’s sharp. Once you’ve finished filing the teeth, it’s a good idea to oil the blade to protect it from rusting.
Sharpening a pole saw may take some practice, but with a little bit of patience and the right tools, you can accomplish it easily and have a sharper, more efficient pole saw at your disposal.
Step 2: Determine the Correct File Size
When it comes to sharpening your pole saw, there are a few important steps to follow. First, make sure you have the right file size for your blade. This can vary depending on the type of saw you are using, so it’s important to check your owner’s manual or do some research online.
Using the wrong size file can damage your blade or result in an uneven edge, so it’s worth taking the time to get this step right. Once you’ve determined the correct file size, you can start sharpening your blade. It’s important to use the right technique here, as a poor sharpening job can actually make your saw less effective.
Some tips to keep in mind include using steady pressure, working in a consistent direction, and taking breaks frequently to avoid overheating your blade. Overall, sharpening your pole saw may seem like a daunting task, but with the right tools and techniques, you can keep your blade in top condition for years to come. So don’t be afraid to take the time to properly maintain your saw, and enjoy the benefits of a sharp and efficient tool.
Step 3: File Each Tooth Individually
When it comes to sharpening a pole saw, filing each tooth individually is an important step that shouldn’t be overlooked. Using a flat file, start by filing one tooth at a time at a consistent angle. It’s important to use light pressure and only file in one direction to avoid damaging the blade.
Once you’ve filed one tooth, move on to the next and continue until all the teeth have been filed. Take your time with this step to ensure each tooth is sharpened evenly, as an uneven blade can lead to inconsistent cuts and make your job more difficult. By taking the time to file each tooth individually, you’ll be able to improve the overall performance of your pole saw and ensure that it’s ready for your next project.
So, grab your file and get to work, your pole saw will thank you!
Step 4: Check for Evenness and Balance
After filing the pole saw’s teeth, the next crucial step is to ensure the saw is even and balanced. An uneven saw can cause fatigue and uneven cutting, making it harder for you to get the job done quickly and effectively. To check for evenness, run your hand along the saw’s blade and feel for any bumps or ridges.
If you find any, use a flat file to remove them until the blade is smooth to the touch. Additionally, balance the saw by placing it on a flat surface and checking if it tilts to one side. If so, use a file to remove material from the heavier side until the saw balances perfectly.
By checking for evenness and balance, you will ensure that your pole saw is easy to use, effective, and lasts for years to come.
Tips for Maintaining a Sharp Pole Saw
If you want your pole saw to perform like new every time you use it, sharpening its blade regularly is essential. Before you start, make sure to remove any debris or dirt from the blade to avoid any accidents. You can choose between using a hand file or an electric grinder to sharpen the blade; however, using a hand file is always safer and easier for beginners.
To sharpen the blade, locate the bevel of the blade, which is the sharpened side. Hold the file at a constant angle and slide it along the bevel in one direction, applying light pressure. Repeat this process for each tooth on the blade until the edge is sharp.
After sharpening, you can lubricate the blade with oil or a sharpening stone. By regularly sharpening your pole saw, you will achieve a better cutting performance and extend the lifespan of your tool.
Clean the Saw Regularly
One of the most important things you can do to maintain a sharp pole saw is to clean it regularly. Sawdust, dirt, and debris can accumulate on the saw’s blade and clog the chainsaw’s air filter, leading to reduced performance and a shorter lifespan for your saw. To clean your saw, first, disconnect it from the power source.
Then, remove the chain and the bar, wiping them down with a clean cloth. Next, brush away any debris or sawdust that may have accumulated on the saw’s body and the saw’s air filter. You can also use compressed air to blast away any stubborn dirt that may have accumulated.
When you’re done, reassemble the saw and store it in a dry location away from moisture and direct sunlight. By following these steps, you’ll ensure that your pole saw remains in top working condition and lasts for years to come.
Store the Pole Saw Properly
When it comes to maintaining the sharpness of your pole saw, proper storage is vital. Storing your pole saw in the right way ensures its longevity and helps it maintain its sharpness. After using the saw, wipe it down with a clean, dry cloth and remove any debris or dirt that may have accumulated on the blade during use.
Then, apply a lubricant, such as silicone or light oil, to the cutting edge of the blade. This will prevent rusting and keep the blade moving smoothly. Store the saw in a cool, dry place, such as a shed or garage, and avoid leaving it outside where it can be exposed to elements.
When storing the pole saw, make sure that the blade edge is facing upward and that it is not in contact with any other tools or objects to prevent damage to the blade’s teeth. Proper storage ensures that your pole saw remains sharp and effective, ready for the next use.
Sharpen the Saw After Every Use
Maintaining a sharp pole saw is essential to ensure its longevity and effectiveness. One of the most important tips for keeping your saw sharp is to sharpen it after every use. This may sound time-consuming, but it’s essential for the best results.
There’s nothing worse than struggling to cut through a branch because your saw isn’t sharp enough. Sharpening your pole saw after each use doesn’t require any special skills; all you need is a sharpening stone or a file and some time. By doing so, you’ll not only keep your saw in top shape, but you’ll also save yourself time and frustration in the long run.
Remember that a dull saw can also be dangerous. Using a dull saw requires more pressure, increasing your chances of an accident. Keep in mind that by sharpening your saw regularly, you’ll be able to tackle tree branches effortlessly and more safely.
Conclusion
In conclusion, sharpening a pole saw is not rocket science, but it does require a bit of finesse. Think of it like giving your trusty tool a spa day – a little TLC can go a long way. By following these simple steps, you’ll be able to slice through your branches with ease and finesse, leaving your neighbors green with jealousy.
So grab your sharpening tools, put on some tunes, and let’s get to work giving that pole saw the edge it deserves!”
FAQs
What tools do I need to sharpen a pole saw?
To sharpen a pole saw, you will need a round file, flat file, vice or clamp, and safety gloves.
How often should I sharpen my pole saw?
It depends on how often you use your pole saw. Generally, you should check the sharpness after every use, and sharpen the blade as needed.
What is the proper technique for sharpening a pole saw blade?
Start by securing the blade in a vice, then use a round file to sharpen the teeth. Follow the existing angle of the teeth, and make sure to file in one direction only.
Can I use a chainsaw file to sharpen my pole saw?
No, pole saw blades have a different tooth design than chainsaw blades, so you need to use a specific pole saw file.
How do I know when my pole saw blade needs to be replaced instead of sharpened?
If the blade is bent, cracked, or has missing teeth, it’s time to replace it. Additionally, if sharpening the blade no longer improves its cutting ability, it may be time to replace it as well.
What safety precautions should I take when sharpening my pole saw?
Always wear safety gloves to protect your hands, and secure the blade in a vice or clamp before sharpening. Be careful not to touch the sharp teeth with your fingers.
How can I maintain the sharpness of my pole saw blade?
To keep your pole saw blade sharp, avoid hitting hard objects while cutting, always clean your blade after use, and store it in a dry place to prevent rust.
