When it comes to working on your vehicle, one of the most crucial parts to maintain is the brakes. Over time, air can build up in the brake lines, which can cause your brakes to feel spongy and less effective. Bleeding your brakes can help remove this air and return your brakes to their optimal performance.
However, manually bleeding brakes can be a difficult and time-consuming task. This is where a power brake bleeder comes in handy. In this step-by-step guide, we will show you how to use a power brake bleeder to bleed your brakes efficiently, quickly, and effectively.
Follow these instructions, and your brakes will be back to top performance, ensuring the safety and reliability of your vehicle.
What is a Power Brake Bleeder?
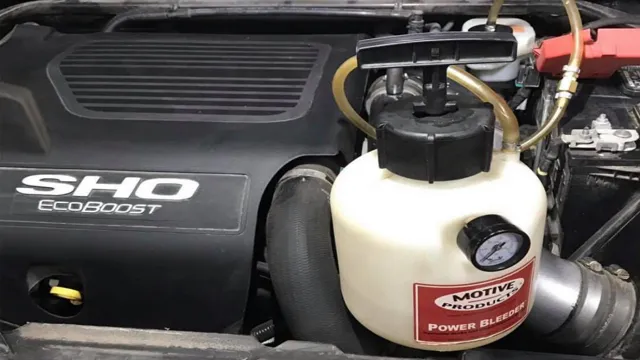
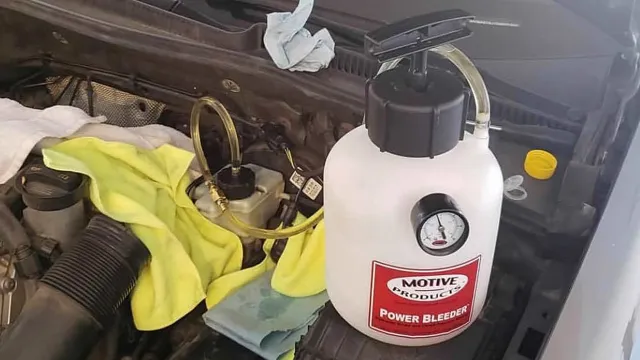
A power brake bleeder is a tool used to easily and efficiently bleed the brakes of a vehicle. Essentially, it consists of a tank that holds brake fluid, a pressure gauge, and a hose that connects to the brake bleeder valve. The power brake bleeder pressurizes the brake system with air, which forces brake fluid through the brake lines and out of the bleeder valve.
This process helps to remove air bubbles and contaminants from the brake lines, ensuring maximum braking performance. Using a power brake bleeder is straightforward – first, make sure the brake fluid reservoir is full and the bleeder valve is open. Then, connect the hose to the brake bleeder valve and pressurize the system using the tank.
Finally, open the bleeder valve and allow brake fluid and air to escape until only fluid remains. Repeat the process for each brake until all air bubbles are gone. In summary, a power brake bleeder is a simple tool that can make brake maintenance and repair much easier and more efficient.
Definition and Benefits
A power brake bleeder is a tool used to remove air and unwanted fluids from a vehicle’s brake system. It is designed to make brake bleeding easy and less time-consuming, as it uses a vacuum or pressure to extract the old brake fluid or air and replace it with fresh fluid. With a power brake bleeder, you can quickly and effectively bleed your vehicle’s brake system without needing another person to pump the brake pedal for you.
This tool is essential for automotive mechanics and car enthusiasts who want to ensure the safety and reliability of their vehicles’ brake systems. By using a power brake bleeder, you can prevent brake failure, reduce the risk of accidents, and prolong the lifespan of your vehicle’s braking components. So if you want to ensure your vehicle’s brake system is working correctly, it’s time to invest in a power brake bleeder!
Preparing for the Job
Learning how to use a power brake bleeder is a crucial step in ensuring that the brakes on your vehicle stay in good working condition. First, you’ll need to prepare the brake bleeder by attaching it securely to the brake fluid reservoir. Next, you’ll need to determine which brake line to bleed first and set the pressure using the pressure regulator.
Once you’ve set the pressure, open the bleed valve on the brake caliper and let the fluid flow through the system until all the air has been expelled. Repeat this process for each brake line until all the air is removed. Finally, check the fluid level in the reservoir and top it off if necessary.
With a little practice, using a power brake bleeder can be a straightforward process that helps ensure your vehicle is safe and roadworthy.
Safety Measures
When it comes to preparing for a job, safety should always be a top priority. This means taking the necessary measures to ensure that both you and those around you are protected from potential hazards. One of the first steps in preparing for a job is to conduct a thorough risk assessment.
This involves identifying any potential hazards or dangers, and developing strategies to manage and mitigate these risks. It is also important to make sure that all equipment and tools are in good working order, and that you are properly trained and qualified to handle them. Additionally, you should always make sure that you are wearing the appropriate personal protective equipment (PPE), such as gloves or a hard hat, and that you are familiar with any emergency procedures that may need to be implemented.
By taking these precautions and putting your safety first, you can help ensure a successful and incident-free job.
Tools and Materials Needed
Preparing for the Job: Tools and Materials Needed Before starting any job, it is always important to ensure that you have all the necessary tools and materials. When it comes to DIY projects, this is especially important to avoid any delays or frustrations. For your next project, here are some tools and materials you might need:
Measuring tape: This is a must-have tool for any project that requires precise measurements. Screwdrivers: Different screwdrivers are required depending on the type of screws you will be working with, such as Phillips or flathead.
Hammer: You can’t go wrong with a good hammer for removing or installing nails.
Drill: Whether you are installing shelves or hanging pictures, a drill is essential for making pilot holes and securing screws. Paintbrushes and rollers: If you are planning on painting, have a variety of paintbrushes and rollers available for different surfaces and textures.
Sandpaper: For any sanding needs, make sure to have sandpaper available in different grits.
Safety equipment: Always prioritize safety, so make sure to have goggles, gloves, and a dust mask if necessary. By having these tools and materials on-hand, you will be more than prepared for your upcoming DIY project. Happy creating!
Bleeding the Brakes with a Power Bleeder
Are you tired of the traditional way of bleeding brakes that is time-consuming and requires a second person to assist? Then it’s time to switch to a power brake bleeder, which makes the process much simpler and quicker. First, connect the power bleeder to the brake fluid reservoir and adjust the pressure to the recommended level for your vehicle. Then, attach the bleeder catch bottle to the caliper and open the valve to release the old fluid and trapped air.
Keep an eye on the fluid level in the reservoir and refill it as needed. Repeat the process for each wheel until you see clear brake fluid without any bubbles in the catch bottle. This will ensure that the brakes are free from air and functioning properly.
With a power brake bleeder, you can easily perform a task that once required an extra set of hands, saving you both time and hassle.
Step 1: Attach the Power Bleeder
The first step in bleeding your brakes with a power bleeder is to attach the device itself. Make sure you have the correct power bleeder for your specific brakes and vehicle, as different models may require different pressure levels. Once you have your power bleeder, locate the brake fluid reservoir and remove the cap.
Connect the power bleeder’s hose to the reservoir’s opening and ensure a secure fit. With the device in place, pump the pressure until the recommended pressure level is reached. Once you’ve achieved the right amount of pressure, it’s time to move on to the next step in the brake bleeding process.
Remember, proper brake maintenance and bleeding can help prevent accidents and ensure the safety of you and your passengers on the road.
Step 2: Prepare the Brake Fluid Reservoir
When it comes to bleeding the brakes with a power bleeder, there are certain steps you need to follow to ensure that the process is done correctly. One crucial step is preparing the brake fluid reservoir. This involves making sure that the reservoir is topped off with the correct type of brake fluid and the lid is securely in place.
The last thing you want is for the fluid to spill out and cause a mess. It’s also important to inspect the reservoir for any signs of damage or leaks. If you notice any issues, it’s best to address them before proceeding with the rest of the process.
By taking the time to prepare the brake fluid reservoir properly, you can help ensure a smooth and successful brake bleeding process.
Step 3: Open the Bleeder Valve
When using a power bleeder to bleed your brakes, the third step is to open the bleeder valve. This valve is located on the caliper or wheel cylinder, and it needs to be open to allow the old brake fluid to exit the system. However, it’s important to make sure you open the valve slowly and at the right time.
If you open it too soon, you may end up with air bubbles in the brake lines, which can cause braking issues and even a complete loss of brakes. On the other hand, if you wait too long to open the valve, the pressure in the system may drop, and the whole process will take longer. By taking your time and carefully opening the valve when instructed to do so, you can ensure that your brakes are properly bled and ready to go.
Step 4: Pressurize the System
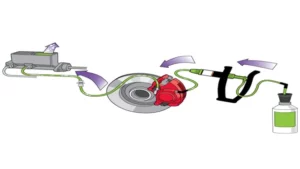
Bleeding the brakes with a power bleeder is an excellent way to pressurize the system. Not only is it fast and efficient, but it’s also less messy than traditional methods. A power bleeder applies air pressure to the brake fluid reservoir, pushing fluid through the system and forcing air bubbles out.
The process is simple, but it does require some equipment. You’ll need a power bleeder, the appropriate brake fluid, and a little bit of patience. To start, fill the power bleeder with brake fluid and connect it to the brake fluid reservoir.
Then, pump the bleeder to apply pressure, and open the brake bleed valve to let the old fluid and air bubbles escape. Once the fluid runs clear and without air bubbles, tighten the bleed valve and move on to the next brake. Keep repeating this process until all brakes are bled.
Remember to check the brake fluid level periodically and refill as needed. Overall, using a power bleeder for bleeding the brakes is a more straightforward, quicker, and less messy process that will ensure your brakes are in optimal condition.
Step 5: Begin Bleeding the Brakes
When it comes to bleeding the brakes of your vehicle, there are several methods available. One of the most efficient and convenient ways is by using a power bleeder. This tool can make the entire bleeding process easier and quicker by applying pressure to the brake fluid, forcing out any air bubbles from the system.
Power bleeders are available in different sizes and can be used for multiple vehicles. To use a power bleeder, you need to first connect the tool to the brake cylinder and the brake fluid reservoir of your vehicle. Then, simply apply pressure to the power bleeder to force the brake fluid through the system.
As you do so, keep an eye out for any air bubbles in the brake fluid and ensure that they are removed. By using a power bleeder, you can ensure that your brakes are free from air bubbles and working efficiently, providing you with the safety you need while driving.
Step 6: Check the Brake Pedal
When bleeding the brakes with a power bleeder, it’s essential to check the brake pedal for the final step. Once you’ve finished the bleed, pump the pedal a few times until it feels firm and has good resistance. You may need to top off the brake fluid level as well, so take a peek under the hood and add more if necessary.
It’s vital to ensure the brake pedal feels normal since it indicates that there’s no air trapped in the system, which could impair braking power. Remember, your brakes are one of the most critical safety features of your vehicle, so don’t take them lightly. Instead, take your time and make sure you follow all the correct procedures when performing maintenance to keep you and your passengers safe.
Final Tips and Tricks
Now that you’ve learned how to use a power brake bleeder, there are a few final tips and tricks to keep in mind. Firstly, always make sure to properly clean and maintain your power brake bleeder to prevent any clogs or malfunctions. Additionally, be sure to follow the manufacturer’s instructions and safety guidelines when using the tool to avoid any accidents or injuries.
It’s also important to use the appropriate brake fluid for your vehicle, as specified in your owner’s manual, and to always dispose of used brake fluid properly. Finally, don’t forget to perform a final brake system check after bleeding to ensure everything is working properly. By following these tips, you can ensure the safety and efficiency of your brake system.
Troubleshooting Common Issues
When it comes to troubleshooting WordPress, there are a few tips and tricks that can help you avoid common issues. First, keep your plugins and themes up to date and make sure they are compatible with the latest version of WordPress. This can help prevent conflicts and compatibility issues that can lead to site errors.
Second, always backup your site before making any major changes or updates. This way, if something does go wrong, you can easily restore your site to an earlier version. Additionally, keep an eye on your site’s performance and loading speed, as slow loading times can cause frustration and deter visitors from returning to your site.
Finally, don’t be afraid to reach out to WordPress support or online communities for help and advice. With these tips in mind, you can ensure that your WordPress site runs smoothly and effectively.
Maintenance and Upkeep
When it comes to maintaining and keeping your home in tip-top shape, there are a few final tips and tricks that can really make a difference. Firstly, don’t underestimate the power of regular cleaning. Even simple tasks like dusting, vacuuming, and wiping down surfaces can help prevent buildup and damage over time.
Additionally, be mindful of any potential issues that may arise and address them promptly to avoid further damage or costly repairs. And finally, consider investing in preventative maintenance measures, such as regular HVAC inspections or roof inspections, to catch any problems before they escalate. Remember, taking care of your home is an investment in both its longevity and your own comfort and well-being.
So, be proactive and stay on top of maintenance tasks to ensure your home is always in top shape.
Conclusion
In conclusion, using a power brake bleeder is like having your own personal brake mechanic at your fingertips. With its easy-to-use design and efficient functionality, you can quickly and effortlessly remove any air bubbles that may be causing your brakes to feel spongy. So, whether you’re an avid car enthusiast or just someone who wants to take control of their vehicle’s maintenance, investing in a power brake bleeder is the smart choice.
Just remember to always read the instructions carefully and take necessary safety precautions, and you’ll be on your way to smoother, safer braking in no time. With a power brake bleeder, you’ll never have to worry about losing your brake pedal again!”
FAQs
What is a power brake bleeder used for?
A power brake bleeder is used to help remove air bubbles from a vehicle’s brake lines, making the brakes more effective.
How do you use a power brake bleeder?
To use a power brake bleeder, you need to first connect it to your vehicle’s brake fluid reservoir and pressurize it. Then, you can open the brake bleeder valves one at a time and allow the fluid to flow through the system until it is free of air bubbles.
Can a power brake bleeder be used on all types of vehicles?
Yes, a power brake bleeder can be used on all types of vehicles, including cars, trucks, and SUVs.
What are the benefits of using a power brake bleeder?
Using a power brake bleeder can help ensure that your vehicle’s brakes are working at their best and can help prevent issues such as brake fade, brake chatter, and spongy brakes.
How often should you use a power brake bleeder?
It is recommended that you use a power brake bleeder at least once a year to help maintain your vehicle’s braking system.
Do you need any special skills or tools to use a power brake bleeder?
No, you do not need any special skills or tools to use a power brake bleeder. However, it is important to follow the manufacturer’s instructions carefully to ensure that you use the tool properly.
Can a power brake bleeder be used to diagnose brake issues?
Yes, a power brake bleeder can be used to diagnose brake issues such as air in the lines or problems with the master cylinder. By using the tool, you can pinpoint the source of the issue and make repairs as needed.
