Are you tired of feeling unsure about your brakes? Using a brake bleeder bottle can make all the difference when it comes to maintaining your car’s safety. It may seem intimidating at first, but with a little bit of guidance, you can easily learn how to use this handy tool. Whether you’re an aspiring DIY mechanic or just looking for ways to save money on repairs, a brake bleeder bottle can be an essential addition to your toolbox.
In this step-by-step guide, we’ll break down the process of using a brake bleeder bottle so that anyone can understand it. From understanding the basics to troubleshooting any issues that may arise, we’ve got you covered. So, let’s get started and take control of your car’s safety today!
What is a Brake Bleeder Bottle?
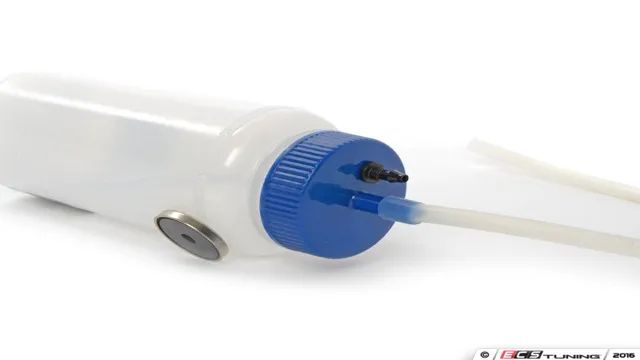
If you’re looking for a safe and efficient way to bleed your brake system, a brake bleeder bottle might just do the trick. This handy tool is designed to make the brake bleeding process easier, by allowing you to catch and dispose of brake fluid in a clean and controlled manner. To use a brake bleeder bottle, simply attach it to the bleeder screw on your brake caliper or wheel cylinder, and open the valve to release the air and old fluid.
The bottle will catch the waste fluid and prevent it from spilling onto your garage floor. Once the air is purged and the fluid runs clear, you can simply close the valve and move on to the next wheel. A brake bleeder bottle is a great investment for anyone in need of an easy and effective way to bleed their brakes.
Definition & Function
A brake bleeder bottle is a device used to remove air pockets or bubbles that have formed in the brake lines of a vehicle. It is an essential tool for any mechanic or DIY enthusiast who wants to change or bleed their brake fluid. The brake bleeder bottle works by collecting old brake fluid and air bubbles that are released when the brakes are bled.
It then allows clean brake fluid to flow back into the brake lines, ensuring that there is no air left in the system. Brake bleeder bottles come in different sizes and shapes, but they all serve the same purpose. They are usually made from durable plastic or glass and have a one-way valve that prevents air from entering the brake system during the bleeding process.
In short, a brake bleeder bottle is an indispensable tool for anyone who wants to maintain optimum braking performance in their vehicle.
Materials Needed
If you’re planning to bleed your brakes, you’ll need a brake bleeder bottle to make the process easier. This device captures the old brake fluid as it is released from the caliper and prevents it from contaminating the environment. In addition to the brake bleeder bottle, you’ll need a few other materials to successfully bleed your brakes.
These include a wrench, a brake bleed kit, a clear plastic tubing, and fresh brake fluid. Before starting, ensure that your vehicle is parked on a flat surface and the engine is turned off. Also, make sure to read the manufacturer’s instructions on how to use a brake bleeder bottle to avoid any mishaps.
By following these steps, you can successfully bleed your brakes and ensure that your vehicle has a smooth and safe braking performance.
List of Required Tools
When it comes to starting a new project, having the right tools is crucial. This is particularly true for DIY projects, as they require a lot of hands-on work and precision. If you’re planning to tackle a DIY project, the tools you’ll need will depend on the specific project you’re working on.
However, there are a few essential tools that you’ll need for most DIY projects. First and foremost, you’ll need basic hand tools, like a hammer, screwdrivers, pliers, and a wrench. These tools will come in handy for a wide range of tasks, from driving nails to tightening bolts.
You’ll also need measuring tools, such as a tape measure, level, and combination square. These will ensure that your project is precise and accurate. Other useful tools include power tools (like a drill or jigsaw), clamps, and safety equipment (like goggles and gloves).
By making sure you have all the tools you need before you start your DIY project, you’ll be setting yourself up for success and making the process much simpler and more enjoyable.
Materials
When it comes to starting a new project, it’s important to have all the necessary materials on hand to ensure a smooth and successful process. For any project, the materials needed will vary depending on the specifics, but there are some general items that you’ll likely need. These include things like measuring equipment, such as a ruler or tape measure, cutting tools like scissors or a utility knife, and basic adhesive like glue or tape.
Depending on your project, you may also need more specialized materials such as paint, fabric, or specific types of wood. It’s important to research and gather all of the necessary materials before you start your project to ensure you have everything you need. This will save time and frustration in the long run and help you create something that you can be proud of.
How to Use a Brake Bleeder Bottle
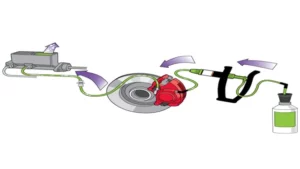
If you’re looking to bleed your brakes at home, a brake bleeder bottle can be a helpful tool. First, make sure your vehicle is cool and the brake fluid is at the correct level. Then, locate the bleeder valve on the brake caliper or wheel cylinder you want to bleed and attach one end of a clear hose to the valve.
Connect the other end of the hose to the brake bleeder bottle. Follow instructions to vacuum fluid from the bleeder valve up through the hose and into the bottle, making sure to keep an eye on the fluid level in the bottle. Once air bubbles have disappeared, close the valve and move on to the next wheel.
This process may take a few tries, so don’t get discouraged. With a little patience and practice, you can use a brake bleeder bottle to effectively bleed your brakes and ensure your vehicle is safe on the road. So, grab your brake bleeder bottle and get started today.
Step 1: Prepping the Vehicle
Using a brake bleeder bottle can make the brake bleeding process a lot easier and less messy. But before you start using the brake bleeder bottle, you need to prepare your vehicle properly. To do this, first, open the brake fluid reservoir and check the level of the fluid.
If it’s below the minimum level, add more brake fluid until it reaches the maximum level. Then, loosen the bleeder valve on each wheel and prepare the bleeder bottle by filling it with fresh brake fluid. Once you have done that, you can attach the bleeder bottle to the brake bleeder valve and start bleeding the brakes.
Remember, proper vehicle preparation is essential in ensuring a successful and safe brake bleeding process.
Step 2: Filling the Bleeder Bottle
Brake Bleeder Bottle Now that you have your brake bleeder bottle, it’s time to fill it up. Start by unscrewing the cap on top and pouring in your brake fluid. Be sure to check your vehicle’s owner manual to see which type of brake fluid is recommended.
Once the bottle is filled, replace the cap and screw it on securely. The next step is to attach the tubing to the bleeder screw on the brake caliper. Make sure the tubing is tight and secure to prevent any leaks.
Now you’re ready to start bleeding your brakes. Pump the brake pedal several times to build pressure in the system, then open the bleeder screw with a wrench. Watch as the old fluid drains out and new fluid begins to fill the system.
Keep pumping the pedal until clean, clear fluid flows through the tubing. Finally, close the bleeder screw and move to the next caliper. With a brake bleeder bottle, you’ll be able to change your brake fluid quickly and easily while maintaining a clean, professional work area.
Step 3: Attaching the Bleeder Bottle
When it comes to brake bleeding, attaching the bleeder bottle is a crucial step in the process. First, grab your bleeder bottle and attach it to the brake caliper. Make sure the hose is securely attached to the bleeder valve on the caliper.
The bottle should be high enough to prevent air from re-entering the system, but low enough to allow brake fluid to flow from the caliper. Once the bottle is in place, you can begin the bleeding process by pumping the brake pedal and opening the bleeder valve. As the fluid exits the valve, it will be collected in the bleeder bottle, preventing any mess or cleanup.
Remember to check the fluid level in the master cylinder periodically and refill it as needed. With the bleeder bottle attached, brake bleeding becomes a streamlined and efficient process, allowing you to quickly and easily bleed your brakes with confidence.
Step 4: Bleeding the System
When it comes to bleeding your brake system, using a brake bleeder bottle can make the process much easier and less messy. First, attach the bottle to the bleeder valve and open the valve. As you pump the brakes, the air and old fluid will be forced out into the bottle, which can easily be disposed of later.
Keep an eye on the fluid level in the master cylinder reservoir and refill as necessary. You’ll know the system is properly bled when all bubbles have been removed from the fluid and the brake pedal feels firm. Using a brake bleeder bottle is a convenient way to ensure that your brakes are working at their best, so keep one handy in your garage.
Step 5: Finishing Up
Using a brake bleeder bottle can seem intimidating, but it’s actually quite simple. Once you’ve connected the bottle properly and bled the brakes, it’s time to finish up. The first step is to make sure you remove all air from the brake system.
This can be done by bleeding the brakes again until you get a steady stream of fluid without air bubbles. Next, double-check all of your connections to make sure they are tight and secure. Finally, top off the brake fluid reservoir to the specified level.
It’s important to remember that this step is crucial for the safety of your vehicle, so be sure to take your time and do it right. With proper use of a brake bleeder bottle, you can ensure your brakes are working properly and keep yourself and others safe on the road.
Tips for Using a Brake Bleeder Bottle
If you’re a DIY mechanic looking to bleed your brakes, a brake bleeder bottle can be an incredibly helpful tool. To use one, start by filling the bottle with fresh brake fluid and attach it to the bleeder valve on the brake caliper or wheel cylinder. Then, open the bleeder valve and pump the brake pedal until you see air bubbles coming out of the valve and into the bottle.
Once the bubbles stop and only clean fluid is coming out, close the valve and move on to the next caliper or cylinder. Remember to check and refill the brake fluid in the bottle often to avoid introducing air back into the brake system. With a little practice, using a brake bleeder bottle can be an efficient and effective way to bleed your brakes and keep your vehicle safe on the road.
Maintenance Tips
If you’re looking for a way to keep your brakes feeling fresh, a brake bleeder bottle might just be the ticket. These handy little tools allow you to flush old brake fluid out of your car’s brake lines and replace it with fresh fluid, which can help improve braking performance and extend the life of your brakes. To get the most out of your brake bleeder bottle, there are a few tips you should keep in mind.
First, make sure you use the right type of brake fluid for your car, as using the wrong type can cause serious damage to your brakes. Additionally, make sure you bleed your brakes in the correct order, starting with the wheel farthest from the master cylinder and working your way closer. Finally, always follow the manufacturer’s instructions carefully and take your time to ensure you get the best results.
With these tips in mind, you’ll be able to make the most of your brake bleeder bottle and keep your brakes performing at their best.
Safety Tips
When using a brake bleeder bottle, safety should be your top priority. First and foremost, make sure to wear gloves and safety glasses to protect yourself from any chemicals or debris that may spray during the process. Additionally, it’s important to follow the instructions provided with your brake bleeder bottle carefully.
Always make sure the bottle is securely attached to your braking system and that the valve is closed before beginning the bleeding process. Once you’ve completed the bleeding process, dispose of the brake fluid and any other materials properly. Remember, taking a few extra precautions can go a long way in ensuring a safe and successful brake bleeding experience.
Conclusion
In conclusion, using a brake bleeder bottle is like having a trusty sidekick for all your brake bleeding needs. It’s simple, efficient, and makes the job of bleeding brakes as easy as a Sunday drive. Just attach the hose to the bleeder screw, pump the brake pedal, and watch as the bubbles disappear like magic.
So if you want to ensure your car has stopping power, don’t hesitate to grab a brake bleeder bottle and get to work. Your brakes (and passengers) will thank you!”
FAQs
What is a brake bleeder bottle?
A brake bleeder bottle is a container used to catch brake fluid during the brake bleeding process.
How is a brake bleeder bottle used?
A brake bleeder bottle is placed over the brake bleeder valve on the brake caliper or wheel cylinder, the valve is opened, and brake fluid is pumped through the system until all air bubbles are removed.
Can any brake bleeder bottle be used for any car?
Not all brake bleeder bottles are universal, so it is important to ensure that the bottle being used is compatible with the specific make and model of the car.
What is the purpose of using a brake bleeder bottle?
Using a brake bleeder bottle helps to prevent brake fluid from spilling onto other components of the car, which can cause damage to the paint and other materials.
How do you clean a brake bleeder bottle?
The brake bleeder bottle can be cleaned with soap and water, or with a brake cleaner designed specifically for the task.
How long does it take to bleed brakes using a brake bleeder bottle?
The length of time it takes to bleed brakes using a brake bleeder bottle depends on the size of the system and the amount of air present in the system.
Can a brake bleeder bottle be reused?
Yes, a brake bleeder bottle can be reused as long as it is thoroughly cleaned and free of any debris.
