Portable welding machines have revolutionized the world of welding, allowing you to take your equipment with you anywhere. Whether you’re a professional welder or just a DIY enthusiast, these machines are easy to carry and use on the go. In this step-by-step guide, we’ll take you through the process of using a portable welding machine, covering everything from safety precautions to troubleshooting common issues.
By the end, you’ll have the knowledge and confidence to tackle any welding project, no matter where you are. So grab your welding helmet and let’s get started!
Before You Begin
When it comes to using a portable welding machine, there are a few things to keep in mind before you begin. Firstly, make sure that you have the necessary safety gear, including welding gloves, a welding helmet, and a fire extinguisher nearby. Additionally, ensure that you have the proper type of welding machine for the job at hand and that you have read and understood the manufacturer’s instructions.
Once you are ready to begin, start by cleaning the metal surface that you will be welding. This will help ensure that your welds are strong and of high quality. Set up your machine according to the manufacturer’s instructions and begin welding, making sure to maintain a steady hand and paying close attention to the quality of your welds as you go.
With these steps in mind, you’ll be well on your way to using a portable welding machine safely and effectively.
Check the Welder’s Manual
Before you start your welding project, it’s essential to check your welder’s manual thoroughly. Every welding machine features different specifications and safety guidelines that you need to follow to ensure that your welding process goes smoothly. The manual will give you all the information you need to set the right voltage, amperage, and wire speed for the welding process you’re about to undertake.
Additionally, it will tell you the correct welding technique to use and the appropriate safety equipment required. Every welder’s manual has a troubleshooting guide, which will help you identify any issues that may arise while welding. So, before you begin your welding project, always check the welder’s manual, which will guide you in the right direction and help you accomplish your job safely and efficiently.

Prepare Your Work Area
Before you begin any task, it’s essential to prepare your work area to ensure maximum productivity, safety, and efficiency. Clear out any clutter or unnecessary items that may distract you or get in the way, and make sure you have all the necessary tools and equipment you need for the job. If you’re working with hazardous or heavy materials, be sure to wear the appropriate personal protective equipment (PPE), such as gloves, safety glasses, and hard hats.
Additionally, try to position your work area in a well-lit, ventilated space to minimize discomfort or strain on your eyes and respiratory system. Taking the time to prepare your work area before starting will save you time, reduce the risk of accidents or injuries, and help you achieve the best possible results. As you begin your project, always keep in mind the importance of safety and ergonomics.
Whether you’re working in a garage, workshop, or office, having a tidy, well-organized space to work in is vital. Not only does it help you focus on the task at hand, but it also reduces the risk of accidents and injuries. With the right tools and equipment, proper PPE, good lighting, and ventilation, you can optimize your work area and achieve maximum productivity and efficiency.
So take the necessary time to plan and prepare your work area before beginning your next project. By doing so, you’ll set yourself up for success and avoid potential pitfalls along the way.
Gather Your Tools and Equipment
Before you begin any task, it is important to gather all the necessary tools and equipment. This applies to just about any project, from baking a cake to fixing a car. It’s no different when it comes to working on your home or garden.
To make sure you have everything you need, start by making a list of all the tools and equipment required. This will ensure that you don’t forget anything important. Once you have your list, check to see if you already have any of the items.
If not, it’s time to head to the hardware store. Make sure to purchase high-quality tools that will last you a long time. Investing in good tools will not only make your job easier but will also save you money in the long run since you won’t have to replace them as frequently.
Remember, having the right tools is essential to ensure that your project is completed correctly and efficiently.
Using the Welding Machine
If you’re looking to learn how to use a portable welding machine, then you’ve come to the right place. First, you need to ensure that the machine is plugged into an appropriate power source. Then, you’ll need to put on all the necessary safety gear, including welding gloves, a welding helmet, and a welding jacket.
Once you’re ready to go, it’s important to set up your welding area carefully. That means ensuring that there are no flammable materials nearby and that the welding area is well-ventilated to prevent any noxious fumes from building up. Then, it’s time to start the welding process itself.
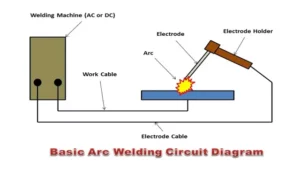
To do so, you’ll need to ensure that the electrodes are securely attached to the welding machine and that the polarity is set correctly. Once everything is in place, you can start welding by striking an arc between the electrode and the metal surface you want to weld. Follow these steps carefully, and you’ll be able to use your portable welding machine safely and efficiently.
Step 1: Set Up the Welder
Setting up the welder is the first step in using a welding machine. Before beginning any welding project, ensure that the welder is properly set up and ready to use. The first thing to check is the power source.
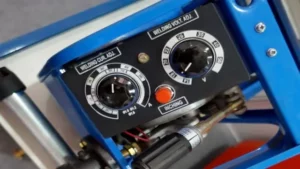
Ensure that the welding machine is properly connected to a grounded power source. Next, check the settings on the welder. Set the welding machine to the appropriate amperage and voltage for the type of metal you are welding.
This will ensure that you have the right amount of power to create a strong, lasting weld. Finally, check the welding wire. Make sure it is feeding smoothly through the machine and that the wire diameter matches the diameter of the welding tip.
With the welder properly set up and ready to use, you can move on to the next step of your welding project with confidence. Remember, taking the time to properly set up your welding machine is essential for getting good results and ensuring your safety.
Step 2: Choose the Correct Settings
When it comes to using a welding machine, choosing the correct settings is crucial for getting optimal results. The first thing you need to do is identify the type of material you will be welding. Generally, thicker materials require higher amperage settings, while thinner materials need lower settings.
You should consult the user manual to find the recommended settings for the specific material you are working with. Additionally, you need to determine the type of electrode to use. Each electrode has its own recommended amperage, which should also be included in the user manual.
It is essential to set the amperage to the right level, as too little or too much can lead to a poor weld. Remember that welding is a precise task, and accurate settings are paramount. Make sure you take the time to set your welding machine correctly before starting the job to ensure the best possible outcome.
Keyword: welding machine.
Step 3: Prepare the Materials
Now that you have prepped the materials, it’s time to use the welding machine. But before we dive into it, make sure to read the instructions carefully and wear the right gear. The welding machine generates heat, electricity, and sparks, which can be dangerous if you’re not prepared.
Once you’re all set, it’s time to take the plunge. First, position the materials you want to weld. Make sure they are secure and won’t move during the welding process.
Next, turn on the welding machine and adjust the settings. The settings will depend on the material you’re using and the type of welding you’re doing. Be patient and take your time adjusting the settings, so you get it right.
Now it’s time to actually weld. Hold the welding gun perpendicular to your work surface and pull the trigger. Move the gun slowly and steadily to create a bead.
If you’re doing spot welding, hold the gun in place until the spot is complete. Always be aware of your surroundings and stay focused on the task at hand. With practice, anyone can become a skilled welder.
Step 4: Start Welding
When it comes to welding, the most important thing to remember is safety. You need to wear protective clothing, including a helmet, gloves, and a jacket. Before you start, check all of your equipment is set up properly, and ensure that the metal is clean and ready to weld.
Once you are ready, it is time to start welding. The first step is to turn on the welding machine and select the appropriate settings, such as amperage and voltage. You should refer to the user manual for your specific machine to ensure that you choose the correct settings.
Once you have everything set up, start by welding a test piece to make sure that your settings are correct. When you are confident that everything is working properly, begin welding your project piece by piece. Remember to take breaks regularly to let your machine cool down, and to drink plenty of water to avoid dehydration.
With the appropriate equipment and safety precautions in place, you will be able to weld your project with confidence.
Safety Tips and Precautions
If you’re new to welding, it’s important to learn how to use portable welding machine step by step to avoid any accidents. First, ensure that you have all the necessary safety equipment, including a welding helmet, gloves, and a welding apron. Make sure that the machine is placed on a steady surface and that your working area is free from any flammable materials.
Next, connect your welding leads and ground the machine properly to prevent any electric shock or fire hazard. Adjust the settings on your machine according to the material you’re working with, and start welding in short bursts while constantly monitoring the temperature. Keep a fire extinguisher nearby at all times in case anything goes wrong.
Remember, practice makes perfect, so start slow and build up your skills gradually. With these simple steps, you’ll be able to safely use your portable welding machine and tackle any welding project with confidence!
Wear Protective Clothing and Gear
Protective clothing and gear are crucial for ensuring safety in various settings. Whether you’re working on a construction site, participating in sports activities, or handling chemicals, wearing the right protective gear can save you from potential harm. For instance, construction workers often wear hard hats, goggles, and safety boots to protect their heads, eyes, and feet, respectively.
Similarly, athletes wear mouthguards, helmets, and shin guards to prevent injuries during sports games. Proper protective gear can reduce the risk of accidents and minimize the severity of injuries. When selecting protective clothing and gear, ensure that it fits properly and provides adequate protection.
The right gear can make all the difference in preventing accidents and injuries. So, don’t take chances with your safety; always wear the appropriate protective gear for your activities.
Keep a Fire Extinguisher Nearby
A fire extinguisher is an essential safety tool that every homeowner should have. It’s important to keep one nearby in case of an emergency. You never know when a fire could break out, and having a fire extinguisher on hand could help prevent a small flame from turning into a destructive blaze.
When choosing a fire extinguisher, make sure you select the correct type for your specific needs. It’s recommended to have at least one fire extinguisher on each level of your home. Be sure to keep them in easily accessible areas such as near the kitchen or garage.
Don’t forget to read the instructions on how to use the extinguisher properly. Remember, having a fire extinguisher is just one step in being prepared for a potential fire emergency. It’s also important to have working smoke detectors, an evacuation plan, and to regularly conduct fire drills with your family.
Taking these simple precautions could save lives and prevent property damage. So, keep a fire extinguisher nearby and stay safe!
Ensure Adequate Ventilation
When it comes to safety in any space, it is essential to ensure adequate ventilation. Proper ventilation helps maintain good indoor air quality and can prevent the accumulation of harmful airborne substances. Whether you’re in a workplace or your home, good ventilation is crucial to your health and well-being.
Without proper ventilation, the air in your space can become stagnant and filled with indoor pollutants such as carbon monoxide, mold, and mildew. These pollutants can cause headaches, dizziness, respiratory infections, and other health issues. To maintain good ventilation, make sure to open windows or use exhaust fans in bathrooms and kitchens.
You can also invest in air purifiers or HVAC systems that have air filters. By taking these precautions, you can breathe easier and reduce your risk of respiratory problems. Remember, prioritizing adequate ventilation is essential to your overall health and well-being.
So, ensure that you are taking the necessary steps to keep the air in your space clean, fresh, and safe to breathe.
Conclusion
In conclusion, using a portable welding machine is like being a master chef cooking up a delicious meal. You need the right ingredients, tools, and techniques to create something incredible. So, step one: gather your materials, step two: power up the machine, step three: adjust the settings, step four: position your workpiece, step five: strike the arc, and step six: weld away flawlessly.
With practice and patience, you’ll soon be creating metal masterpieces that are worthy of a standing ovation. So grab your welding helmet and get to work, because the sky’s the limit, and the world is your oyster!
FAQs
What are the safety precautions I need to take before using a portable welding machine?
Before using a portable welding machine, you should wear proper eye and skin protection gear, make sure the machine is grounded, keep the work area clear, and avoid welding near flammable objects.
What type of power source is required for a portable welding machine?
A portable welding machine typically requires a 120 or 240-volt electrical supply, depending on the amperage needed for the job.
How do I prepare the metal for welding with a portable welding machine?
To prepare metal for welding with a portable welding machine, you should clean it thoroughly to remove any rust, paint, or debris that may interfere with the welding process.
What type of welding rods should I use with a portable welding machine?
The type of welding rod you should use with a portable welding machine will depend on the material you are welding and the type of welding process you are using.
How do I set up the machine for welding?
To set up a portable welding machine for welding, you should first select the appropriate welding rod and amperage setting, then adjust the machine’s voltage and wire speed based on the type of weld you are performing.
Can I use a portable welding machine for overhead welding?
Yes, you can use a portable welding machine for overhead welding, but proper safety precautions and support should be taken.
How do I maintain my portable welding machine?
To maintain your portable welding machine, you should regularly clean it and check for any loose or worn parts that may need to be replaced. Additionally, you should store the machine in a dry and secure location to prevent damage.
