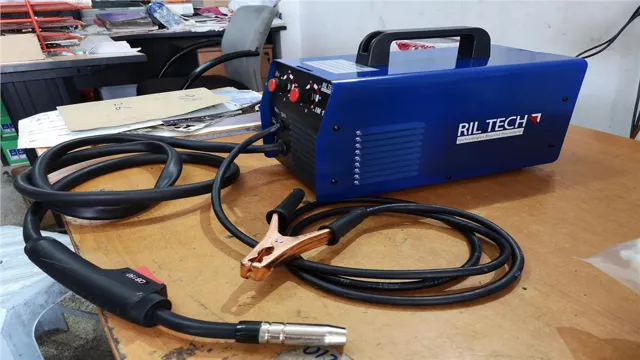
Do you want to learn how to use a MIG gasless welding machine but have no idea where to start? Well, you’re in luck because it’s easier than you think! A MIG gasless welding machine is a great option for those who don’t want to deal with gas tanks and want more portability. But, how do you use it? The first step is to prepare your workspace. Make sure you have a clean and well-ventilated area to work in.
You also need to make sure you have the proper safety gear, including a welding helmet, gloves, and a protective jacket. Once you have your workspace and safety gear ready, it’s time to set up your machine. One of the great things about a MIG gasless welding machine is that it’s relatively easy to set up.
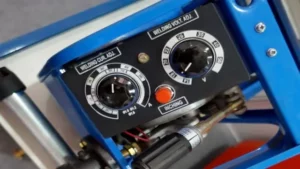
After you’ve plugged it in, you’ll need to adjust the wire speed and voltage settings to fit the metal you’re working with. It’s important to read the manufacturer’s instructions carefully to ensure that you’re using the correct settings. Once your machine is set up, it’s time to start welding! With a MIG gasless welding machine, you have the luxury of not needing a shielding gas.
This saves you time and money, but it’s important to remember that you’ll need to use the correct wire for the metal you’re working with. In conclusion, using a MIG gasless welding machine is an easy process that requires proper preparation, set up, and knowledge of the correct wire to use. With a little practice, you’ll be welding like a pro in no time!
Safety Precautions
If you’re new to welding, it’s important to know how to use a MIG gasless welding machine safely to prevent injury. First and foremost, make sure you read the manufacturer’s instructions and safety guidelines before using the machine. You should also make sure you have the appropriate protective gear, such as gloves, eye protection and long-sleeved clothing.
When setting up the welding machine, ensure it’s on a stable surface and that all cords and wires are secured. Before beginning the welding process, also make sure you’ve cleared the area of any flammable materials or liquids that could potentially ignite. Once you’re ready to begin welding, carefully hold the welding gun steady and practice a few times to get the hang of moving the gun along the designated path.
By following these safety precautions, you’ll be well on your way to safely and effectively using a MIG gasless welding machine.
Wear protective gear (i.e. gloves, goggles, long-sleeved clothing)
As fun as it may be, working with heavy machinery or hazardous materials can be extremely dangerous. One of the best ways to ensure your safety is to wear protective gear at all times. This includes gloves, goggles, and long-sleeved clothing.
These items will protect you from sharp or abrasive materials, chemical spills, and potential eye damage. Protective gear can also prevent skin irritation and respiratory problems from long-term exposure to certain substances. It’s important to select the appropriate gear for the task at hand and to make sure it fits properly.
While it may be tempting to skip this step, the consequences of not wearing protective gear can be severe. Don’t put yourself at risk – make sure you’re properly equipped before starting any work.
Ensure proper ventilation in the work area
Proper ventilation is essential in any work area to ensure the safety of workers and prevent the buildup of harmful gases and particles. It is important to regularly check all ventilation systems to ensure that they are functioning properly. In addition to these systems, it may be necessary to use additional ventilation methods such as fans or air purifiers to keep the air clean and breathable.
Failure to provide ventilation can result in workers experiencing short-term and long-term health issues, including headaches, dizziness, respiratory problems, and chronic illnesses such as cancer. When it comes to the safety of employees, there is no reason to cut corners or save money. Make sure that your work area is properly ventilated to avoid any health hazards.
Preparing the Welding Machine
If you’re wondering how to use a MIG gasless welding machine, the first step is to prepare the machine. Start by checking the wire feeder and making sure it’s properly aligned. You also need to ensure the wire diameter is compatible with the feeder.
Next, check the polarity settings. In most cases, MIG welding machines use direct current electrode positive (DCEP) polarity. However, gasless welding machines typically use direct current electrode negative (DCEN) polarity.
Double-check your owner’s manual to confirm. The last step is to load the welding wire spool into the feeder, making sure it’s properly mounted and secure. With these steps completed, you’re ready to move on to the actual welding process.
Ensure the correct wire and settings are selected for intended metal
When it comes to welding, it’s important to ensure that the correct wire and settings are selected for the intended metal. But before you even begin to think about that, preparing the welding machine is key. This means checking the power source, inspecting the machine for any damage, and making sure the ground cable and clamp are properly connected.
It’s also important to clean the work area and clear away any flammable materials to ensure a safe environment for you and those around you. Once the machine is properly prepared, you can then move on to selecting the appropriate wire and settings for the metal you’ll be working with. By taking these important steps before starting your welding project, you can help guarantee both the safety of yourself and others, as well as a successful and efficient welding experience.
Insert the welding wire spool into the designated area of the machine
When it comes to welding, one of the most important aspects is properly preparing the welding machine. One crucial step in this process is inserting the welding wire spool into the designated area of the machine. This may seem like a simple task, but it is essential for ensuring a successful weld.
To begin, make sure you have the correct type and size of welding wire spool for the job you will be completing. Once you have the spool in hand, locate the designated area on your welding machine for inserting it. This area may vary depending on the specific machine you are using, so refer to the manufacturer’s instructions if necessary.
Next, remove any protective packaging or wrapping from the spool. Then, ensure that the spool is properly oriented for insertion into the machine. This will typically involve placing the spool onto a spindle or other device that will allow it to rotate freely as you weld.
With the spool properly oriented, it is time to insert it into the machine. This may involve placing the spool onto a spindle and manually feeding the wire through the appropriate guides and rollers. Other machines may have an automatic feed system that will handle this step for you.
Regardless of the method, be sure to double-check that the wire is feeding correctly and is not tangled or misaligned. By taking the time to properly insert the welding wire spool into your machine, you can help ensure a successful and stress-free welding experience. So the next time you are preparing your welding machine, don’t overlook this crucial step.
Attach the ground clamp to the workpiece
When it comes to welding, it’s important to properly prepare the welding machine before beginning the process. One crucial step in this process is attaching the ground clamp to the workpiece. This step is necessary to establish a solid electrical connection between the welding machine and the workpiece, which is essential in producing a strong and reliable weld.
First, ensure that the workpiece is clean and free of any debris or rust. Next, attach the ground clamp securely to the workpiece, making sure that it is in direct contact with the metal surface. This will prevent any electrical interference or weak connections that can compromise the welding process.
Remember, the ground clamp is just as important as the welding machine itself. A well-grounded welding setup will reduce the risk of electrical shocks and fires while ensuring high-quality welds. So, take the time to properly prepare your welding machine and attach the ground clamp to the workpiece for successful results.
Starting the Welding Process
Now that you have your MIG gasless welding machine, it’s time to get started with the actual welding process. Firstly, make sure to attach your welding wire to the spool holder and feed it through the feeder rollers. Ensure that the welding wire is secure by tightening the tensioner knob.
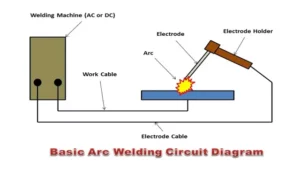
Next, connect the ground clamp to the workpiece you will be welding on. This will complete the electric circuit when you begin welding. Now, turn on the welding machine and adjust the voltage, wire feed speed, and amperage to suit the thickness of the metal you’re working with.
Before you start welding, make sure to wear appropriate welding safety gear such as gloves, a welding helmet, and a welding jacket. With all this set-up taken care of, you’re ready to start welding with your MIG gasless welding machine. Happy welding!
Attach the welding gun tip to the workpiece
When starting the welding process, it’s essential to attach the welding gun tip to the workpiece properly. This step is crucial to ensure a secure connection between the gun and the material, which is vital for achieving a solid weld. To attach the welding gun tip, first, you need to align the tip with the workpiece.
Then, hold the gun at a 90-degree angle to the material and press the trigger. The gun will release high-temperature metal filler material onto the workpiece, creating a molten pool. As the molten metal cools, it solidifies and fuses the workpiece into a single unit.
The welding gun tip plays a crucial role in starting the welding process. If it’s not attached correctly, the gun won’t be able to transfer the heat and filler material to the material effectively. The result will be a flawed weld that lacks strength and durability.
Therefore, it’s crucial to pay close attention to this process and take your time to ensure that everything is aligned correctly. In conclusion, attaching the welding gun tip to the workpiece is a fundamental step in starting the welding process. It’s essential to do this correctly to achieve a strong, durable weld.
By taking your time and aligning the gun and material correctly, you can ensure that your welds are top-quality and reliable.
Turn on the welding machine
If you’re ready to start welding, the first step is to turn on the welding machine. But before you do that, make sure you have all the necessary safety equipment, like a welding helmet, gloves, and a full-length apron. Once you’re protected, it’s time to turn on the machine and let it warm up.
Depending on the type of welding you’re doing, you may also need to adjust the settings on the machine, such as the voltage or wire feed speed. It’s important to follow the manufacturer’s instructions for your specific machine and welding process. Remember, safety always comes first in welding, so don’t take any shortcuts.
With the machine on and warmed up, you’re ready to start the welding process. Hold the welding torch at the correct angle and position, and begin to slowly lower it towards the metal. You’ll hear and see the arc start, and molten metal will begin to flow onto the metal.
Keep a steady hand and maintain the correct distance between the torch and the metal, and you’ll be off to a great start in your welding journey. So, are you excited to start welding and bring your projects to life?
Begin welding by pulling the trigger and moving the gun continuously
Starting the welding process can be intimidating, but with the right technique, it can be a breeze. Begin by pulling the trigger on your welding gun and moving it continuously in a smooth motion to create a uniform weld. It’s essential to maintain a consistent pace throughout the process to avoid creating weak spots.
You may need to adjust the angle and distance of the gun from the metal depending on the thickness and type of metal you’re welding. It’s crucial to keep a steady hand to ensure a clean, strong weld. Remember, the key to successful welding is practice, so don’t be discouraged if it takes a few tries to master the art.
As with any skill, it takes time to perfect. So keep practicing and try different techniques until you find the one that works best for you. By following these steps and maintaining a steady hand, you’ll be on your way to creating strong, beautiful welds in no time.
Troubleshooting Tips
If you’re new to welding, you might be wondering how to use a MIG gasless welding machine. First of all, it’s important to keep in mind that gasless welding requires a different approach than traditional welding. You’ll need to make sure that your machine is set up properly, with the right wire and feed speed.
You’ll also want to make sure that you’re using the right techniques and safety precautions. One common problem that people run into when using a gasless welding machine is wire feed issues. If your wire isn’t feeding smoothly, you may need to adjust your spool tension or check for kinks or snags in your wire.
Another issue that can arise is porosity in your welds. This can be caused by a number of factors, such as incorrect gas flow or poor shielding. By troubleshooting these issues and taking the time to learn proper techniques, you can become a skilled gasless welder in no time.
If the wire is jammed, turn off the machine and remove the spool
If you’re experiencing wire jams while using your machine, don’t panic! A simple troubleshooting tip is to turn off the machine and remove the spool. This can be a common issue when the wire isn’t feeding correctly, causing it to become tangled or caught in the machine. Turning the machine off and removing the spool creates a chance for you to inspect the wire for any kinks or tangles that may be causing the jam.
Once the wire is freed from any obstructions, you can re-thread the spool and turn the machine back on to resume your work. Remember, it’s crucial to troubleshoot and maintain your machine regularly to avoid any significant issues and keep it running smoothly. Keep in mind that if the problem persists, it’s best to consult a professional to prevent any further complications.
If the wire feed is inconsistent, adjust the tension on the wire feed
If you’re experiencing issues with inconsistent wire feed while using your welding machine, there’s a good chance that adjusting the tension on your wire feed could solve the problem. Inconsistent wire feed can cause disruptions in your welding process, leading to rough welds and other issues. By adjusting the tension, you can ensure that the wire is feeding through the machine at a consistent rate, allowing you to concentrate on your welding without any unexpected surprises.
To adjust the tension, you’ll need to refer to your welding machine’s user manual, which should contain instructions for making the necessary adjustments. With a little patience and attention to detail, you should be able to get your wire feed working consistently once again, making your welding projects go more smoothly overall.
Conclusion
In conclusion, using a MIG gasless welding machine can be a breeze if you follow these simple steps: 1) Prepare your materials and choose the appropriate settings for your machine, 2) Securely fasten your workpiece and wear proper safety gear, 3) Hold the welding gun at the correct angle and maintain a steady pace, 4) Keep a close eye on your weld and make any necessary adjustments as you go, and 5) Clean up your workspace and store your equipment properly. With a little practice and patience, you’ll be wielding that welding gun like a pro. So go ahead and embrace your inner welder – and remember, safety first! Now let’s go make a masterpiece that would make even Picasso proud!”
FAQs
What is a mig gasless welding machine?
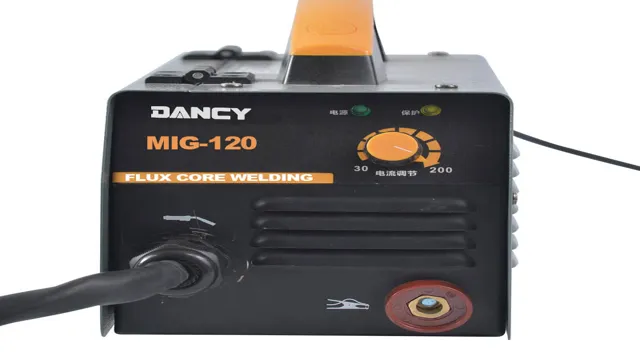
A mig gasless welding machine is a type of welding machine that uses flux-core wire to weld without the need for external gas.
How do I set up a mig gasless welding machine?
To set up a mig gasless welding machine, insert the wire into the welding gun, adjust the wire speed and voltage settings, and ensure that the workpiece is clean and properly positioned.
Can I use a mig gasless welding machine for heavy-duty welding applications?
While mig gasless welding machines can be used for light to medium welding applications, they may not be suitable for heavy-duty welding tasks due to their lower heat output and limited penetration.
What materials can I weld with a mig gasless welding machine?
Mig gasless welding machines can typically be used to weld mild steel, stainless steel, and aluminum.
What are the advantages of using a mig gasless welding machine?
Some advantages of using a mig gasless welding machine include portability, convenience, and the ability to weld outdoors without the need for external gas tanks.
Do I need to wear any special protective gear when using a mig gasless welding machine?
Yes, it is important to wear protective gear when using any type of welding machine, including a mig gasless welding machine. This may include a welding helmet, gloves, and protective clothing.
What are some common safety precautions to follow when using a mig gasless welding machine?
Some safety precautions to follow when using a mig gasless welding machine include ensuring that the work area is well-ventilated, keeping flammable materials away from the welding area, and never touching the workpiece or welding gun while the machine is in operation.
