If you are a DIY enthusiast or someone who works with electronic equipment, learning how to use a multimeter voltage tester can be extremely beneficial. This useful tool can help you troubleshoot faulty wiring, check battery levels, and diagnose issues with electronic devices. But if you are new to using a multimeter, it can be a bit overwhelming at first.
Don’t worry, though. This comprehensive guide will give you a basic introduction to using a multimeter voltage tester, while also providing some practical tips for using it effectively. Whether you are testing household appliances, car batteries, or circuit boards, this guide will help you get started.
So, let’s dive in and learn more about using a multimeter voltage tester.
Introduction
One of the essential tools for any DIY enthusiast or electrician is a multimeter voltage tester. Understanding how to use this tool correctly can save you from electrocution and prevent damage to your devices or appliances. To begin, make sure you’re using the correct settings for the task at hand.
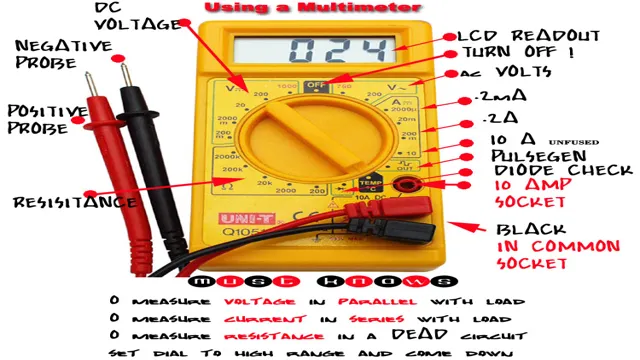
If you’re testing for voltage, set the dial to VAC or VDC, depending on the type of current you’re working with. Next, ensure that your probe tips are secure and that you’re using the correct polarity, as the red lead should typically be plugged into the V/Ohm input. Once everything is set up correctly, you can place the probes on the wires or device you wish to test, taking care not to touch the metal tips with your fingers.
The multimeter will then display the voltage, allowing you to safely and accurately diagnose any issues. Remember always to read the instructions before handling any electrical equipment and take all necessary safety precautions to protect yourself and others.
What is a Multimeter Voltage Tester?
A multimeter voltage tester is a versatile tool that helps users measure, analyze and troubleshoot various electrical circuits. It’s a must-have tool for electricians, electronics hobbyists, and DIY enthusiasts. With a multimeter voltage tester, you can measure AC and DC voltage, resistance, amperage, continuity, and other electrical parameters.
It works by using two test leads that connect to the circuit you want to measure or test. Once connected, the multimeter displays the measured parameter on its LCD screen. This tool is an essential piece of equipment for anyone working with electricity, as it helps identify potential problems, fix issues, and ensure safety.
Whether you need to fix an appliance or install new wiring, having a multimeter voltage tester can save you time and money by making the process quick, easy and efficient.
Why Use a Multimeter Voltage Tester?
Multimeter voltage tester Introduction: A multimeter voltage tester is a crucial tool for anyone dealing with electronics or electricity. It helps to measure voltage, current, and resistance accurately, allowing users to troubleshoot and fix problems with ease. With the increasing number of electrical devices in our daily lives, it is essential to have a reliable multimeter voltage tester to ensure safety and functionality.
But why use a multimeter voltage tester? In this blog section, we will take a closer look at the benefits of using a multimeter voltage tester in different scenarios and how it can make your life easier. So let’s get started!
Step-by-Step Guide
If you’re looking for an easy and effective way to measure voltage in an electrical circuit, using a multimeter voltage tester may be just what you need. To start, make sure your multimeter is set to the correct range and setting for voltage measurement. Then, turn off the power to the circuit and securely attach the meter’s probes to the circuit’s positive and negative terminals.
Turn the power back on and carefully read the measurement on the multimeter’s display. It’s important to note that safety should always be top priority when using any electrical equipment, so be sure to wear appropriate protective gear and handle tools carefully and confidently. By following these simple steps and staying safe, you can confidently use a multimeter voltage tester to measure voltage in your electrical circuits.
Step 1: Turn off Power
When it comes to dealing with electrical appliances, safety should always be a top priority. That’s why, before you start working on any electrical components, the first step you need to take is to turn off the power. This ensures that you won’t accidentally get electrocuted while making repairs or replacements.
The process of turning off the power might vary depending on the appliance you’re working on, but you should always start by unplugging it from the outlet. If the appliance is wired directly to your home’s electrical system, you’ll need to turn off the circuit breaker that controls that specific connection. This will ensure that there’s no electrical current flowing through the wires and that you can safely work on the appliance.
Remember, electrical work can be dangerous, so don’t take any chances and always turn off the power before starting any repairs.
Step 2: Set the Multimeter Voltage Tester to the Correct Setting
When it comes to using a multimeter voltage tester, it’s crucial to set the tool to the correct setting for accurate readings. Not doing so can lead to incorrect results or even damage to the device you’re testing. The first thing to consider is whether you’re measuring AC or DC voltage, as the settings won’t be the same for both.
Once you know which type of voltage you’re measuring, you can adjust the multimeter’s setting accordingly. It’s also important to choose a voltage range that’s appropriate for your measurement to ensure the most accurate reading possible. Always consult the device’s manual or a trusted online resource if you’re unsure of which setting to choose.
By setting your multimeter voltage tester to the correct setting, you’ll be able to get the most accurate readings possible and avoid any potential damage to your devices.
Step 3: Connect the Test Leads to the Circuit
Connecting the test leads to a circuit is a crucial step in conducting an electronic test. To begin, ensure that the circuit is disconnected from any power source or battery to avoid any accidental shocks or damage to the circuit. Next, insert the test leads into the corresponding ports of the digital multimeter, making sure that the red lead is connected to the positive or voltage input and the black lead is connected to the negative or common input.
Once the test leads are securely connected, we can move on to connecting them to the circuit. Identify the two points in the circuit where you need to perform the test and connect the leads to them. Make sure the leads are making good contact with the circuit by ensuring that they are not loose or touching other components.
With the leads now connected, we can safely proceed with our electronic test. Remember to double-check that you have followed all safety procedures before turning on the power and conducting the test to get accurate results.
Step 4: Read the Voltage Measurement
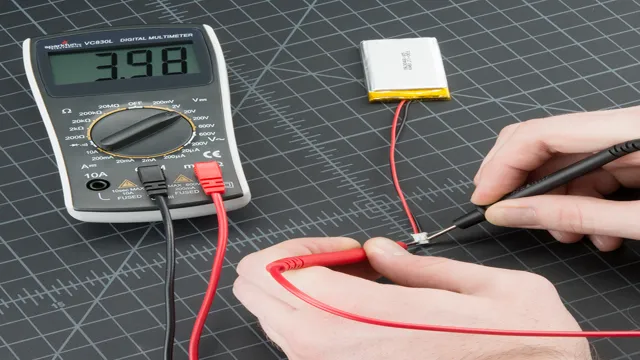
Now that the multimeter is set up and connected properly, it’s time to take your voltage measurements. Make sure the probes are securely touching the contact points by jiggling them a little bit. Once you’re sure they’re in place, you can read the voltage measurement on the display screen.
Keep in mind that the multimeter will give you a reading in volts, so make sure you’re looking at the correct number. On some models, you may need to switch between AC and DC voltage measurements, so be sure to double-check which one you’re on before you start. Remember, accuracy is key when it comes to voltage measurements, so take your time and be patient.
Once you have your reading, write it down so you don’t forget. Now you’re ready to move on to the next step of your electrical project.
Tips and Safety Precautions
If you’re ever in need of checking voltage levels, using a multimeter voltage tester is an easy solution. But how do you use one correctly and safely? Here are a few tips and precautions to consider before diving in. First, make sure the area you’re working in is dry, and that you’re not standing in water or touching conductive materials.
Next, set the meter to the correct voltage range that you need to test. When you’re ready, touch the probes to the circuits or wires you want to test, being careful not to touch them together or other nearby conductive material. Lastly, always check the meter for accuracy by testing a known voltage source before testing anything else.
With practice and careful attention to safety, using a multimeter voltage tester can be a valuable tool for any electrical projects or repairs.
Tip 1: Test Continuity
When it comes to electrical work, safety should always be your top priority. One important tip to keep in mind is to test continuity before touching any wires or components. Continuity testing involves checking to see if there is a complete electrical path between two points.
This is important because if there is a break in the path, it could mean that there is an issue with the circuit or component. To test for continuity, you can use a multimeter or a continuity tester. Simply touch one lead to each point and look for a reading on the display.
If there is no reading, then there is a break in the circuit and you should investigate further before proceeding. By taking the time to test continuity, you can prevent potential hazards and ensure that your electrical work is done safely and correctly.
Tip 2: Know the Range of Your Multimeter Voltage Tester
When using a multimeter voltage tester, it’s important to know the range of the device in order to accurately measure the voltage of your circuit. Most multimeters have different voltage ranges that can vary from mV to kV, so it’s important to know which one to use before testing. Using the wrong range can damage the device, the circuit, or even yourself.
Always check the voltage range before use, and never exceed the maximum voltage that the device can handle. It’s also recommended to use a voltage divider if you’re unsure about the voltage of your circuit. This will lower the voltage to a safe level for the multimeter to measure accurately.
Overall, being aware of the voltage range of your multimeter voltage tester is crucial for your safety and the integrity of your circuits.
Tip 3: Keep Your Hands and Equipment Dry
Keeping your hands and equipment dry is an important safety precaution that should not be overlooked. Whether you’re in the kitchen cooking or outside working with tools, wet hands can be easily more prone to accidents. Moisture on equipment can make it slippery or interfere with its function, making it more difficult to handle.
To avoid accidents, always ensure your hands are completely dry before handling anything sharp or hot. Wearing gloves can also be a good idea if you need extra protection. If you’re using tools outside, such as saws or drills, make sure that your equipment is dry before using it to prevent slipping or malfunctioning.
Taking these simple measures can make all the difference in preventing injuries and keeping you safe during any task.
Tip 4: Use Proper Safety Gear
When it comes to DIY projects or working with machinery, it’s essential to use proper safety gear to prevent accidents and injuries. Safety gear can include gloves, safety glasses, helmets, earplugs, boots, and respirators, depending on the type of work you’re doing. Wearing suitable clothing, such as non-loose-fitting clothes, can also be considered safety gear.
It’s crucial to understand the hazards of the job and choose the right safety gear to prevent potential dangers. For example, if you’re working with chemicals, you should wear protective gloves and a respirator to avoid inhaling toxic fumes. Safety gear not only protects you from harm but also gives you peace of mind, allowing you to focus on the task at hand.
Remember, safety comes first, and investing in the right safety gear is always a wise decision.
Tip 5: Always Test Your Multimeter Voltage Tester Before Using
Multimeter Voltage Tester When it comes to working with electrical equipment, safety should always be a top priority. This is why it’s crucial to always test your multimeter voltage tester before using it. Testing your tester beforehand will ensure that it’s working correctly and accurately measuring voltage levels.
To do this, simply take a voltage reading from a known source (like a battery) and make sure the reading matches what is expected. If the reading is off, it could potentially lead to inaccurate measurements and even dangerous situations. Additionally, make sure to wear appropriate safety gear like gloves and eye protection and follow all manufacturer instructions.
Remember – testing your multimeter voltage tester is a simple step that can go a long way in preventing accidents and ensuring a safe and successful project.
Conclusion
In conclusion, using a multimeter voltage tester might seem intimidating at first, but fear not! It’s as easy as 1-2- Just remember to always start by turning off the power, select the correct function and range, and touch the probes to the correct points. With this knowledge in your tool belt, you’ll be able to test voltage like a pro and impress your friends with your electrician skills.
So go forth and measure voltage confidently and safely! Remember, safety first, then voltage testing.”
Summary of Steps
If you’re planning on making any renovations or repairs to your home, it’s important to take the necessary steps to ensure your safety and avoid any accidents. Before you begin any work, make sure to thoroughly inspect the area and any tools or equipment you’ll be using. It’s also a good idea to have a first aid kit on hand in case of any injuries.
When working with electricity or gas, always turn off the power source and use proper safety gear. When using ladders or scaffolding, make sure they’re properly secured and positioned on a flat surface. It’s also crucial to follow all instructions and guidelines for any products or materials you’ll be using.
By taking these precautions, you can ensure a safe and successful project.
Benefits of Using a Multimeter Voltage Tester
Using a multimeter voltage tester has several benefits, but it’s important to remember some tips and safety precautions before operating it. First and foremost, always turn off the power source before testing anything. Also, be sure to select the correct function on your multimeter and the appropriate voltage range.
When touching the leads or probes to the circuit, always grasp them as close to the insulation as possible to avoid electrical shock. Keep in mind that the multimeter cannot differentiate between AC and DC voltage, so make sure to check the type of voltage you are measuring before proceeding. Finally, when testing high voltage circuits, always wear protective equipment like gloves and safety glasses.
Taking these precautions will ensure that you can safely use a multimeter voltage tester and reap its benefits, like accurate voltage readings and an easier way to troubleshoot circuit issues.
FAQs
What is a multimeter voltage tester and how does it work?
A multimeter voltage tester is a tool used to measure electrical voltage, current, and resistance in a circuit. It works by connecting the probes to the circuit and displaying the readings on a digital or analog display.
How do I set up my multimeter voltage tester for voltage measurement?
To set up your multimeter voltage tester for voltage measurement, first ensure that the meter is on the correct range setting for the voltage you wish to measure. Next, connect the red probe to the positive (+) terminal of the circuit and the black probe to the negative (-) terminal.
How do I test the voltage of a battery using my multimeter voltage tester?
To test the voltage of a battery using your multimeter voltage tester, turn the meter to the DC voltage setting and set the range to the appropriate voltage level. Then, connect the red probe to the positive (+) terminal of the battery and the black probe to the negative (-) terminal.
Can I use my multimeter voltage tester to test AC voltage?
Yes, many multimeter voltage testers are designed to test both AC and DC voltage. Be sure to select the appropriate setting on your multimeter before testing AC voltage.
How do I test the continuity of a circuit using my multimeter voltage tester?
To test the continuity of a circuit using your multimeter voltage tester, set the meter to the continuity setting and touch the probes to the two points in the circuit that you wish to test. If the circuit is continuous, the meter will emit a beep sound.
Is it safe to use a multimeter voltage tester to test high voltage circuits?
No, it is not safe to use a multimeter voltage tester to test high voltage circuits unless it is specifically designed for high voltage testing. Make sure to read the manufacturer’s instructions before using your meter on high voltage circuits.
How do I maintain my multimeter voltage tester?
To maintain your multimeter voltage tester, keep it clean and dry, store it in a safe place when not in use, and replace the batteries as needed. Additionally, test the accuracy of your meter periodically and have it calibrated if necessary.
