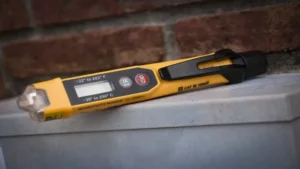
Have you ever found yourself stuck in a tricky situation where you needed to check the voltage in a device or outlet, but didn’t have the right tool for the job? It can be frustrating and even dangerous to rely on guesswork when it comes to electrical wiring. That’s where the Klein Tools ET40 Voltage Tester comes in. This handy device is a game-changer for anyone who works with electrical systems, from DIY enthusiasts to professional electricians.
With its easy-to-read display and simple operation, you can quickly and safely test for voltage without having to guess or take unnecessary risks. In this blog post, we’ll delve deeper into the features of the Klein Tools ET40 Voltage Tester and how you can use it to make your work easier and safer. Whether you’re a seasoned pro or just starting out, this tool is a must-have for anyone who needs to test voltage on a regular basis.
Let’s get started!
Checking for AC Voltage
If you’re wondering how to use the Klein Tools ET40 voltage tester to check for AC voltage, it’s easier than you might think. First, make sure the tester is functioning correctly by inserting the tip into a live outlet. The tester should light up, indicating that it’s working correctly.
Next, hold the tip of the tester against the wire or outlet you want to check. If AC voltage is present, the tester will light up, indicating that you should exercise caution and avoid contact with the wire or outlet. However, if there is no voltage present, the tester will not light up, indicating that the area is safe.
It’s essential to use reliable tools when working with electricity, and the Klein Tools ET40 is a great choice for homeowners and professionals alike. With its easy-to-use design and accurate readings, you can be confident that you’re always working safely.
Step 1. Turn on the Voltage Tester
When it comes to checking for AC voltage, the first step is to turn on your voltage tester. Once you’ve ensured that it’s working properly, it’s important to take safety precautions such as wearing gloves and avoiding conductive surfaces. Make sure that the area you’re testing is dry and that there’s no exposed wires or other hazards.
Once you’re ready, simply touch the tip of the voltage tester to the wire or outlet you want to test. If the tester beeps or lights up, then you know that there is voltage present. Keep in mind that AC voltage can be dangerous, so always exercise caution and use the appropriate equipment when testing for it.
By following these simple steps, you can safely and accurately check for AC voltage whenever you need to.

Step 2. Select the AC Voltage Setting
When using a multimeter to test for AC voltage, the next step after selecting the correct mode is to choose the AC voltage setting. This is important as it ensures that the reading obtained is accurate and reliable. To do this, locate the AC voltage range selector on your multimeter and set it to the highest range available.
This will prevent the multimeter from attempting to measure a voltage higher than what it’s capable of handling, which could result in potential damage. Once you’ve set the AC voltage range selector, insert the multimeter probes into the AC voltage testing points. Remember to ensure the probes are properly inserted to prevent errors in your readings.
Once you’ve completed the steps, a value should appear on your multimeter screen. This reading indicates the amount of AC voltage present at the testing point, allowing you to accurately measure and troubleshoot circuits in your device. Overall, it is vital to select the correct AC voltage setting for your multimeter to ensure accurate readings when testing for AC voltage.
Step 3. Touch the Test Leads to the Circuit
When it comes to checking for AC voltage, the third step involves touching the test leads to the circuit. But what does this mean exactly? Well, first of all, it’s important to make sure that the circuit you’re testing is actually turned on. Once you’ve confirmed that, you’ll need to take your test leads (which should be plugged into your multimeter) and touch the black lead to the negative side of the circuit and the red lead to the positive side of the circuit.
This will complete the circuit and allow your multimeter to measure the voltage present. Keep in mind that it’s important to be careful when working with electrical circuits, so always make sure that you’re using the right safety precautions before attempting to check for AC voltage.
Step 4. Observe the Results
After completing the previous steps of testing your electrical systems, it’s time to check for AC voltage. This is an important step in determining whether your electrical system is functioning safely and properly. To check for AC voltage, use a voltmeter to measure the voltage between the hot and neutral wires.
If the reading is between 110-120 volts, your system is working normally. However, if the reading is outside this range, it could indicate a problem with your electrical system. It’s important to note that voltage readings can vary depending on the time of day and the load on the system, so it’s best to take multiple readings at different times to ensure accuracy.
By testing for AC voltage, you can ensure that your electrical system is safe and functioning as it should be.
Checking for DC Voltage
If you need to check for DC voltage, the Klein Tools ET40 Voltage Tester is a great tool to have. Before using it, it’s important to understand the basics of how it works. When you touch the tester to a circuit, it will either light up or make a sound if DC voltage is present.
The LED lights will start to flash and the beeper will beep more frequently as the voltage increases. This tool is great for checking low voltage circuits, such as those found in cars and trucks, as well as solar panel systems. The Klein Tools ET40 Voltage Tester is easy to use and gives fast, accurate readings, making it an essential tool for any electrician or DIY enthusiast.
So the next time you need to check for DC voltage, make sure you have the Klein Tools ET40 Voltage Tester on hand, and you’ll be able to get the job done in no time.
Step 1. Turn on the Voltage Tester
When it comes to testing for DC voltage, the first thing you’ll need to do is turn on your voltage tester. This tool is essential for ensuring that the electrical current is flowing as it should and can help you identify any potential issues early on. To test for DC voltage, simply place the tester’s probes on the positive and negative terminals of the circuit you’re working with.
The tester will then display the voltage level, allowing you to monitor the flow of current and ensure that everything is working as it should. Remember, it’s important to check for DC voltage regularly to avoid any potential hazards or malfunctions. By using a voltage tester, you can keep your electrical systems safe and functioning properly.
Step 2. Select the DC Voltage Setting
After you have set up the multimeter, it’s time to check for DC voltage. To do this, you need to select the correct voltage setting on the multimeter. This is important because if the setting is too low, you won’t be able to measure the voltage accurately, and if it’s too high, you risk damaging the multimeter or the circuit you’re testing.
The voltage setting knob can usually be found on the front panel of the multimeter and is labeled with a “V” followed by a DC symbol. You can choose the DC voltage setting you require by rotating the knob until the desired range is shown on the display. Make sure that the range you select is higher than the voltage you’re measuring to avoid inaccurate readings.
Once you have selected the right setting, you are ready to test for DC voltage. Remember to double-check your connections and probes and take precautions when working with live circuits to avoid injury.
Step 3. Touch the Test Leads to the Circuit
When it comes to checking for DC voltage in a circuit, you need to touch the test leads to the specific points. Make sure that the circuit is turned off and disconnected from the power source before beginning the process. Once you have your multimeter in hand, set it to measure DC voltage.
Now, touch the black lead to the ground point in the circuit and the red lead to the point where you want to test the voltage. The voltage measurement will show up on the display of your multimeter. If you get a reading close to zero, it means there is no voltage present in the circuit.
However, if you get a reading above zero, it indicates that there is a voltage in the circuit. Remember that the voltage measurement you get should be within the range of your multimeter’s capabilities. If the voltage measurement exceeds the range of your multimeter, it may lead to damage or even electric shock.
Therefore, it is always recommended to use a multimeter with a suitable voltage range for the circuit you are working on. That way, you can ensure your safety and efficiency while testing for DC voltage.
Step 4. Observe the Results
When conducting electrical work, it is crucial to check for DC voltage levels to ensure safety and proper functionality. To accomplish this, you’ll need to use a multimeter equipped with a DC voltage mode. Once you have selected this mode, place the positive and negative probes on the specific points where you need to measure the voltage.
The multimeter’s display will then show the voltage levels in volts (V). It’s important to note that you may need to change the range of the multimeter to get an accurate reading, so make sure you read the instruction manual carefully. Once you have gathered the readings, you can then compare them to the expected range to check for any abnormalities.
If you encounter any anomalies, it’s essential to investigate the cause and make the necessary adjustments for optimal performance. Overall, regularly observing and checking the DC voltage is an essential component of electrical work that ensures functionality and safety.
Additional Tips and Precautions
When using the Klein Tools ET40 voltage tester, it’s important to take certain precautions to ensure your safety and accuracy of readings. First and foremost, always turn off the power supply before testing voltage. Additionally, test the tester on a known live source before every use to ensure accuracy.
When testing AC voltage, hold the tip of the tester near the contact point and do not touch the metal part of the tester. Finally, always check the battery status before use and replace the battery as needed. By following these tips and precautions, you can effectively and safely use the Klein Tools ET40 voltage tester for all your voltage testing needs.
Conclusion
Well, congratulations my dear friend! You have now mastered the art of using the Klein Tools ET40 Voltage Tester. You are a true voltage detecting ninja! With this trusty tool in your tool belt, you can safely and confidently navigate the world of electrical currents and ensure that your projects are always up to code. Just remember to always follow proper safety procedures and never take any risks when it comes to electricity.
Stay sharp, stay safe, and keep on voltage testing!”
FAQs
What is the purpose of the Klein Tools ET40 voltage tester?
The Klein Tools ET40 voltage tester is used to detect the presence or absence of voltage in an electrical circuit.
How accurate is the Klein Tools ET40 voltage tester?
The Klein Tools ET40 voltage tester is accurate to within 0.01 volts, making it a reliable tool for electricians and DIY enthusiasts.
Can the Klein Tools ET40 voltage tester test both AC and DC circuits?
Yes, the Klein Tools ET40 voltage tester can be used to test both AC and DC circuits, allowing for versatility in its use.
How do I use the Klein Tools ET40 voltage tester to test for voltage?
Simply touch the tip of the tester to a live wire or electrical component. The tester will emit an audible and visual signal if voltage is detected.
Is the Klein Tools ET40 voltage tester safe to use?
Yes, the Klein Tools ET40 voltage tester is designed to be safe for users. It is built with durable materials and has a non-contact voltage detection feature to prevent accidents.
Can the Klein Tools ET40 voltage tester be used to test for continuity?
Yes, the Klein Tools ET40 voltage tester has a continuity testing feature that can be used to check if there is a complete electrical connection between components.
How long does the battery of the Klein Tools ET40 voltage tester last?
The battery of the Klein Tools ET40 voltage tester can last up to 90 hours of continuous use, making it a reliable tool for extended periods of work.


