Have you ever wondered if your outlets are functioning correctly or if they are putting you at risk? Well, the good news is that testing an outlet with a voltage tester is a simple process that anyone can do. A voltage tester is a small device that can be purchased at any hardware store. It works by detecting the electrical current flowing through the wires in the outlet.
By using a voltage tester, you can determine if your outlet is properly grounded and if it is providing the right amount of electricity. Testing your outlet is important because faulty outlets can pose a serious safety hazard. For instance, if an outlet is not properly grounded, it can potentially cause electrical shock or even start a fire.
But don’t worry, testing your outlet is easy and can give you peace of mind. In just a few simple steps, you can make sure your outlets are functioning properly and keep your home and family safe. So, let’s dive into how to test an outlet with a voltage tester.
Gather Your Materials
If you’re having issues with your electrical outlets, one of the best ways to test for any problems is by using a voltage tester. Before you start, be sure to gather all the necessary materials. You’ll need a voltage tester, a screwdriver, and a pen and paper to take notes.
Make sure your voltage tester is working correctly by testing it on a working outlet. When you’re ready to test your outlet, use your screwdriver to remove the cover plate from the outlet. Make a note of which wires are connected to each terminal on the outlet.
Before touching any wires, turn off the power to the outlet by turning off the circuit breaker. Once you’ve confirmed that the power is off, use your voltage tester to test each wire. Don’t forget to take notes on your findings so that you can refer to them later.
By taking these simple steps, you can safely and effectively test your outlet and identify any potential problems.
Voltage Tester
When it comes to testing voltage, having the right equipment is essential. One of the most important tools in your arsenal is a voltage tester. To start, gather your materials.
You’ll need a voltage tester, which can be found at any hardware or home improvement store. Make sure to choose a tester that is appropriate for the level of voltage you plan to test. You’ll also want to have gloves and safety glasses on hand for protection.
Once you have all your materials, familiarize yourself with the tester’s instructions and safety precautions before use. Remember that safety should always come first when working with electricity. With the right tools and preparation, you’ll be able to test voltage with confidence and accuracy.
Electrical Tape
Electrical Tape If you’re looking to start a DIY electrical project, one essential tool to have in your arsenal is electrical tape. Not only is it great for insulating wires, but it can also be used to mark cables, label switch terminals, and even temporarily fix small holes in your equipment. But before you start, you’ll need to gather a few materials.
First, you’ll need your electrical tape of choice. There are many different types of electrical tape available, so be sure to choose the appropriate type for your project. You’ll also need a pair of wire cutters or scissors to help you cut the tape to the desired length.
Additionally, you might consider having a wire stripper and pliers on hand to help you strip and manipulate the wires you’ll be working with. Finally, having a marker nearby can be useful for labeling and keeping track of your cables. With these materials in hand, you’ll be ready to tackle your DIY electricity project with confidence, knowing that you have all the essential equipment you need to succeed.
Screwdriver
When it comes to handy tools, a screwdriver is a must-have in any household. But before you start your DIY project, make sure you gather all the necessary materials to make the job easier. First, consider the type of screwdriver you need.
There are different sizes and shapes, including flathead, Phillips, and Torx. Choose the appropriate one based on the type of screw you are working with. Next, prepare your screws.
Make sure you have the correct size and number of screws for the job. It’s also helpful to have a container to keep them organized and easily accessible. Finally, consider additional materials such as a magnetic wristband, pliers, and a flashlight for better visibility.
By gathering your materials beforehand, you can save time and avoid frustration during your project. So grab your screwdriver and get started on your DIY journey!
Prepare the Outlet
Testing an electrical outlet with a voltage tester is crucial to ensure the safety of your home. Before beginning the testing process, it is important to take certain precautions to prepare for the test. Firstly, you need to turn off the power supply to the outlet that you are going to test.
This can be done by flipping the breaker switch that controls the outlet or by unplugging the device that is currently in use. Once this is done, it is essential to visually inspect the outlet for any visible signs of damage such as cracks, burns, or loose wiring. If you notice any visible damage, it is best to hire a professional electrician to diagnose and fix the problem.
If there is no visible damage, you can move on to testing the outlet using a voltage tester. Remember, safety is key when dealing with electrical wiring, so it is always better to err on the side of caution.
Turn off Power
When it comes to electrical work, safety should always be your number one priority. Before you start messing around with outlets, it’s crucial to turn off the power to the specific area you’ll be working on. This might seem obvious, but it’s essential to double-check that the power is indeed off before beginning any work.
To prepare the outlet, you need to locate the circuit breaker and switch it off. If you’re not entirely sure which circuit breaker controls the outlet, it’s best to switch off the main power. This way, you’ll be sure that no electricity is flowing through the system while you’re working.
Remember, electricity can be deadly, so take no chances.
Remove Outlet Cover
Removing an outlet cover can seem like a daunting task, but it’s actually quite simple with the right preparation. First, ensure that there is no power running to the outlet by turning off the corresponding circuit breaker. Once the power is off, use a screwdriver to carefully remove the screws holding the outlet cover in place.
It’s important to take your time and avoid breaking the cover or damaging the surrounding wall. Once the screws are removed, gently pull the outlet cover away from the wall and set it aside. This will give you access to the outlet itself, where you can make any necessary repairs or updates.
By taking the time to properly prepare for this task, you can easily remove an outlet cover without any hassle or frustration.
Test with Voltage Tester
When preparing to test an outlet with a voltage tester, there are a few steps you should take to ensure you are doing it properly and safely. First, make sure to turn off any power to the outlet you are testing by switching off the breaker in your electrical panel. Once you have done this, use a screwdriver to remove the outlet cover, being careful not to touch any of the wires inside.
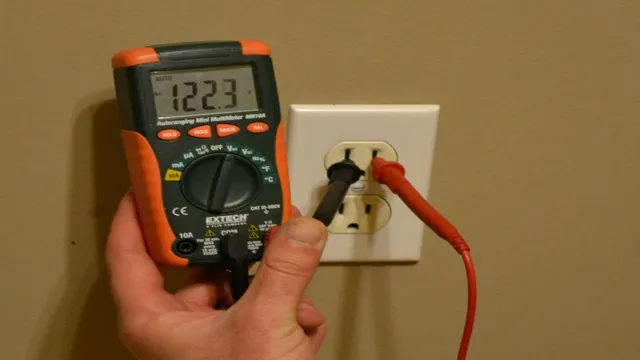
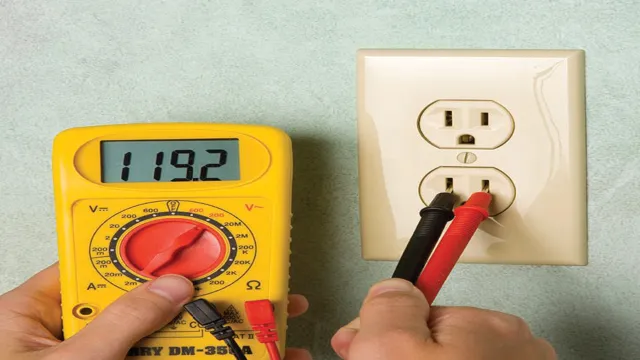
Then, use a voltage tester to check for any live electrical current by touching the tester’s leads to the outlet’s hot and neutral wiring. If the tester indicates that there is electricity present, do not proceed with any electrical work and contact a licensed electrician for assistance. By taking these precautions and using a voltage tester correctly, you can ensure your safety and the safety of your home’s electrical system.
Interpret the Results
Testing an outlet with a voltage tester might sound challenging, but it’s actually quite simple. First, you need to make sure that your voltage tester is functioning correctly. To do so, you can test it on a known live circuit or use a voltage source to ensure that it is working correctly.
Once you’ve established that the tester is working, you can proceed to test the outlet. Start by turning off the power supply to the outlet by switching off the circuit breaker or removing the fuse. Then, remove the outlet cover and use the voltage tester to test each wire.
If the tester indicates that there is voltage, it means that the wire is live and you should not touch it. If the tester does not show any voltage, then it is safe to work on the outlet. Once you’re done, switch the power supply back on, replace the outlet cover and test your outlets again to ensure that they’re fully functional.
Testing your outlets with a voltage tester is a straightforward process that requires minimal effort. Make sure to follow all necessary safety precautions to avoid any accidents.
Reading the Tester
When it comes to interpreting results from a tester, it’s important to understand what the numbers and data mean. First, look at the pass/fail rate for each test and consider if it falls within the expected range. If it doesn’t, it’s important to explore why.
Next, examine any trends or patterns in the data. Is there a particular test or area consistently showing failures? This could indicate a problem that needs to be addressed. It’s also important to consider the context in which the testing was done.
Were all variables controlled for? Were there any outside factors that could have impacted the results? By taking a thorough approach to interpreting the results, you can better understand the state of your product and identify areas for improvement. So, don’t just look at the numbers, understand what they mean and take action accordingly.
Common Results
When it comes to interpreting common results in your field, it’s important to take a step back and look at the big picture. Often, we can get bogged down in the details and lose sight of what the data is telling us overall. One key aspect to keep in mind is perplexity – the idea that results may seem contradictory or confusing at first glance.
This is actually quite common, and it’s important to dig deeper to understand what is really going on. Burstiness is another factor to consider, which refers to the idea that certain results may be skewed or influenced by rare events or outliers. Again, it’s important to take a closer look and try to identify any patterns or trends that may be influencing your results.
Ultimately, the goal of interpreting common results is to uncover insights and make informed decisions based on the data. By staying focused and analyzing your results carefully, you can gain a better understanding of your field and make progress towards your goals.
Conclusion
In conclusion, testing an outlet with a voltage tester is a simple and straightforward process that can save you from potential harm or damage. Just remember to turn off the power, insert the tester into the outlet, and look for any indications of voltage. And always remember, when it comes to electrical safety, it’s better to be a volt-detective than to be in shock!”
FAQs
What is a voltage tester and how does it work?
A voltage tester is a tool used to check if there is electricity flowing through a circuit. It works by detecting the presence of an electrical field around the wire or outlet being tested.
Can a voltage tester be used on any type of outlet?
No, not all voltage testers are compatible with every type of outlet. Make sure to check the specifications of your voltage tester to see which types of outlets it can safely test.
How do I test an outlet to see if it is properly grounded?
To test if an outlet is grounded, use a voltage tester and touch one lead to the hot wire (black) and the other lead to the ground wire (green). The tester should light up if the outlet is properly grounded.
Can a voltage tester be used to test for other electrical issues besides outlet problems?
Yes, a voltage tester can be used to detect electrical issues in wiring, circuits, and appliances.
How do I know if a voltage tester is calibrated correctly?
Check the user manual of the voltage tester to see if there are any recommended calibration procedures. Some voltage testers may require recalibration after extended use or if they have been dropped or damaged.
Is it safe to use a voltage tester on a live circuit?
Yes, as long as the voltage tester is designed for this purpose and you follow proper safety procedures. Always wear appropriate protective gear and follow the manufacturer’s instructions carefully.
What should I do if I discover an electrical issue while testing an outlet with a voltage tester?
If you find an electrical issue while testing an outlet, turn off the power to that outlet and call a licensed electrician to make any needed repairs.
