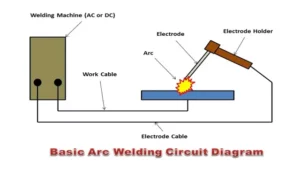
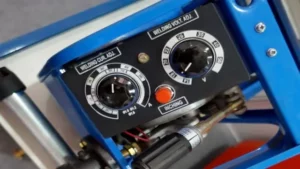
Setting up your welding machine for Shielded Metal Arc Welding (SMAW) is critical for creating strong, precise welds. Whether you’re a beginner or an experienced welder, properly setting up your equipment can make a significant difference in the final outcome of your project. In this blog, we’ll cover everything you need to know to set up your welding machine for SMAW, including selecting the proper amperage, electrode size, and electrode type.
We’ll also discuss safety precautions to consider before and during the welding process. By the end of this article, you’ll have all the information you need to ensure your welding machine is set up correctly and ready for a successful welding project. Get ready to dive into the world of SMAW with us!
Introduction to SMAW
Setting up a welding machine for shielded metal arc welding or SMAW may seem like a daunting task, especially for beginners. However, with proper guidance and a few steps to follow, it can be a quick and easy process. First, ensure that your welding machine has the right specifications for SMAW.
Check the manual or consult a professional to avoid any accidents or damages. Next, select the appropriate electrode and rod depending on the type of metal you will be welding. Ensure that the electrode and rod are clean and free from rust or dirt.
Then, set the amperage and welding polarity depending on the thickness of the metal and the type of joint you will be welding. Finally, check and adjust the electrode stickout, and you’re good to go! By following these simple steps, you’ll be able to set up your welding machine for SMAW like a pro!
Definition and applications of SMAW
SMAW, also known as Shielded Metal Arc Welding, is the process of joining two metals by melting them together using an electric arc. It is one of the most widely used welding methods in the industry due to its versatility and cost-effectiveness. SMAW can be used to weld steel, iron, and other metals, making it a popular choice for fabricating structures, machinery, and pipelines.
The process involves using a coated electrode, which melts as it makes contact with the metal, creating a filler material that binds the two metals together. SMAW is relatively easy to learn and can be done in a variety of environments, including in the field or in a workshop. Despite its ease of use, SMAW requires skill and attention to detail to produce high-quality welds.
With proper training and practice, however, SMAW can be a very effective welding technique for creating strong, durable joints.
Advantages of SMAW over other welding processes
SMAW, welding process Shielded Metal Arc Welding (SMAW) is a commonly used welding process that offers several advantages over other welding processes. SMAW is a manual process that uses a consumable electrode to join metals. The electrode is coated with a flux material that shields the weld pool from atmospheric contamination and provides protection against oxidation.
One of the significant advantages of SMAW is that it can be used in almost any position, making it suitable for welding in tight spaces and difficult-to-reach areas. Unlike other welding processes, SMAW requires minimal equipment, making it a cost-effective option for small welding jobs. Additionally, SMAW is a versatile process that can be used to weld a wide range of metals, including steel, cast iron, and copper alloys.
Its simplicity also makes it easy to learn and use for DIY enthusiasts or welding beginners. Overall, SMAW’s ability to weld in any position, its cost-effectiveness, versatility, and ease-of-use make it an attractive option for many welding applications.
Necessary equipment
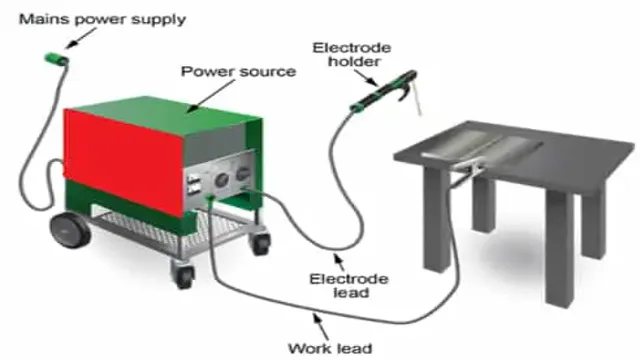
When setting up a welding machine for SMAW, it’s important to have the necessary equipment in place to ensure a smooth and safe operation. First and foremost, you’ll need a power source to supply the machine with electricity. This can be a generator, a wall outlet, or a dedicated power supply.
You’ll also need a welding machine that’s compatible with SMAW and capable of producing the required amperage and voltage. Additionally, you should have welding cables to connect the machine to the workpiece, as well as electrodes and chipping hammer and wire brush for the actual welding and cleanup process. Safety equipment such as welding gloves, a face shield, and a welding jacket should also be worn to protect yourself from the heat and sparks generated during the welding process.
With these essential tools in place, you can confidently set up your welding machine for SMAW and begin your welding project.
List of required equipment
If you’re planning an outdoor adventure, it’s important to have the necessary equipment on hand. The type of equipment you need will depend on the specific activity you’re planning. For example, if you’re going camping, you’ll need a tent, sleeping bag, and cooking supplies.
If you’re going on a hike, you’ll need appropriate footwear, a backpack, and a map. Other equipment that may be necessary includes a first aid kit, insect repellent, and sunscreen. It’s important to make a list of all the equipment you’ll need ahead of time to ensure you don’t forget anything.
By having all the necessary equipment, you’ll be able to fully enjoy your outdoor adventure without any unexpected surprises.
Welding machine specifications for SMAW
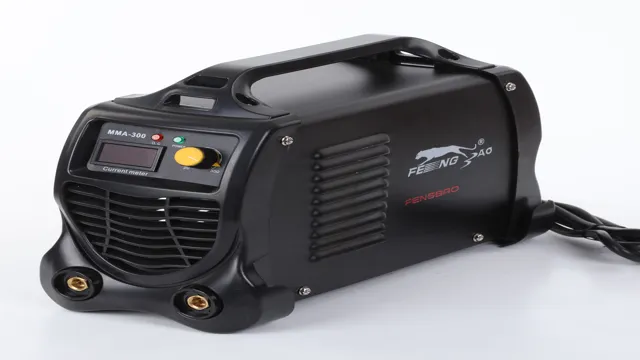
When it comes to SMAW welding, there are some essential pieces of equipment needed to get started. The most vital tool is, of course, the welding machine itself. The machine should have a stable and reliable power source that can accommodate the necessary amperage range for your work.
It is also important to consider the machine’s duty cycle, which will determine how much welding you can complete without the machine overheating. Additionally, SMAW welding requires electrode holders and ground clamps to hold the welding rod and transfer electrical currents. Proper safety gear such as gloves, helmets, and jackets are also crucial to protect the welder from potential harm.
All of these factors must be taken into account when selecting the right welding machine for the job at hand. For optimal performance, make sure to choose a machine that meets all of your specific welding needs.
Preparing the work area
When setting up your welding machine for SMAW, the first step is to prepare your work area. Start by clearing away any flammable materials or clutter that can cause a fire hazard. Ensure there’s enough space around your workspace to move freely, and if you’re working in an enclosed area, make sure it’s well-ventilated to prevent the accumulation of harmful fumes and gases.
Next, check if your welding machine is in good condition and inspect the cables and all the electrical connections. Ensure that the ground clamp is securely attached to your workpiece and that all your tools and materials are within reach. Finally, put on your protective gear, including your welding helmet, gloves, and long-sleeved clothing to protect your skin from both sparks and sunburn.
Remember, safety is paramount when using welding equipment, and taking the necessary precautions beforehand goes a long way in preventing accidents and injuries.
Clearing the work area
Preparing the work area begins with clearing up any clutter on the desk or table you’ll be working on. This step is essential to ensure that you have ample space to spread out and do your work comfortably. Start by throwing out any trash lying around, such as used tissues, empty coffee cups, or snack wrappers.
Once the table is cleared up, proceed to tidy up the rest of the area around it. Move any unnecessary objects off the table, such as decorative items, books, or files. This helps you keep your focus on the work at hand and avoid getting distracted by anything that could hinder your productivity.
After completing this step, you can then bring in the necessary tools and equipment required to finish your work efficiently. A neat and organized work area sets the tone for a productive and stress-free work experience.
Organizing materials and tools
When it comes to tackling a new DIY project, preparing the work area is crucial before diving in. Organizing materials and tools ahead of time not only saves you time in the long run but can also increase safety by reducing the risk of tripping or accidents. Before you start working, take a moment to clear the workspace of any clutter or hazards.
Set up a designated area for your tools and keep them easily accessible. Be sure to also gather all necessary materials and have them within reach. Having a clear and organized work area can make all the difference in the success of your project.
By prioritizing preparation and organization, you can set yourself up for a productive and stress-free DIY experience.
Setting up the welding machine
If you’re unfamiliar with welding, setting up a welding machine for Shielded Metal Arc Welding (SMAW) can seem daunting. However, with a little bit of practice, it’s quite simple. Start by selecting the appropriate electrode for the metal you’re welding.
The thickness of the material will also play a role in electrode selection. Next, set the amperage on your welding machine according to the electrode manufacturer’s recommendations. The amperage setting can also vary based on the thickness of the metal.
Check that your ground clamp is secure and properly connected to your workpiece. Make any necessary adjustments to ensure your workpiece is properly aligned and positioned for welding. Finally, put on your protective gear and start your arc.
With a little bit of practice and attention to detail, setting up your welding machine for SMAW will become second nature.
Plugging in the machine
When it comes to setting up your welding machine, one of the first steps is to plug it in. However, before you do that, there are a few things to keep in mind. Firstly, make sure that the machine is located in a well-ventilated area, as welding can produce fumes and gases that can be hazardous to your health.
Next, you’ll need to make sure that the power source you’re using for the machine is suitable for the machine’s voltage and amperage requirements. This information can usually be found in the machine’s user manual. Once you’ve confirmed that everything is in order, you can go ahead and plug the machine in.
It’s important to remember that electricity and welding can be dangerous, so it’s crucial to follow all safety precautions when setting up and operating your welding machine. By doing so, you can ensure that you get the best possible results from your welding projects while keeping yourself and those around you safe.
Selecting the appropriate electrode and polarity
When it comes to setting up a welding machine, selecting the appropriate electrode and polarity is imperative. The electrode is the metal that conducts electricity and melts during the welding process, and the polarity determines which direction the electrons flow. In general, the electrode should match the base metal being welded, and the polarity should be chosen based on the type of electrode being used.
For example, a DC reverse polarity is typically used for electrodes that produce a deep penetrating weld, while a DC straight polarity is better suited for electrodes with a shallow penetrating weld. It’s also important to consider the amperage settings on the welding machine to ensure the correct heat input and prevent damage to the weld. Taking the time to properly set up the welding machine will ensure a successful and high-quality weld.
Adjusting the amperage and arc length
When it comes to welding, setting up the welding machine is crucial to achieving a high-quality weld. The first step in setting up the machine is adjusting the amperage, which determines the strength of the weld. If the amperage is too high, the weld will be too hot and may penetrate through the material, creating a hole.
On the other hand, if the amperage is too low, the weld will be weak and may not penetrate through the material. It’s important to find the right balance, depending on the thickness and type of material being welded. The second important factor in setting up the welding machine is the arc length, which refers to the distance between the electrode and the material being welded.
If the arc length is too short, the electrode will touch the material, creating a short circuit and damaging the electrode. If the arc length is too long, the weld will be unstable and may create porosity or weak spots in the material. Again, finding the right balance is key to achieving a strong and durable weld.
Overall, adjusting the amperage and arc length of the welding machine is crucial to achieving a high-quality weld. It takes practice and experience to find the right balance, but with time and patience, anyone can become a skilled welder. Just remember to always prioritize safety and follow proper welding procedures to ensure a successful outcome.
Safety precautions
When setting up a welding machine for SMAW, it is important to prioritize safety. This means wearing proper protective gear, such as a welding helmet and gloves. Additionally, make sure to work in a well-ventilated area to avoid inhalation of harmful fumes.
Before beginning the welding process, inspect the machine for any damage or malfunction and ensure that all cables and connections are secure. It is also important to have a fire extinguisher nearby in case of emergencies. Once the machine is properly set up and all safety precautions have been taken, it’s time to get to work.
By prioritizing safety, you can ensure a smooth and successful welding process while keeping yourself and others protected from harm. Keep in mind that proper SMAW machine set-up should always include prioritizing safety measures.
Welding safety gear
Welding safety gear is essential for anyone working in the welding industry. When it comes to welding, safety should be your top priority. It requires a lot of heat and sparks, which can be very dangerous if you’re not adequately protected.
Welding accidents can cause serious burns, eye injuries, and respiratory issues. Hence, it’s vital to take safety precautions and wear the appropriate gear. The gear includes goggles, helmets, gloves, and jackets, among other things.
It would be best if you ensure you wear high-quality safety gear, and always check them before commencing any welding project. Welding safety gear is essential in shielding you from sparks, heat, and bright light that can harm your eyes. So, always wear the appropriate gear and be wary of the potential hazards to keep yourself safe.
Risk management and hazard assessment
When it comes to risk management and hazard assessment, safety should always be the top priority. In any industry or workplace, it is crucial to identify potential hazards and take the necessary precautions to prevent accidents and injuries. One of the most effective ways to promote safety is to implement regular training and education programs for employees.
By educating workers on safety protocols and procedures, they will have a better understanding of the potential risks associated with their job and will be better equipped to handle unexpected situations. Additionally, investing in proper equipment and tools can greatly reduce the risk of accidents. For example, using safety harnesses and helmets on construction sites or implementing ergonomic workstations in an office can greatly improve workplace safety.
Ultimately, by prioritizing safety and taking proactive measures to prevent hazards, employers can create a safer and healthier work environment for everyone.
Conclusion
Congratulations, you have successfully mastered the art of setting up a welding machine for SMAW. You are now equipped with the skills and knowledge to tackle any welding job that comes your way. Remember to always prioritize safety and never hesitate to ask for assistance if you’re unsure.
As the saying goes, “welding is like a dance, with sparks flying and metal twisting, but with practice and patience, you will become a master of this fiery art.” So, go out there and let your creativity flow, and let the sparks fly as you weld your way to success!”
FAQs
What is SMAD welding technique?
Shielded Metal Arc Welding (SMAW) is a welding process that uses a flux-coated electrode to form the weld.
What are the factors to consider when setting up a welding machine for SMAW?
The factors that need to be taken into account when setting up a welding machine for SMAW include electrode size, type of base metal, welding amperage, and electrode manipulation techniques.
What are the commonly used electrodes in SMAW?
The commonly used electrodes in SMAW include E6010, E6011, E6012, E6013, E7014, E7018, and E7024.
How do I choose the right electrode for SMAW?
The choice of electrode for SMAW depends on the type of base metal, welding position, and desired weld strength.
What are the safety precautions that need to be taken during SMAW?
The safety precautions that need to be taken during SMAW include wearing protective gear, maintaining a safe distance from the arc, and ensuring proper ventilation in the workspace.
How do I maintain the welding machine for SMAW?
The welding machine for SMAW should be regularly inspected, and any worn-out parts must be replaced. The electrode holders and cables must be kept clean and free from damage.
What are the common defects in SMAW, and how do I avoid them?
The common defects in SMAW include porosity, undercutting, and slag inclusion. These defects can be avoided by maintaining proper electrode manipulation techniques, selecting the appropriate electrode for the base metal, and ensuring that the base metal is clean and free from rust or oil.
