When it comes to stick welding, setting up the machine can be a daunting task for beginners. The process may seem confusing, but with a few simple steps, you can have your machine up and running in no time. Stick welding is a popular welding method used for many applications, including construction, maintenance, and repair work.
It’s a great option for welding thicker materials and can be done both indoors and outdoors. In this blog, we’ll guide you through the process of setting up your stick welding machine, from choosing the right equipment to connecting the cables and adjusting the settings. So, whether you’re a welding enthusiast or a novice, let’s dive in and get your welding machine up and running!
Step 1: Gather Necessary Equipment
To set up a stick welding machine, the first step is to gather all of the necessary equipment. This includes the welding machine itself, welding rods, welding gloves, a welding helmet, clamps, and a wire brush for cleaning the material you’ll be welding. Make sure to choose the right welding rods for the project you will be working on, as different rods are designed for different types of metal.
Traditional stick welding machines run off of a direct current power source, so be sure to have the appropriate extension cord on hand. Also, make sure to properly ground the welding machine to prevent electric shock and fire hazards. By gathering all of the necessary equipment before beginning the welding process, you will ensure that the work will be completed safely and effectively.
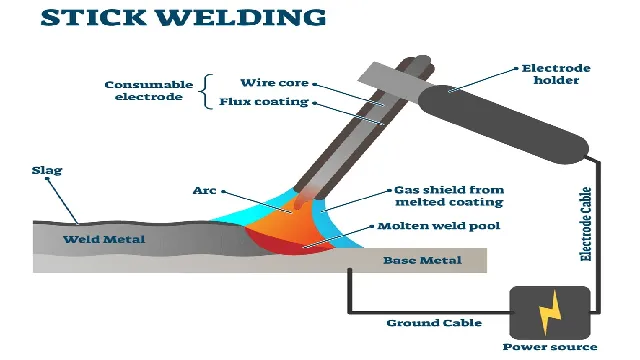
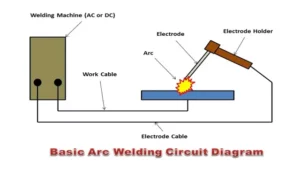
Examples: Welding machine, welding rod, electrode holder, ground clamp, protective gear.
When it comes to welding, having the right equipment is essential. To ensure a successful and safe welding process, it’s important to gather all the necessary tools and protective gear before starting. The primary equipment needed for welding includes a welding machine, a welding rod, electrode holder, ground clamp, and protective gear like gloves, helmet, and clothing.
These tools play an important role in the welding process, and each requires proper care and usage. The welding machine performs as the primary power source and is the essential tool for welding. The welding rod is used to melt and join the metal while the electrode holder holds the rod in place.
The ground clamp completes the electrical circuit, making it possible for the electrical current to flow through the metal, completing the welding process. Wearing protective gear is crucial for every welder, as it helps to prevent burns and eye injuries from the intense light produced during the welding process. By gathering all the necessary equipment before starting, the welding process can be completed efficiently, safely, and with great results.
Step 2: Set Up Welding Machine
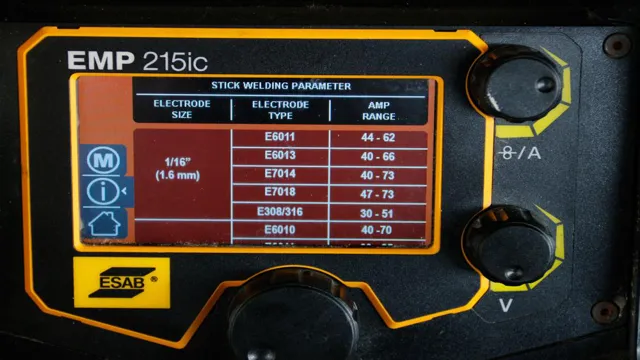
Setting up a stick welding machine can seem like a daunting task at first, but it’s actually quite simple. First, you need to make sure you have all the necessary safety equipment such as gloves, a welding helmet, and protective clothing. Then, you should check the input voltage and make sure you have the correct amperage for the electrode you’ll be using.
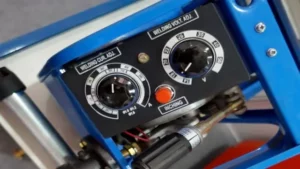
Once you’ve done this, you’ll need to connect the ground clamp to a clean, bare metal surface and insert the electrode into the electrode holder. Turn on the welding machine and adjust the amperage according to the manufacturer’s specifications for the electrode you’re using. And voila! You’re ready to start welding.
It’s important to remember to always follow safety guidelines and take precautions when working with welding machines to avoid injury or damage to your equipment. With a bit of practice and patience, you’ll become a pro in no time.
Plug in machine, turn on, adjust settings according to project.
Now that you have assessed the materials and chosen the welding method, it’s time to set up your welding machine. This step may vary based on the type of welding machine you are using, but the general instructions remain the same. First, plug in the machine and turn it on.
Once it’s powered up, you will need to adjust the settings to match the requirements of your project. This includes setting the amperage, voltage, wire speed, and gas flow rate. You can find these requirements in your welding manual or by consulting with a welding expert.
Making sure your machine is set up correctly is essential to achieving clean and successful welds. Skipping over this step could lead to poor weld quality, making the welding process more difficult and time-consuming. Take the time to ensure your machine is set up correctly, and your welding project will be off to a great start.
Step 3: Prepare Materials
When it comes to stick welding, preparing the materials is just as crucial as setting up your welding machine. Before you begin welding, make sure your work area is clean and free of any debris or flammable materials. Then, prepare your welding rods according to the manufacturer’s instructions, ensuring they are properly stored in a dry, cool area.
Once you’ve got your rods ready to go, you’ll want to make sure your metal is clean and properly prepared as well. This may involve grinding, wire brushing, or using a chemical cleaner to ensure a clean surface for welding. Taking the time to properly prepare your materials can make all the difference when it comes to the quality of your welds and the overall success of your welding project.
So, don’t rush through this step and make sure everything is in order before you begin!
Clean and prepare the metal you plan to weld.
Before you start welding, it is crucial to properly prepare the metal you plan to join. This involves cleaning off any oil, grease, or rust using a wire brush or grinder. The presence of dirt, debris, or corrosion may compromise the quality and strength of the weld.
For instance, impurities can lead to porosity, which weakens the bond between the metals. After cleaning, you should also make sure that the surfaces are level and smooth. Any gaps or irregularities can result in weak spots or air pockets.
Using a clamp or vice can help keep the pieces in place and ensure that they fit together snugly. In case you’re working with different metals, it is essential to clean each substrate separately and avoid touching them with bare hands to prevent contamination. In summary, properly preparing the material is an essential step in achieving a successful weld.
By taking the time to clean and level the surfaces, you’ll have a better chance of creating a strong and durable joint that can withstand the test of time.
Step 4: Insert the Electrode
As you move on to the final step of setting up your stick welding machine, it’s time to insert the electrode into the electrode holder. Before you do so, make sure to clamp the workpiece securely to the welding table. Check to ensure that the electrode you’ve selected is compatible with the metal you’re welding and examine the electrode tip for damage or defects that could affect the welding process.
Next, insert the electrode lead into the holder and tighten the set screw to hold it firmly in place. You’re now ready to start welding. As you weld, be sure to maintain a consistent angle and distance between the electrode and the workpiece, and always keep the electrode tip within the welding arc for optimal results.
By following these steps, you’ll be able to set up and use your stick welding machine to achieve professional-quality welds on a variety of metals.
Select welding rod appropriate for the project.
When it comes to welding, using the appropriate electrode is crucial for a successful project. The welding rod determines the type of metal being welded, the current needed and the type of joint required. Step 4 involves inserting the electrode into the welding gun.
It’s essential to ensure that the electrode is positioned correctly and securely in the gun to avoid any misfiring or accidents. Once the electrode is inserted into the gun, the welder can start the welding process. A good analogy for the importance of selecting the appropriate welding rod would be choosing the correct tool for a specific task.
You wouldn’t use a hammer when you need a screwdriver, and the same goes for welding rods. It’s essential to choose the appropriate one for the specific project to ensure successful results. In conclusion, selecting the right welding rod is an essential step in the welding process, and inserting it correctly is crucial for a safe and effective project.
Insert electrode into electrode holder.
In step 4 of the electrode assembly process, it’s time to insert the electrode into the electrode holder. This step is crucial to ensure that your electrode is securely held in place while in use. To begin, make sure your electrode holder is open and ready to receive the electrode.
Then, carefully insert the electrode into the holder, making sure to line up the grooves on the electrode with the corresponding slots in the holder. It’s important to be gentle during this process to avoid damaging either the electrode or the holder. Once the electrode is fully inserted, give it a slight twist to lock it in place.
You should now have a fully assembled electrode ready to be used for whatever electrical project you have in mind. With this step complete, you’re one step closer to a successful project.
Step 5: Attach Ground Clamp
One of the final steps in setting up a stick welding machine is to attach the ground clamp. The ground clamp is an essential component that connects the welding machine to the metal being worked on and completes the electrical circuit. Without a proper ground, welding can be dangerous and ineffective.
To attach the ground clamp, first, ensure that the welding machine is turned off and unplugged. Then, locate the ground cable and clamp, typically a black or green wire with a clamp at one end. Connect the clamp securely to the workpiece where you plan to weld.
Make sure the connection is tight and that the surface is clean and free of any paint, rust, or other debris. Once the ground clamp is in place, you can turn on the welding machine and begin the welding process. Remember to always wear protective gear and take appropriate safety measures to prevent accidents or injuries.
With the ground clamp properly attached, you’ll be ready to tackle your welding projects with confidence and precision.
Attach clamp to metal you plan to weld.
Once you’ve got your welding tools and safety gear ready, you’re ready to take the next step in welding: attaching the ground clamp. This small part may seem insignificant, but it plays a crucial role in the success of your welding project. The ground clamp is responsible for creating a circuit between the welding machine and the metal object you’re welding, ensuring a smooth, uninterrupted flow of electricity.
Before attaching the clamp, make sure the metal you plan to weld is clean and free of any dirt or debris. Once you’ve found a suitable spot to connect the clamp, ensure it’s tightly secured to the metal surface to avoid any potential safety hazards. Make sure to keep the clamp as close to the welding area as possible for optimal performance.
By following these simple steps, you’ll be well on your way to a successful welding project.
Step 6: Welding Technique
Now that you have set up your stick welding machine, it’s vital to understand the proper welding technique. One of the most crucial aspects of welding is maintaining a steady and consistent pace. It’s essential to keep the welding rod at a consistent distance from the workpiece and maintain a steady speed to ensure consistency and a uniform bead.
Additionally, make sure that you aren’t letting the electrode stick to the metal, causing splatter or an uneven weld. This can be avoided by holding the electrode at the proper angle and using a consistent motion. Remember to keep the arc length short, so the electrode doesn’t burn down too quickly, causing inconsistencies in the weld bead.
By following all these tips, you can ensure a high-quality weld that will meet your needs.
Hold electrode at a slight angle and start welding in a circular motion.
Welding is a skilled trade that requires precision and care. When it comes to welding techniques, holding the electrode at a slight angle and starting the welding in a circular motion is crucial. This technique ensures that the weld is consistent and strong.
By holding the electrode at an angle, it allows the weld to penetrate deeper, creating a stronger bond. The circular motion helps to spread the weld across the entire joint evenly. It is essential to maintain a consistent speed and pressure while welding to avoid any gaps or weak spots.
Think of it like drawing a circle with a pen. If you move the pen too fast or too slow, the circle won’t be round. The same applies to welding.
If the speed and pressure aren’t consistent, the weld won’t be uniform, resulting in a weaker joint. So, it’s vital to take your time and practice until you can perfect this technique. Remember, with patience, practice, and the right technique, you can achieve a strong and durable weld.
Continuously move to avoid overheating of the metal.
When it comes to welding, technique is everything. One crucial step to take into consideration is continuously moving to avoid overheating of the metal. This is especially important when welding thin materials where the heat affected zone can become a problem.
To accomplish this, you’ll want to maintain a steady pace as you weld, keeping the torch or electrode moving in a circular or zigzag pattern. If you stay in one spot for too long, the metal can overheat and warp, causing unsightly and potentially dangerous imperfections in the weld. By keeping things moving, you’ll ensure that the heat is distributed evenly and that the metal will hold up to stress and strain.
Remember, practice makes perfect, so don’t be afraid to experiment with different techniques until you find what works best for you. With perseverance and a commitment to good welding practices, you’ll be well on your way to becoming a skilled welder.
Step 7: Safety Precautions
When setting up a stick welding machine, it’s important to prioritize safety precautions. First and foremost, always wear the appropriate personal protective equipment, such as a welding mask, gloves, and protective clothing. Before starting any welding project, thoroughly check your machine for any damages or malfunctions that may pose a safety risk.
Additionally, make sure your workspace is free of any flammable materials or hazards, and that your machine is set up in a well-ventilated area to prevent inhalation of harmful fumes. Keep a fire extinguisher nearby in case of emergencies. Finally, it’s essential to understand the proper techniques for stick welding to avoid injuries or accidents.
By taking these safety precautions, you can ensure a successful welding project without risking harm to yourself or others.
Wear appropriate protective gear.
When it comes to any activity that involves physical movement or even the slightest risk of injury, it’s always better to be safe than sorry. That’s why one of the most important safety precautions you should always take is wearing appropriate protective gear. This can include helmets, pads, gloves, goggles, and more depending on the activity you’re participating in.
Not only does wearing protective gear significantly reduce the risk of injury, but it can also give you the confidence to push yourself to new limits. Think of how a knight wouldn’t go into battle without his armor – you shouldn’t engage in any potentially hazardous activity without your gear either. So, whether you’re riding a bike, playing a contact sport, or working with machinery, make sure you’re properly dressed for the occasion.
Remember – safety first!
Ensure proper ventilation.
When it comes to ensuring safety while using power tools, proper ventilation is often overlooked. However, it’s an essential precaution that should not be ignored. Failing to do so can lead to a buildup of fumes and dust particles, which can be harmful to your health.
You should always check the ventilation in your workspace before starting any project. If there’s inadequate ventilation, it’s best to open a window or door and use a fan to circulate the air. You can also wear a mask to prevent inhaling harmful substances.
When you neglect to take these safety measures, you put yourself at risk of developing respiratory problems that could be serious in the long run. So, make sure you prioritize proper ventilation when working with power tools.
Keep flammable materials away from the welding area.
When it comes to welding, safety should always come first. One important precaution to take is to keep flammable materials away from the welding area. This includes anything from paper and cardboard to gasoline and cleaning solvents.
Not only can these materials ignite easily, but they can also release harmful fumes when exposed to high temperatures. It’s important to store these materials in a separate, designated area away from the welding site and to never leave them unattended in the same room. In addition, make sure that everyone working in the area is aware of the potential hazards of these materials and knows how to prevent accidents.
By taking these safety precautions, you can minimize the risk of fire and injury during a welding project.
Step 8: Finishing Up
Once you’ve finished adjusting your polarity, amperage settings, and electrode selection, it’s time to start welding with your stick welding machine. Make sure your workpiece is clean and free of any debris, rust, or oil. Once you’re ready to begin welding, hold your electrode at about a 15-degree angle to the workpiece and make contact with the metal.
Then simply drag the electrode along the surface of the workpiece while maintaining a steady arc and speed. Remember to keep a short arc distance between the electrode and the workpiece to ensure a smooth, consistent weld. Finally, when you’re done welding, be sure to shut off your machine and let it cool down before storing it away.
By following these simple steps on how to set up stick welding machine, you’ll be well on your way to becoming a successful welder.
Allow project to cool before handling.
When it comes to finishing up your project, it’s important to remember to allow it to cool before handling it. This step is especially important if you’ve been working with heat sources like ovens or hot glue guns. Allowing your project to cool for a few minutes can prevent burns and damage to the final product.
It can be tempting to rush through the process, especially if you’re excited about your creation, but taking the time to let it cool will ensure that your hard work isn’t ruined. So, take a deep breath, step back, and let your project cool before handling it. Your fingers (and your project!) will thank you.
Clean up equipment and store properly.
“Clean up equipment and store properly” is the final step in the process of cleaning your workspace. Once you have finished cleaning your equipment, it is essential to ensure that everything is stored properly. This means that you need to make sure that all equipment is stored in a dry and safe place.
The last thing you want is for your equipment to get damaged due to moisture or other elements lurking around. When storing your equipment, it is essential to make sure that it is organized and easy to access when you need it next time. This will save you time and effort the next time you are gearing up for a project.
Additionally, make sure you clean any leftover cleaning materials, dispose of chemicals safely, and keep everything where it needs to be so that it’s easy to find when you need it again. Remember, keeping your workspace organized and clean will not only improve productivity but prevent accidents.
Conclusion
Setting up a stick welding machine can be a daunting task, but it doesn’t have to zap your energy. With a few simple steps, you can strike up a welding arc like a pro. Remember, keep the cables tidy, choose the right electrode, set your amperage, and adjust your arc length.
Always practice proper safety precautions and you’ll be on your way to welding success in no time. So don’t get stuck in the dark ages of welding, light up your world with stick welding!”
FAQs
What are the essential components required to set up a stick welding machine?
The essential components required to set up a stick welding machine are a welding machine, welding electrode, ground clamp and cable, electrode holder and cable, and welding helmet or shield.
How do you choose the right amperage for stick welding?
To choose the right amperage for stick welding, you should refer to the welding machine manual, consider the type and thickness of the base metal, and the diameter of the electrode.
What is the proper way to connect the welding cables to the stick welding machine?
The proper way to connect the welding cables to the stick welding machine is to connect the ground clamp cable to the negative terminal and the electrode holder cable to the positive terminal.
Why is it essential to maintain a proper arc length during stick welding?
It is essential to maintain a proper arc length during stick welding to ensure accurate and consistent welds, prevent overheating or burn-through, and reduce the risk of arc strikes.
How do you prevent spatter and slag buildup when stick welding?
To prevent spatter and slag buildup when stick welding, you can adjust the amperage and electrode angle, use a proper technique, and clean the base metal thoroughly before welding.
What type of base metals can be welded using a stick welding machine?
A stick welding machine can be used to weld a wide range of base metals, including mild steel, cast iron, stainless steel, and aluminum.
What are the safety precautions to follow when using a stick welding machine?
The safety precautions to follow when using a stick welding machine are to wear protective gear, work in a well-ventilated area, avoid touching the electrode with bare skin, and never weld near flammable materials or gas cylinders.
