Ready to take on a new welding project? While the process may seem intimidating, you can be well on your way to mastering SMAW welding with the right equipment and knowledge. Setting up your SMAW welding machine is the first step to creating strong and reliable welds. Whether you’re a seasoned welder or a beginner, setting up your welding machine properly ensures that you get the best results possible.
In this blog, we’ll provide a comprehensive guide on how to set up your SMAW welding machine, covering everything from understanding the machine’s parts to choosing the right amperage for your specific project. So, let’s get started and make sure you’re prepared to tackle your next welding project with confidence!
Check the Power Supply
One of the essential steps in setting up an SMAW welding machine is to check the power supply. It’s important to ensure that the welding machine is receiving the appropriate voltage that it needs to function properly. You should check the voltage being supplied to your machine by looking at the user manual or label on the machine itself.
Make sure that the voltage of the outlet is the same as what your welding machine requires. You can also use a multimeter to check the voltage. In case the voltage is not appropriate, you might have to use a different power outlet or upgrade your electrical system.
Ensuring that your SMAW welding machine receives the correct voltage is crucial to getting your welding job done in a safe and efficient manner.
Make sure the welding machine is unplugged.
When working with a welding machine, it’s critical to check the power supply before starting any work. One of the first things you’ll need to do is make sure the welding machine is unplugged. This will help ensure your safety, as well as the safety of anyone else nearby.
Once you’ve checked that the machine is unplugged, you’ll want to check the power supply to make sure it’s functioning properly. This means checking that the voltage and current are appropriate for the job at hand, and that the machine is grounded properly. If you’re not sure how to check the power supply, it’s always best to consult an expert before proceeding.
By taking these steps to ensure that the power supply is working correctly, you’ll be able to work with your welding machine safely and efficiently, without any unnecessary risks or accidents.
Check the power supply voltage matches the rating on your machine.
When it comes to using electrical appliances, it’s always important to ensure that the power supply is compatible with the device. This is particularly important for machines that require high voltage to function effectively. Before you start using any machine, always check the power supply voltage matches the rating specified on your device.
Using the wrong voltage can not only damage your machine but also pose a significant safety risk. For instance, if your machine is designed to operate at 220V, a 110V power supply could damage your machine’s internal components, cause overheating, and potentially result in a fire or electrical shock. In addition to checking the voltage rating, always ensure that the power plug is correctly grounded.
By taking this simple precautionary measure, you can ensure that your machine performs optimally and extends its lifespan.
Set the Welding Current
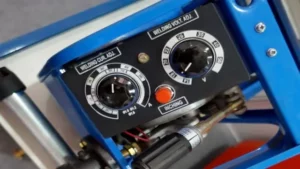
When setting up a SMAW welding machine, one crucial step is to adjust the welding current. This is important because the current influences the quality of the weld and affects the overall durability of the finished product. To set the welding current, you should start with the recommended settings on the electrode packaging.
Then, you can adjust the current based on the thickness of the material you’re welding. Thicker metals require higher currents, while thinner metals need lower currents. It’s essential to note that using the wrong current setting can lead to poor quality welds, which can be costly to fix later on.
So, take the time to adjust the welding current correctly, and you’ll enjoy a strong, clean, and durable weld.
Refer to the manufacturer’s manual for recommended settings.
When it comes to welding, it’s crucial to set the welding current at the recommended levels. This will help ensure that your welding process is efficient and that you’ll achieve strong welds. To achieve optimal settings, I recommend referring to the manufacturer’s manual.
It provides recommended settings based on the material and thickness you’re working with, as well as the welding process you’ll be using. The recommended settings will determine how much current you’ll need to generate the necessary heat to create good welds. Communicating with other welders can also help you gain insights into recommended settings based on their unique experiences.
It’s essential to remember that different materials and welding processes will require different welding currents. Hence, it’s essential to understand the proper settings for each requirement to avoid sub-optimal performance. If you’re unsure about the correct settings, it’s always best to err on the side of caution and consult an expert.
Achieving the right welding current is a critical factor that will determine the success of your project. So ensure you set it at the recommended levels to achieve optimal results.
Select the appropriate welding current for the metal thickness.
When it comes to welding, selecting the appropriate welding current for the metal thickness is crucial in achieving a high-quality weld. The welding current refers to the amount of electricity used during the welding process, and it directly affects the heat input and penetration into the metal. Getting the right welding current allows the welder to avoid undesirable outcomes, such as poor-quality welds, weak bonds, or even welding defects.
To set the welding current, you need to determine the metal thickness based on the welding specifications. If the metal thickness is too thin, using too much current could lead to burn-through or distortion. On the other hand, if the metal is too thick, using a low welding current could result in incomplete penetration and a weaker bond.
Thus, it’s essential to match the appropriate welding current for the metal thickness to achieve the desired quality and strength of the weld. The welding current also affects the welding speed and the amount of filler metal needed. Higher welding currents allow for faster welding speeds, reducing the overall welding time, but they often require more filler metal to fill the gap.
Conversely, lower welding currents typically involve slower welding rates but can reduce the amount of filler metal required. In summary, matching the appropriate welding current to the metal thickness is crucial for achieving high-quality welds. By following welding specifications and guidelines, welders can avoid welding defects, poor-quality welds, and weak bonds while also optimizing the welding speed and filler metal usage.
Insert Electrode
When it comes to setting up a SMAW welding machine, it’s important to take your time and follow a few key steps to ensure everything is done properly. One of the first things you’ll need to do is insert the electrode into the holder or clamp, which is typically located on the welding torch. Make sure the electrode is straight and secure, and that it’s the correct type for the project you’re working on.
Next, you’ll need to adjust the current and amperage settings on the welding machine based on the thickness of the metal you’re welding. It’s important to pay close attention to these settings, as using the wrong settings could result in a poor weld or even damage to your welding equipment. Overall, setting up a SMAW welding machine requires attention to detail and a careful approach, but once you have everything in place, you’ll be ready to create high-quality welds with ease.
Loosen the electrode clamp and insert the electrode.
Inserting an electrode may seem like a daunting task, but it’s actually quite simple. First, you’ll need to loosen the electrode clamp on your machine. Once it’s loosened, simply insert the electrode into the designated slot.
Be sure to check your machine’s manual to ensure you’re inserting the electrode correctly. The electrode should fit snugly in the clamp, but not too tight. It’s important to note that electrodes come in different sizes and shapes, so be sure to select the one that’s right for your machine and welding project.
Additionally, be sure to check the condition of the electrode before inserting it. Any signs of damage, wear, or tear could affect the quality of your weld, so it’s best to replace it with a new one. Inserting an electrode is a crucial step in the welding process, as it’s what creates the arc that melts the base metals together.
Without a properly inserted electrode, your weld won’t be strong or durable. So take your time, make sure you’re using the right electrode, and insert it correctly to ensure a successful weld. Happy welding!
Tighten the clamp to secure the electrode.
Insert Electrode When it comes to welding, one of the most important aspects is the proper insertion of electrodes, and it’s essential to follow the instructions carefully. Begin by selecting the appropriate electrode type and size for your welding project. Then, ensure that the electrode holder is in good condition and properly positioned.
It’s crucial to properly secure the electrode within the holder, using a tightener clamp. If the electrode is not seated correctly, it can cause welding arc instability and mess up the welding process. Next, insert the electrode into the welding gun or holder, with the electrode’s tip pointing towards the weld.
When inserting the electrode, ensure that the electrode’s tip is clean and free from any debris or contamination. You can use a wire brush or sandpaper to clean the electrode if it appears dirty. Once the electrode is in the holder or gun, tighten the clamp to secure the electrode firmly.
Overall, welding is a precise process that requires particular attention to different variables involved. One of these is the insertion of the electrode, which must be done promptly and correctly. So, take the time to prepare and insert the electrode correctly, and you can achieve high-quality welding results every time.
Connect Ground Cable
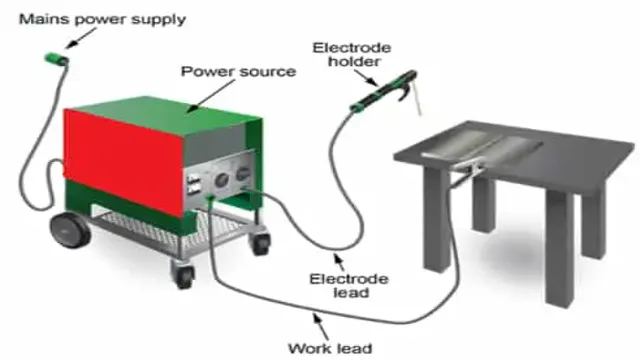
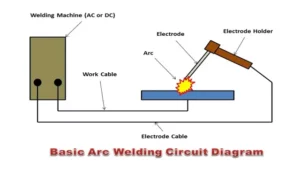
If you’re new to SMAW welding, you might be wondering how to set up your welding machine properly. One of the first and most crucial steps is to connect the ground cable. The ground cable acts as an electrical conductor between the welding machine and the metal you’re welding.
Without a grounded cable, you risk damaging your equipment or even harming yourself. To connect the ground cable, start by finding the grounding clamp on your welding machine. Attach one end of the ground cable to this clamp and secure it tightly.
The other end of the ground cable should be connected to the part of the metal you’ll be welding. Make sure the connection is tight and secure to ensure a safe and effective weld. Don’t forget to test the connection before starting your work to ensure that everything is grounded properly.
Setting up your SMAW welding machine requires attention to detail, but once you understand the basics, it becomes much easier to work confidently and safely.
Connect the ground cable to the workpiece.
When using welding machines, connecting the ground cable to the workpiece is essential for a safe and effective welding process. The ground cable provides a path for the electric current to flow, completing the circuit and allowing the welding process to take place. Without the ground cable properly connected, you risk electrocution and other hazards.
To connect the ground cable, you will first need to identify the ground clamp, which is typically attached to the welding machine. Once you have located the ground clamp, attach it securely to the workpiece you will be welding. It is important to make sure that the clamp is tightly secured to ensure a good electrical connection.
Before starting the welding process, give the clamp a firm tug to make sure it won’t become dislodged during use. By properly connecting the ground cable, you can ensure a safe and productive welding experience.
Make sure the connection is secure.
When working with electrical systems, it’s important to always connect the ground cable to ensure a secure connection. This simple step can provide protection against electrical shock or fire. The ground cable acts as a safety net by providing a direct path for any stray current to flow safely through the earth, rather than potentially harming you or damaging the equipment.
Just like how a well-placed safety net can make all the difference during a high-wire act, the ground cable can give you peace of mind when working with electricity. Don’t forget this important step, connect the ground cable and stay safe!
Safety Precautions
When it comes to setting up a SMAW welding machine, safety should always be a top concern. Before anything else, ensure that you are wearing the appropriate personal protective equipment (PPE) such as gloves, safety glasses, and a welding helmet. Additionally, make sure that your workspace is clear of any flammable materials, and keep a fire extinguisher nearby in case of emergency.
Once your safety measures are in place, you can begin setting up your machine by first selecting the appropriate electrode polarity for the material you will be welding. Consult your welding machine manual or a welding expert if you are unsure of which polarity to use. Next, adjust the amperage settings according to the electrode size and material thickness.
Finally, test the machine before beginning to weld to ensure it is functioning properly. By following these steps and prioritizing safety, you can set up your SMAW welding machine with confidence and get to work on your project.
Wear proper welding gear, including a helmet, gloves, and apron.
Welding is a process that requires safety precautions to ensure that those involved are protected from burns, fire, and other hazards. As a welder, one of the first things you need to do is wear proper welding gear. A helmet is essential to protect your eyes, face, and head from the brightness, sparks, and heat generated by welding.
It should have a shade number that suits the welding process you are using. Gloves also play a vital role in welding. They protect your hands from heat, sparks, and electric shock.
They should be made of flame-resistant material and provide a good grip. Finally, an apron comes in handy to protect your clothes from sparks and dirt. It should be made of fire-resistant material and cover your chest, legs, and feet.
By wearing the appropriate welding gear, you can work confidently, knowing that you are well protected.
Work in a well-ventilated area.
When working on a project, it’s essential to take safety precautions seriously. One of the most important things you can do is work in a well-ventilated area. That means opening windows, turning on fans, and even wearing a mask if necessary.
Why is this so important? Well, when you’re working with paints, chemicals, or any other substances that emit fumes, you need to make sure that you’re not breathing them in. Otherwise, you could face serious health hazards like respiratory problems or dizziness. Plus, a well-ventilated area helps to prevent the accumulation of flammable vapors, which can cause explosions or fires.
So, before you start any project, take a moment to assess your workspace and make sure it’s properly ventilated. Your health and safety depend on it.
Do not touch the electrode or metal without proper protection.
When working with electrodes or metal, safety precautions should always be taken to avoid any potential harm or injury. One of the most important things to remember is to never touch the electrode or metal without proper protection. This means wearing gloves, goggles, and other safety gear as needed to prevent direct contact with the surface.
A simple error or slip-up can lead to burns, shocks, or other serious injuries, so it’s crucial to remain vigilant and careful at all times. Additionally, it’s important to have a clear understanding of the specific hazards associated with the materials you’re working with, and to take proactive measures to minimize any risks. By following these guidelines, you can ensure that you’re always working in a safe and secure environment, and that you’re doing everything possible to avoid any accidents or injuries.
Conclusion
In conclusion, setting up a SMAW welding machine can seem daunting at first, but with a few simple steps and some practice, you’ll be able to strike an arc and lay down a perfect bead in no time. Just remember to take your time, wear your safety gear, and always be prepared for the unexpected. With a little bit of dedication and a lot of sparks, you’ll be welding like a pro in no time.
So don’t be afraid to get your hands dirty and jump in, because when it comes to welding, the only thing hotter than the metal is your passion for creating something amazing!”
FAQs
What are the basic components of a SMAW welding machine?
The basic components of a SMAW welding machine include the electrode holder, ground clamp, welding cables, power source, and the electrode.
What factors should I consider when selecting a SMAW welding machine?
The factors to consider when selecting a SMAW welding machine include amperage range, input power supply, portability, duty cycle, and cost.
How should I maintain my SMAW welding machine to ensure its longevity?
Regular maintenance is key to ensuring the longevity of your SMAW welding machine. This includes inspecting and replacing worn out parts and cleaning the machine on a regular basis.
What are some common problems that can occur when using a SMAW welding machine?
Common problems that can occur when using a SMAW welding machine include electrode sticking, poor weld quality, and overheating.
How can I troubleshoot problems with my SMAW welding machine?
To troubleshoot problems with your SMAW welding machine, start by checking the power supply, inspecting the electrode holder and ground clamp, and adjusting the amperage settings.
Can I use a SMAW welding machine for welding different types of metals?
Yes, SMAW welding machines can be used to weld different types of metals, including steel, cast iron, and stainless steel.
How can I ensure the safety of myself and others when using a SMAW welding machine?
To ensure safety when using a SMAW welding machine, wear protective gear, work in a well-ventilated area, and follow proper welding techniques to prevent burns and electrocution.
