If you’re new to welding, or even if you’re experienced, setting up your MIG welding machine can be a daunting task. But don’t worry, it doesn’t have to be complicated. In fact, with a little bit of knowledge and some basic steps, you can easily get your MIG welder up and running in no time.
First, it’s important to understand what equipment you’ll need. Along with your MIG welder, you’ll need a welding gun, a gas cylinder, a regulator, and a ground clamp. Additionally, you’ll need to choose the appropriate wire for your project and make sure you have the correct nozzle installed on your gun.
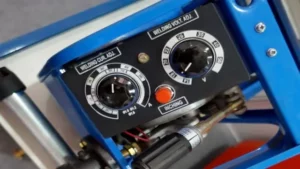
Once you have your equipment set up, it’s time to adjust your settings. Depending on the thickness and type of metal you’ll be welding, you’ll need to adjust your wire speed and voltage accordingly. It’s important to start with a lower setting and test welds on scrap metal before moving up to higher settings.
Another crucial step in setting up your MIG welder is ensuring proper safety measures are in place. This includes wearing appropriate protective gear such as gloves, safety glasses, and a welding helmet. You’ll also want to make sure you’re working in a well-ventilated area and that any flammable materials are removed from your workspace.
Overall, setting up your MIG welding machine may seem overwhelming at first, but by following these basic steps and taking proper safety precautions, you’ll be on your way to successful welding in no time. So, don’t be afraid to give it a try and start creating your next masterpiece!
Gather Your Materials
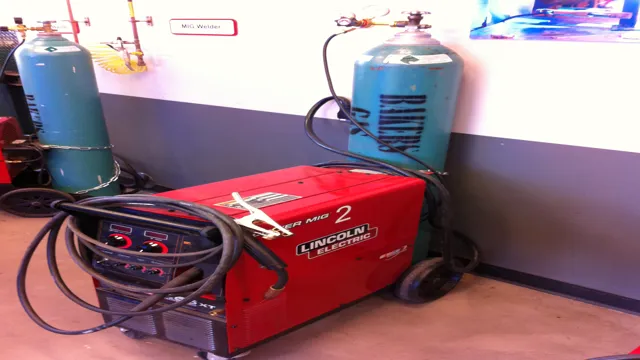
Setting up your MIG welding machine requires gathering the right materials to get started. First and foremost, you’ll need a reliable MIG welder that is suited for your project requirements. Along with your welder, you’ll also need a wire feeder and welding gun that is compatible with your machine.
You’ll also need to get your hands on a welding helmet to protect your eyes from the bright light, as well as a pair of gloves to protect your hands from the heat. Lastly, it’s important to make sure you have enough welding wire and shielding gas to complete your project. By gathering all of these materials ahead of time, you will be fully prepared to set up your MIG welding machine and complete your welding project with ease.
Examples: Welding machine, power supply, welding gun, wire feeder, gas cylinder
If you’re planning on getting started with welding, it’s important to gather all the necessary materials before diving in. You’ll need a welding machine, which can come in different types depending on the type of welding you want to do. For example, MIG, TIG, and stick welding machines all have different functions and require different power supplies.
Speaking of power supplies, you’ll want to make sure you have a reliable source of power that can handle the requirements of your welding machine. Additionally, you’ll need a welding gun and wire feeder to help you control the flow of welding wire and create clean, precise welds. Don’t forget about the gas cylinder, which will provide you with the necessary shielding gas to protect your welds from contamination and oxidation.
With these materials in hand, you’ll be well on your way to mastering the art of welding and creating quality metalwork pieces with ease.
Selecting the Right Wire
MIG welding machines are a great choice for welding projects, and knowing how to set up your machine is essential before getting started. One important aspect to consider is selecting the right wire for your project. The wire that you choose will depend on a few factors, including the type of metal you are welding, the thickness of the metal, and the joint design.
Generally, a smaller wire diameter is better for thin materials, while a larger diameter is better for thicker materials. The wire also comes in different materials, such as mild steel, stainless steel, and aluminum. It’s important to choose the right type of wire for your project to ensure that you get the best results.
By taking the time to select the appropriate wire, you can ensure that your welding project is efficient, effective, and long-lasting.
Examples: Solid or flux-cored wire, wire thickness, material type
When it comes to welding, choosing the right wire is crucial for achieving optimal results. The two most common types of welding wires are solid and flux-cored. Solid wire is typically used for welding thinner materials and produces clean, strong welds.
Flux-cored wire, on the other hand, is used for welding thicker materials and is ideal for outdoor welding due to its ability to work well in windy conditions. When selecting a wire, it’s important to choose the appropriate thickness for the job at hand. Thicker wires are better suited for heavy-duty welding while thinner wires work well for lighter materials.
Additionally, the material type of the wire is also important. Steel wire is the most commonly used, but other materials such as aluminum and stainless steel can be used for specific applications. By selecting the right wire, welders can ensure that their welds are strong, durable, and tailored to the specific job they are working on.
Setting the Power and Wire Feed Speed
When it comes to setting up a MIG welding machine, one key factor is the power and wire feed speed. These two settings are crucial in achieving a successful weld that is strong and clean. To start, adjust the power setting according to the thickness of the material you’ll be welding.
A lower power setting is recommended for thin materials while a higher power setting is necessary for thicker ones. Once you’ve set the power, move on to adjusting the wire feed speed. The wire feed speed should be adjusted to match the amperage being used, ensuring that the wire melts at a steady rate to create a consistent bead.
It’s important to note that the wire feed speed may need to be adjusted throughout the welding process as the material heats up and expands. With the correct power and wire feed speed settings, your MIG welding machine will produce clean, strong, and precise welds.
Examples: Recommended settings for the welding machine, adjusting voltage and amperage, adjusting wire feed speed
When it comes to welding, setting the power and wire feed speed is crucial for achieving a successful weld. The recommended settings for the welding machine vary depending on the type of material you are working with and its thickness. In general, a higher voltage and amperage setting will be required for thicker materials, while thinner materials will require a lower setting.
Adjusting the wire feed speed is equally important. If the wire feed speed is too fast, the weld may be too shallow, while a feed speed that is too slow can lead to poor penetration and an incomplete weld. As a general rule, a wire feed speed of 200-300 inches per minute is recommended for most welding projects.
But how do you know if the settings are correct? The best way to test the settings is by doing a practice weld on a scrap piece of material. This will give you the opportunity to adjust the settings until you achieve the desired result. It’s also important to pay attention to the sound of the weld.
A good weld will have a consistent sizzling sound, while a bad weld will produce a popping or crackling sound. In conclusion, when setting the power and wire feed speed for your welding machine, remember to consider the material thickness and adjust accordingly. Testing the settings on a scrap piece of material is an important step to ensure a successful weld.
By following these guidelines, you’ll be able to achieve strong and long-lasting welds for all your projects.
Choosing the Right Gas
When it comes to setting up your MIG welding machine, one of the most important factors to consider is choosing the right gas. The two most common options are carbon dioxide and a mixture of carbon dioxide and argon. Carbon dioxide is a more budget-friendly option, but it can lead to more spatter and may not provide the best results for thinner materials.
On the other hand, a mixture of carbon dioxide and argon offers better weld quality and less splatter, but comes at a higher cost. Ultimately, the choice comes down to the type of project you are working on and your budget. Be sure to do your research and talk to an expert if you’re not sure which gas to choose.
Examples: CO2 or Argon, gas flow rate, gas mixture
When it comes to welding, choosing the right gas is crucial for achieving optimal results. Two common gases used for welding are CO2 and Argon. CO2, also known as carbon dioxide, is a cost-effective option that provides deep penetration of the metal being welded.
On the other hand, Argon is more expensive but is known for its ability to produce a high-quality weld with a cleaner finish. The gas flow rate is also an important factor to consider as it affects the quality of the weld. The gas flow rate that is too high can result in a porous weld, while a flow rate that is too low can lead to oxidation.
In addition to choosing the right gas, it is also essential to use the appropriate gas mixture. The gas mixture can depend on various factors such as the type of metal being welded, the welding process being used, and the desired outcome. In summary, choosing the right gas is crucial for obtaining the desired welding outcomes, and it is essential to consider factors such as the type of gas, flow rate, and gas mixture when making this decision.
Preparing the Workpiece
If you’re looking to get into MIG welding, it’s important to know how to set up your welding machine properly to get the best results. Before you get started, you’ll need to prepare your workpiece. This means cleaning it thoroughly to remove any rust, paint, or other debris that might interfere with the weld.
You’ll also need to ensure that the metal is flat and free of any warping or distortion. Once your workpiece is ready, you can move on to setting up your MIG welding machine. First, you’ll need to choose the appropriate wire and gas for your project.
The wire you choose will depend on the thickness of the metal you’re welding, while the gas will depend on the type of metal and the conditions under which you’ll be welding. Once you’ve made your selections, you can load the wire into your machine and adjust the tension and speed settings. From there, you’ll need to set your welding amperage according to the specifications for your machine and your project.
With these steps completed, you’re ready to start MIG welding!
Examples: Removing rust or paint, marking the welding seam
When preparing a workpiece for welding, it’s crucial to remove any rust or paint first. Not doing so can lead to weak welds and a shortened lifespan for your project. One way to remove rust or paint is by using a wire brush or sandpaper.
This will provide a rough surface for the welding material to adhere to. Another option is to use a chemical rust remover, which can be applied with a brush or spray bottle. However, be sure to wear protective gear and work in a well-ventilated area when using chemicals.
Additionally, marking the welding seam is important to ensure accuracy during the welding process. This can be done with chalk, paint, or even a sharpie. By marking the seam, you can make sure that the weld is in the exact location you need it to be.
It can also be helpful to mark any guide lines or measurements before beginning the project, to make sure your workpiece is structured properly. Taking the time to properly prepare your workpiece will result in a stronger, more stable finished product.
Setting Up Your Welding Area
Setting up your welding area properly is essential to achieve high-quality welds with your MIG welding machine. First, you want to make sure your machine is in good working order and set up correctly. Refer to your machine’s manual for specific instructions, but generally, you will need to connect the welding gun, ground clamp, and shielding gas.
You also want to ensure that your work area is clean and free of clutter to prevent accidents and to give you enough space to move around. Next, choose a suitable work surface that is stable and will not catch fire, such as an industrial workbench or a sheet of metal. Finally, make sure you have proper ventilation in your workspace as MIG welding can produce harmful fumes.
A well-ventilated area will help you breathe easier and ensure your safety as you work. Overall, by following these steps and having a well-organized work area, you can set yourself up for welding success with your MIG welding machine.
Examples: Maintaining a clean workspace, protecting the surrounding area from sparks and debris
When setting up your welding area, it’s crucial to prioritize safety. Maintaining a clean workspace is essential to ensure that you and others in the area do not trip over equipment or inadvertently step on sharp objects. Additionally, you want to protect the surrounding area from sparks and debris.
It’s essential to identify a designated area for welding that is free from any flammable materials. You might consider using fire-resistant curtains to prevent sparks and flames from spreading. It’s also a good idea to protect yourself by wearing personal protective equipment (PPE), including gloves, goggles, and a welding helmet.
By taking these precautionary measures, you can ensure that your welding area is safe and minimize the risk of accidents or incidents during the welding process. Remember, it’s better to take the time to set up your welding area correctly than to risk injuring yourself or others. So, take the necessary steps to organize your workspace and make sure that you have everything you need before you begin welding.
Welding Technique and Safety
Are you wondering how to set up your MIG welding machine? Here are a few steps to follow to ensure your welding machine is properly set up for your next project. First, make sure your power source is adequate and grounded. Next, choose the right wire for your project, typically either .
030 or .035 diameter wire. After that, select the appropriate gas for your electrode and make sure the gas nozzle is clean and in good condition.
Once your welding machine is set up, it’s crucial to take safety precautions when welding. Always wear protective gear, including welding gloves, a welding helmet, and a welding jacket. It’s also important to keep your work area clean and dry to avoid slipping hazards.
By following these steps and taking safety precautions, you’ll be able to successfully set up your MIG welding machine and complete your welding project with confidence.
Examples: Proper positioning of the welding gun, safety gear, monitoring weld quality
Welding is an essential process in many industries, especially in construction, manufacturing, and fabrication. It involves joining two metal pieces by melting them using heat and pressure. However, welding can be dangerous when proper safety measures are not observed.
Therefore, it is crucial to follow the right welding technique to guarantee safety and maintain high-quality welds. One of the critical aspects of welding technique is the proper positioning of the welding gun. The gun’s angle and distance from the metal surface can significantly affect the weld quality.
If the gun is too close, the metal may overheat, resulting in weld defects such as cracking, distortion, and porosity. On the other hand, if the gun is too far, the weld may have insufficient penetration, which affects its strength. Additionally, safety gear is necessary when welding, including a welding helmet, gloves, apron, and boots.
These protect the welder from arc radiation, burns, and sparks. Lastly, monitoring weld quality ensures that the weld meets the required standards for appearance, strength, and corrosion resistance. With proper welding technique and safety measures, welds can be a reliable and long-lasting connection.
Troubleshooting Tips
When setting up a MIG welding machine, there are some common troubleshooting tips you should keep in mind to ensure your welding job is seamless. Firstly, always make sure that the machine settings are appropriate for the welding job at hand. If the wire feed speed or voltage is set incorrectly, it may cause issues such as poor penetration, uneven welds, or even burn-through.
It is also important to maintain the welding gun and replace any worn-out parts such as the liner or contact tip. Checking the gas flow rate and ensuring the shielding gas is not contaminated is crucial to achieving the ideal weld. Moreover, if you experience any issues with welding quality, always inspect the weld surface as it can often give you a clue as to what went wrong.
With these troubleshooting tips, you can get your MIG welding machine up and running smoothly and ensure a successful welding job every time.
Examples: Identifying and addressing common welding errors, adjusting settings for optimal weld quality
When it comes to welding, errors are bound to happen, and it’s crucial to identify and address them. Some of the most common welding errors include insufficient heat input, improper electrode placement, and incorrect travel speed. To troubleshoot these issues, try adjusting the welding settings, increasing the amperage or voltage, or changing the electrode type.
It’s also essential to ensure the welding surface is clean and free of any contaminants, which can affect the weld quality. Another troubleshooting tip is to change the welding technique, such as switching to a different welding process or adjusting the angle of the welding torch. By following these troubleshooting tips and testing each adjustment, you can achieve optimal weld quality and minimize errors.
Remember, every welding project is different, so don’t be afraid to experiment and find the best solution for each situation.
Conclusion
In summary, setting up a MIG welding machine may seem daunting at first, but with a little bit of patience and know-how, it can be a breeze. Remember to choose the appropriate wire feeder speed and welding amperage, adjust the gas flow to provide adequate coverage, and ensure the workpiece is clean and prepped. Follow these steps, and you’ll be ready to create some seriously weld-erful creations!”
FAQs
What is a MIG welding machine?
A MIG (Metal Inert Gas) welding machine is a tool used for joining metal parts by creating an arc between a metal wire electrode and the workpiece.
What are the essential components of a MIG welding machine?
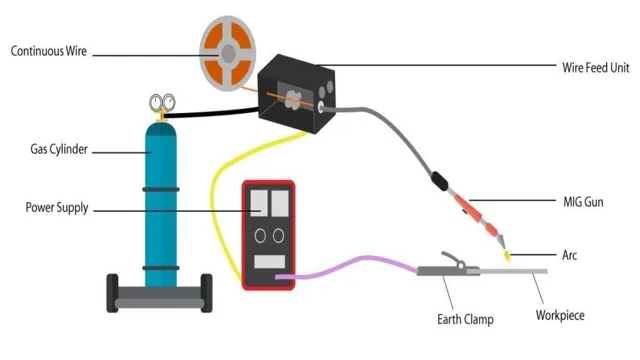
The essential components of a MIG welding machine include a power supply, a wire feed unit, a welding gun, and a shielding gas source.
How do you set up a MIG welding machine?
First, plug in the power supply and turn on the machine. Then, load the wire into the wire feed unit and adjust the tension. Connect the ground clamp to the workpiece and attach the welding gun to the machine. Finally, adjust the voltage and wire speed settings based on the metal being welded and the thickness of the material.
What are the advantages of using a MIG welding machine?
MIG welding machines are fast, efficient, and easy to learn. They produce a clean weld with little to no splatter and provide good penetration. They are also versatile and can be used on a range of metal types and thicknesses.
What types of shielding gases are used in MIG welding machines?
Common shielding gases used in MIG welding machines include argon, carbon dioxide (CO2), and a mixture of both. The type of gas used is typically based on the type of metal being welded.
How often should you maintain a MIG welding machine?
Regular maintenance is essential to ensure the proper functioning of a MIG welding machine. This includes cleaning the wire feed unit and welding gun, checking the gas flow and pressure, and inspecting the machine for any damage or wear. Maintenance frequency will depend on usage, but it is recommended to perform some form of maintenance before each use.
Can a MIG welding machine be used for aluminum welding?
Yes, a MIG welding machine can be used for aluminum welding, but it will require a different wire, drive rollers, and liner. It is also important to choose the correct shielding gas and welding technique to achieve a strong weld.
