Have you ever found yourself stranded in the middle of nowhere with a dead battery? It’s a frustrating situation that we’ve all found ourselves in at one point or another. In such cases, having a car battery charger can be a lifesaver. But how do you go about setting it up? We’ve got you covered.
Whether you’re a seasoned driver or a newbie, setting up a car battery charger can be daunting for anyone. The good news is that it’s easier than you think. With a little bit of knowledge and a few simple steps, you can get back on the road in no time.
In this blog, we’ll guide you through the process of setting up a car battery charger step-by-step. From understanding the different types of car battery chargers to connecting the charger to your car’s battery, we’ve covered it all. So, sit back, relax, and let’s get into it!
Gather Necessary Tools and Supplies
Before setting up your car battery charger, it’s important to gather all of the necessary tools and supplies. First and foremost, you’ll need a compatible charger that’s suited for your car’s battery. Consider purchasing one with automatic shut-off capabilities to prevent overcharging.
Along with the charger, you’ll need a set of jumper cables and a multimeter to measure the battery’s voltage and check for any potential issues. You may also want to have a battery cleaning solution and wire brush on hand to remove any buildup or corrosion on the battery terminals. It’s important to note that safety should always be a top priority when working with car batteries, so be sure to wear gloves and protective eyewear and work in a well-ventilated area.
By having all of the necessary tools and supplies on hand, you’ll be able to confidently set up your car battery charger and ensure proper functionality for your vehicle.
Battery Charger
If you’re planning to build your own battery charger, you’ll need to gather the right tools and supplies. The first thing you need is a charger IC, which you can find online or at your local electronics store. You’ll also need a transformer with the right voltage and current output, as well as capacitors, resistors, diodes, and a heatsink to control the temperature.
A soldering iron and solder wire are necessary for connecting all the components. Additionally, you’ll need a housing to keep your charger safe and organized. Don’t forget to get some wire cutters, pliers, and a multimeter to help you measure voltage, current, and resistance.
Once you have all the tools and supplies you need, you can start building your battery charger and enjoy the satisfaction of having created a useful and practical device.

Safety Glasses
If you’re planning on using safety glasses for your next home improvement or woodworking project, it’s important to gather all necessary tools and supplies beforehand. First and foremost, you’ll need to choose the right pair of safety glasses for your specific needs. There are many different types of safety glasses available, from those designed for general use to those that are specifically designed for welding or chemical exposure.
Once you’ve chosen the right pair, you’ll need to make sure that you have all of the other supplies you’ll need on hand, such as cleaning cloths, carrying cases, and replacement lenses. By taking the time to gather all of the necessary tools and supplies ahead of time, you’ll be able to ensure that you’re fully prepared to protect your eyes and stay safe during your next project.
Rubber Gloves
When it comes to handling potentially hazardous or messy materials, rubber gloves are essential. Before beginning any task where gloves are necessary, it’s important to gather all the necessary tools and supplies. First and foremost, make sure you have the right size and type of rubber gloves for the job.
There are various options available, including latex, nitrile, and vinyl gloves. Next, consider the type of material or substance you’ll be working with and whether additional protective gear is needed, such as goggles or a respirator. It’s also a good idea to have a designated area for disposing of used gloves, as well as a backup supply in case of tears or punctures.
By being prepared with the right tools and supplies, you can ensure a safe and efficient task with no surprises.
Choose a Suitable Location
If you’re wondering how to set up a car battery charger, one important factor to consider is your location. You’ll want to find a suitable spot that’s close enough to your car’s battery but still provides enough space to move around. Look for an area that’s well-ventilated and free of any flammable materials.
A garage or carport is a good choice, as it provides protection from the elements and keeps your charger within easy reach. Just be sure to avoid setting up in an area with high foot traffic or where pets or small children may be playing. Once you’ve found the right location, make sure your charger is properly grounded and follow the manufacturer’s instructions for safe and effective charging.
With a bit of planning and care, you’ll be able to keep your car’s battery charged and ready to go whenever you need it.
Well-Ventilated Area
When it comes to setting up a well-ventilated area, selecting the right location is key. You want to choose a space that has good air circulation and plenty of fresh air flowing through it. This may mean finding a spot that receives a good amount of natural light or is situated near a window or open door.
It’s also important to consider factors like entrances and exits, as well as any potential sources of heat or humidity. For example, setting up your workspace near a busy kitchen may not be the best idea, as cooking appliances can generate a lot of heat and moisture that could negatively impact your air quality. Additionally, consider investing in a fan or air purifier to help keep the air circulating and filtered.
By taking the time to carefully select your location, you can create a safe and healthy workspace that promotes productivity and well-being.
Flat Surface
Choosing a suitable location for your flat surface is crucial for many reasons. First and foremost, you want to ensure that your surface is level to avoid any accidents or injuries when using it. Look for an area that is flat and stable, and if possible, use a level to determine if the ground is even.
You also want to consider the environment in which your flat surface will be placed. For example, if you plan on using it for outdoor activities like cooking or grilling, you want to make sure that the location is protected from the elements such as wind, rain, and sun. Additionally, think about the accessibility of the area, and make sure that it is located in a spot that is easy to reach and doesn’t obstruct the flow of foot traffic.
Overall, the most important thing when choosing a location for your flat surface is ensuring that it is level and stable, protected from the elements, and easily accessible.
Prepare the Battery for Charging
Before you start charging your car battery, there are a few important steps to take in order to prepare it for the charging process. First and foremost, ensure that the battery charger you are using is compatible with your specific battery type and voltage. Once you have a compatible charger, it’s important to locate the battery and disconnect any visible cables or connections to avoid any electrical hazards.
Next, inspect the battery for any physical damages, such as cracks or leaks, as this can prevent the battery from charging or cause further damage. Finally, if the battery water levels are low, fill them up with distilled water before beginning the charging process. Taking these steps can ensure that the battery is in good condition and ready to be charged efficiently, keeping you safe and prolonging the lifespan of your battery.
Disconnect Cables
When preparing your battery for charging, it’s important to disconnect any cables that may be attached. This ensures that there’s no electrical charge being transferred to the battery during the charging process, which could be dangerous for both you and the battery. Before disconnecting the cables, make sure that the battery is completely cool to the touch to avoid any accidental burns.
For those who are unfamiliar with battery cables, it may be helpful to consult your owner’s manual or an expert for guidance. Taking these extra precautions will help ensure that your battery is ready for a successful charging cycle and that you stay safe in the process.
Inspect Battery
Before you start charging your battery, it’s vital to inspect it thoroughly. Look for any visual signs of damage or corrosion, such as bloatedness or leakage. If you spot any of these symptoms, your battery may need to be replaced.
If the battery looks okay, you should then clean the terminals with a soft-bristled brush or cloth to get rid of any dirt, rust, or debris. Doing so helps ensure a good connection with the charger and prevents any arcing or sparking. After cleaning the terminals, check the voltage level using a multimeter.
Ideally, your battery should read at least 16 volts before you start charging it. If it’s below this level, you may need to charge it using a specialized charger.
Also, ensure that the battery vents are open and that it’s not exposed to high temperatures or humidity. Taking these precautions can safeguard your battery from any damage and ensure that it charges correctly.
Remove Corrosion
If you’ve been using your car battery for a while, it’s likely that corrosion has built up on the terminals. This is a common issue that can interfere with the battery’s performance, so it’s important to remove it before charging your battery. To get rid of the corrosion, you’ll need a few basic tools like baking soda, water, a wire brush, and safety gloves.
Start by turning off the engine and disconnecting the negative cable from the battery terminal. Then mix the baking soda and water until you have a thick paste. Apply this to the corroded areas and let it sit for a while.
Once the paste has done its work, use the wire brush to scrub away any remaining corrosion. Remember to wear safety gloves to protect your hands during the process. Finally, rinse off the terminal with water and dry it with a clean cloth before reconnecting the cable and charging your battery.
By taking the time to remove corrosion, you’ll ensure that your battery is ready to perform at its best.
Connect the Charger
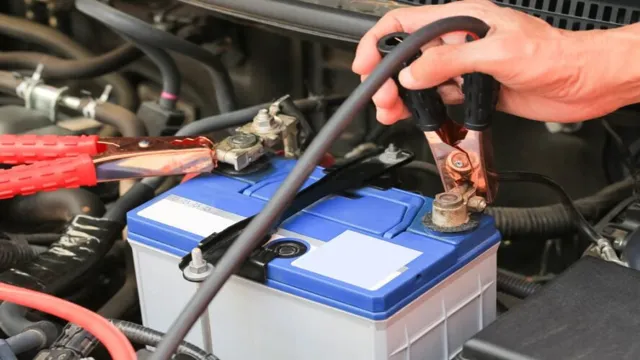
When it comes to setting up a car battery charger, the first and most important step is to connect the charger. Make sure your charger is unplugged before you begin. Next, attach the positive (red) clamp from the charger to the positive terminal on the battery.
This is usually labeled with a “+” sign. Then attach the negative (black) clamp from the charger to either a bare metal part of the car’s frame or the negative terminal on the battery. This is usually labeled with a “-” sign.
Once the clamps are securely attached, plug in the charger and turn it on. Make sure the charger is set to the correct voltage and amperage for your vehicle’s battery. Now you’re ready to charge your car battery! Remember to monitor the charger periodically and disconnect it once the battery is fully charged to avoid overcharging and damaging the battery.
Identify the Polarity
When it comes to charging our devices, we often overlook the importance of identifying the polarity. However, this can be a crucial step in preventing damage to the device and even potential harm to ourselves. To connect the charger correctly, first, locate the port on your device and examine it closely for any markings or symbols indicating the polarity.
Once you have identified the negative and positive terminals, match them with the corresponding terminals on the charger cable. Remember, connecting the charger improperly can lead to short circuits or even damage to the battery. So take a few extra seconds to ensure you have identified the polarity correctly before plugging your device in.
By doing so, you can ensure a safe and efficient charging experience every time.
Connect the Charger to the Battery
When it comes to charging a battery, connecting the charger correctly is crucial. First, ensure that the charger you have is compatible with the battery you plan to charge. Once you have confirmed compatibility, locate the positive and negative terminals on the battery.
The positive terminal is usually marked with a plus sign, and the negative terminal with a minus sign. Next, connect the red cable from the charger to the positive terminal, and the black cable to the negative terminal. It’s important to make sure the cables are securely attached, as loose connections can result in inefficient charging or even damage to the battery.
Double-check the connections before turning on the charger. Keep in mind that charging times can vary depending on the type and condition of the battery, so it’s best to monitor the charging progress regularly. With the charger connected correctly, you can rest assured that your battery is receiving the charge it needs to keep running smoothly.
Set the Charging Rate
If you want to know how to set up a car battery charger, then it’s essential to understand how to adjust the charging rate of the charger. When a battery is being charged, the rate at which it is charged can have a significant impact on its lifespan. To set the charging rate, you need to first determine the battery’s requirements by referring to the manufacturer’s instructions.
Once you’ve determined this, you can then adjust the rate of charge to suit the battery’s needs. Most modern battery chargers have a range of charging rates, making it easy to select the correct value for your battery. It’s also essential to monitor the battery while it’s charging and adjust the rate if necessary.
Remember, overcharging a battery can shorten its lifespan or even cause it to fail prematurely. Overall, setting the charging rate is a simple but vital aspect of using a car battery charger.
Read the Manual
When it comes to electric cars, one of the most important factors to consider is the charging rate. This is the rate at which your car’s battery will charge, and it can have a significant impact on how long it takes to fully recharge your car. Setting the charging rate is a simple process, but it’s important to read the manual carefully to ensure that you do it correctly.
Depending on your car, you may be able to adjust the charging rate using the car’s touchscreen or through a mobile app. Some cars may also have physical switches or dials that allow you to adjust the charging rate. Regardless of the method, it’s important to pay attention to the instructions and set the charging rate to the appropriate level for your needs.
By doing so, you can ensure that your car charges efficiently and safely, giving you the peace of mind you need when you’re out on the road.
Choose the Correct Charging Rate
When it comes to electric vehicle charging, choose the correct charging rate to ensure optimal performance and battery life. Setting the charging rate depends on various factors such as the battery size, the charging infrastructure, and the time available for charging. For instance, if you’re in a hurry and need a quick charge, choose a higher charging rate; however, if you have plenty of time and want to preserve your battery, a lower charging rate is recommended.
Additionally, if you use a public charging station, check the station’s charging rate before plugging in, as some stations may offer different charging rates. Keep in mind that charging at higher rates can also generate more heat, so ensure proper cooling mechanisms are in place to prevent damage to the battery. Overall, choosing the right charging rate can help extend the life of your EV battery and optimize your driving range.
Start the Charging Process
If you’re wondering how to set up a car battery charger, the first step is to locate the battery in your vehicle. Once you’ve found it, remove the battery cover and make sure the terminals are clean and free of corrosion. Then, connect the charger’s positive clamp to the positive terminal of the battery, followed by the negative clamp on the negative terminal.
Make sure the charger is set to the correct voltage and amperage for your battery, and turn it on. You should see the charger start working and charging your car’s battery. It’s important to monitor the charger and battery closely, ensuring they don’t overheat or get damaged.
Once the battery is fully charged, turn off the charger and disconnect the clamps, starting with the negative one. With these simple steps, you’ll be able to set up your car battery charger and keep your vehicle running smoothly.
Plug in the Charger
So, you’ve received the low battery notification on your device, and you know it’s time to start charging. The first step in the process is to plug in the charger. Depending on the type of device you have, the charger may be a wall adapter, a USB cable, or a wireless charging pad.
Make sure you have the appropriate charger and that it’s in good condition before plugging it in. Once you have the charger ready, locate the charging port on your device and insert the charger. It’s essential to make sure the connection is secure and that the charger is properly plugged in to avoid any interruptions in the charging process.
With the charger now connected, you can sit back and relax while your device charges up. Keep in mind that charging times can vary based on the device and charger used. However, once your device is fully charged, you’ll be ready to go about your day without any battery life worries.
Monitor the Charging Process
To start the charging process, it is essential to monitor the process properly. Before plugging your device into the charger, make sure to use the appropriate charging cable. Avoid using cheaply made cables as they may cause damage to your device, or worst case scenario, can pose as a fire hazard.
Once you have the appropriate cable, plug it in and look for indications of the charging process on your device’s screen. Make sure to keep an eye on the battery status and charging speed to ensure the process is working correctly. It’s also recommended to avoid using your device while charging as it may slow down the charging process or cause the device to overheat.
Properly monitoring the charging process is crucial in ensuring that your device’s battery life is maximized, making your life easier as you go about your day. So always remember to keep an eye on your device, so you stay on top of the charging process.
Disconnect the Charger
Setting up a car battery charger is a simple task that anyone can do with a bit of guidance. First, you’ll need to ensure that the charger you are using is appropriate for your vehicle’s battery. Once you have verified this, the next step is to connect the charger’s cables to the battery terminals.
Be sure to connect the positive cable to the positive terminal, and the negative cable to the negative terminal. Double-check these connections before proceeding. Once everything is in place, plug the charger in and turn it on.
As the battery charges, keep an eye on the charger’s display to monitor progress. When your battery is fully charged, be sure to disconnect the charger by removing the negative cable first, then the positive cable. Remember, safety is paramount when working with electrical equipment, so always wear appropriate protective gear and never touch the battery, cables or charger while the charger is in operation.
With these simple steps in mind, you’ll be able to set up your car battery charger like a pro in no time!
Turn off the Charger
One of the simplest ways to extend the battery life of your mobile device is to turn off the charger when it is no longer needed. Leaving your charger plugged in even after your battery is fully charged can cause it to overheat, which can then cause damage to the battery. This can lead to reduced battery life and ultimately, the need to replace the battery sooner than you should have to.
Moreover, overcharging your device on a regular basis can gradually reduce its overall battery capacity, making it less efficient over time. In order to avoid these issues, it’s advisable to unplug the charger as soon as your device’s battery is at 100%. This will help to ensure that your battery remains healthy and efficient for as long as possible.
By simply disconnecting the charger when you’re finished charging your device, you can avoid unnecessary damage and keep your mobile device running smoothly.
Disconnect the Charger from the Battery
If you are planning to charge your battery, make sure to disconnect the charger when it reaches full capacity. If you leave the battery connected, the charger will continue to supply it with electricity, which can damage the battery and reduce its lifespan. When the charging process has completed, turn off the charger and disconnect it from the power source.
Wait for the battery to cool down before detaching it from the charger. Doing this will prevent any sparks or accidental release of electricity. Disconnecting the charger from the battery helps ensure that it remains in good condition and performs well over its lifespan.
Failure to do so can result in a shorter battery life, reduced capacity, and in some cases, even physical damage to both the battery and the charging unit. So, remember to unplug the charger when you’re not using it to protect your battery.
Conclusion
In summary, setting up a car battery charger is not rocket science but it does require some basic knowledge and safety precautions. Always ensure you have the right charger for your battery, read the instructions carefully, wear protective gear, and handle the battery with care. Just remember, a fully charged battery keeps your car running smoothly and can give you the power to conquer any roadblocks that come your way.
So, charge up and let’s hit the road!”
FAQs
What equipment do I need to set up a car battery charger?
To set up a car battery charger, you’ll need the charger itself, a set of jumper cables, a wrench, and safety gear like gloves and goggles.
What should I do before setting up a car battery charger?
Before setting up a car battery charger, make sure the car is turned off and the charger is unplugged. Also, check the battery terminals for any corrosion or damage.
Can I use any type of battery charger for my car battery?
No, you should use a battery charger specifically designed for car batteries. Using the wrong charger could damage the battery or cause a fire.
How long should I leave the charger connected to my car battery?
The length of time depends on the charger and the battery, but generally you should leave the battery charging overnight or until it’s fully charged.
Can I charge a completely dead car battery with a charger?
Yes, you can charge a completely dead car battery with a charger. However, you may need to jump start the car afterwards to get it running.
What safety precautions should I take when setting up a car battery charger?
Always wear gloves and goggles, make sure the car is turned off and the charger is unplugged before connecting the charger, and never touch the clamps together while the charger is plugged in.
Should I remove the battery from the car before charging it?
It’s not necessary to remove the battery from the car before charging it, but if you do, make sure to place it on a stable surface away from any flammable materials.
