How to Read Depth Gauge on Drill Press: A Comprehensive Guide for Beginners
Have you ever found yourself confused when trying to read a depth gauge on your drill press? Don’t worry, you’re not alone. Many people struggle with understanding how to properly read the gauge and end up with incorrect measurements. But fear not, this blog post will introduce you to the basics of using a depth gauge and how to read it accurately.
Think of the depth gauge as a ruler for your drill press, indicating how deep the drill bit will go into the material. By the end of this post, you’ll be able to confidently utilize your depth gauge and achieve accurate results every time. So, let’s dive in and uncover the mysteries of the depth gauge on your drill press!
Understanding the Parts of a Depth Gauge
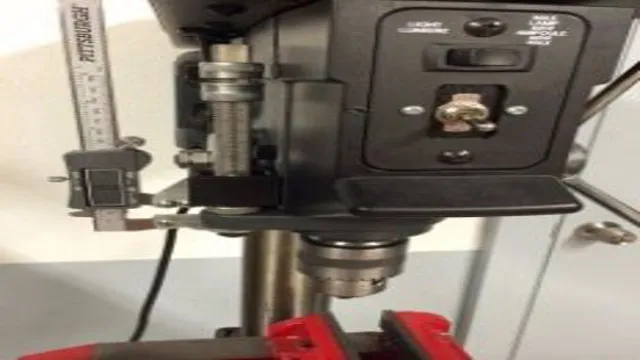
If you’re wondering how to read the depth gauge on a drill press, it’s important to understand the different parts involved. The depth gauge is a tool that measures the depth of a hole, typically used in drilling operations. Its key components include a gauge block that is used to set the desired depth, and a measuring rod that is used to indicate the depth of the hole being drilled.
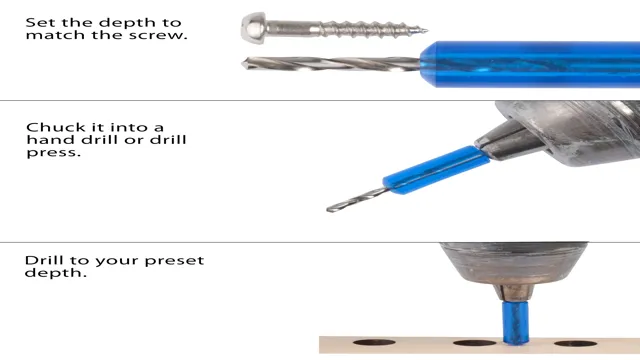
When using the depth gauge, it’s important to set the gauge block to the desired depth before beginning the drilling operation. This will ensure that you drill to the correct depth and avoid over-drilling or under-drilling the hole. Once the gauge block is set, you can begin drilling, and the measuring rod will indicate the depth of the hole in real-time.
Overall, learning how to read and use a depth gauge on a drill press is an essential skill for anyone who needs to drill precise holes in various materials.
The Gauge
If you’re new to using depth gauges, it can be challenging to know what all the different parts are and how they work. The gauge itself consists of three different parts: the base, the beam, and the indicator. The base is the flat surface that sits against the material you’re measuring, while the beam extends upward and holds the indicator in place.
The indicator is the part that moves up and down as you adjust the depth gauge to the correct measurement. Some depth gauges also come with additional parts, like a locking screw to keep the indicator in place once you’ve set it. Understanding the different parts of the depth gauge can help you use it more effectively and accurately.
So, next time you’re using a depth gauge, take a moment to familiarize yourself with the different parts and how they work together to give you an accurate measurement.
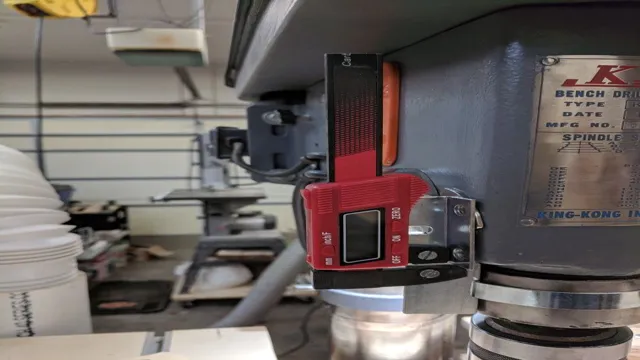
The Scale
When it comes to understanding the parts of a depth gauge, the scale is one of the most important components to comprehend. The scale on a depth gauge is a graduated ruler that is used to measure the depth of a particular object or surface. This is achieved by taking readings from the graduated lines on the scale, which are typically displayed in inches or millimeters.
The scale is an essential part of a depth gauge, as it allows the user to accurately determine the depth of a particular object, helping them to make informed decisions about the best course of action. Understanding how to read the scale on a depth gauge is a vital skill for anyone working in fields such as construction, engineering, or manufacturing, as it can help ensure that projects are completed accurately and efficiently. So, next time you’re using a depth gauge, take some time to familiarize yourself with the scale and improve your understanding of this essential tool.
The Locking Nut
When it comes to understanding the parts of a depth gauge, one key component to know about is the locking nut. This small piece of hardware is responsible for keeping the depth gauge securely in place, ensuring that accurate measurements can be taken. Without the locking nut, the depth gauge would be prone to sliding around or shifting, leading to incorrect readings and wasting time.
Think of it like a seatbelt for your depth gauge, keeping it tightly fastened and preventing any mishaps. Overall, properly utilizing the locking nut is crucial for getting the most out of your depth gauge and ensuring accurate readings.
Setting the Depth Gauge
If you want to achieve precision in your drilling tasks, it’s important to know how to properly read the depth gauge on your drill press. First, make sure the depth gauge is correctly installed and properly calibrated to match the drill bit you’ll be using. Next, set the depth by loosening the depth stop, positioning the material to be drilled, and lowering the drill bit until it touches the surface.
Then, slide the depth stop up to the drilling depth you desire and tighten it in place. Use the depth gauge to confirm the accuracy of your setting before beginning your drilling operation. Remember, being meticulous with your depth gauge settings can make a huge difference in the outcome of your project, so take the time to get it right!
Loosening the Locking Nut
When it comes to using a chainsaw, ensuring the correct depth gauge setting is crucial for optimal performance and safety. To set the depth gauge correctly, you must first loosen the locking nut on the chainsaw chain, which is usually found near the guide bar. Once loosened, you can use a depth gauge tool to measure the distance between the depth gauge and the cutter.
This distance is typically around 0.025 inches for most chainsaws. After measuring, adjust the depth gauge with a flat file until it matches the recommended distance.
Finally, tighten the locking nut back up to secure the chain in place. Failure to set the depth gauge correctly can lead to poor performance and a higher risk of kickback, so it’s essential to take this step seriously. With a little bit of careful attention, you can set your chainsaw up for smooth, safe, and effective cutting every time.
Raising or Lowering the Gauge
Setting the depth gauge is a crucial part of using a chainsaw safely and effectively. The depth gauge, or also known as the raker, determines how deep the chainsaw cuts into the wood. When using a chainsaw, it is important to set the depth gauge properly to prevent kickback.
Kickback occurs when the teeth of the chainsaw hit something solid, and the chainsaw pushes back towards the user. Setting the depth gauge too low can cause the chainsaw to cut too deeply into the wood, making it more challenging to control and increasing the risk of kickbacks. Conversely, setting the depth gauge too high can result in a chainsaw that doesn’t cut deeply enough, making cutting more challenging and time-consuming.
Therefore, it is essential to set the depth gauge correctly to ensure accurate cuts and prevent safety hazards.
Tightening the Locking Nut
When it comes to woodworking, one of the most important aspects is getting the right depth for your cuts. To achieve this, you need to set the depth gauge correctly. This process involves tightening the locking nut to secure the router bit and prevent it from slipping out of place while cutting.
It’s important to make sure the nut is tight enough, but not too tight, as you don’t want to damage the bit or router. Once the nut is secure, you can adjust the depth gauge to the desired depth by raising or lowering it. This can be done either by hand or with the help of depth adjustment knobs on the router.
By taking the time to properly set the depth gauge, you’ll be able to achieve precise cuts and create quality woodworking projects. So, remember to take your time and double-check your settings to ensure a successful outcome.
Reading the Depth Gauge
If you own a drill press, it’s essential to know how to read the depth gauge to ensure that you’re drilling to the right depth. The depth gauge is a small measurement tool that shows you how deep you’ve drilled into your material. It’s typically located on the drill press’s head and can be adjusted to set the depth you want.
To read the depth gauge, first, you need to set the gauge to zero. Then, as you begin to drill, the gauge will move with the bit, indicating how deep you’ve gone. You can adjust the gauge as needed to ensure that you’re drilling to the correct depth.
It’s important to note that different drill bits have different lengths, so you’ll need to adjust the depth gauge accordingly. Overall, knowing how to read the depth gauge is crucial for accurate and efficient drilling on your drill press.
Aligning the Gauge with the Mark
When it comes to using a depth gauge, aligning the gauge with the mark is crucial for accuracy. The first step is to zero the gauge on the surface of the material you’re measuring. Then, carefully align the gauge with the mark you’re measuring by adjusting the position until the needle lines up precisely.
It’s important to keep a steady hand and take your time to ensure the gauge is in the correct position before taking your reading. By following these steps and taking care when aligning the gauge, you can ensure accurate measurements every time.
Reading the Scale
When it comes to using a depth gauge, it’s essential to know how to read the scale accurately. The depth gauge is a tool that measures the depth of a hole, groove, or other surface area. The device measures the distance between the tip of the probe and the surface being measured, giving you an accurate reading in either metric or imperial units.
To read the scale, carefully observe the markings on the gauge, noting the intervals between each line. Some gauges have additional markings such as numbers or fractions, making it easier to read specific depths. To ensure an accurate and precise reading, it’s crucial to make sure the gauge is perpendicular to the surface you are measuring.
With a little practice, you’ll be proficient at reading the scale and taking accurate depth measurements.
Tips and Precautions
When it comes to using a drill press, the depth gauge is a crucial tool to ensure accurate and consistent drilling. If you’re not familiar with how to read the depth gauge, it can be a bit intimidating at first, but with a little practice, you’ll be able to easily adjust the settings to your desired depth. Firstly, insert the drill bit into the chuck and lower the drill bit until it touches the material you’re drilling.
Next, loosen the depth gauge locking mechanism and adjust the gauge until it matches the desired depth on the scale. Tighten the locking mechanism and repeat the process if necessary. It’s important to keep in mind that different materials may require different drill bit sizes and depths, so it’s important to double-check these settings before drilling.
Additionally, be sure to wear appropriate safety gear, such as safety glasses and hearing protection, when using a drill press. By following these tips and precautions, you’ll be able to confidently use a drill press with a depth gauge to complete your projects with precision and accuracy.
Conclusion
In conclusion, reading a depth gauge on a drill press may seem intimidating at first, but with practice and patience, it can become as easy as pie. Remember to always start by zeroing out the gauge and pay attention to the measurements as you adjust the depth. And if you’re feeling stuck, don’t be afraid to consult the manual or a helpful tutorial online.
With these tips in mind, you’ll soon be drilling with precision and confidence, and impressing all your DIY-loving friends. Happy drilling!”
FAQs
What is a depth gauge on a drill press used for?
A depth gauge on a drill press is used to measure the depth of the hole being drilled.
How do I read the depth gauge on a drill press?
To read the depth gauge on a drill press, first loosen the locking nut. Then set the stop collar to the desired depth and tighten the locking nut. Finally, lower the drill bit until it touches the workpiece, and the depth gauge will show the exact depth of the hole.
What is the significance of using a depth gauge on a drill press?
Using a depth gauge on a drill press ensures that the holes are drilled to the correct depth, which is essential for specific projects that require precise measurements.
Can I use a depth gauge on a hand-held drill?
Although some hand-held drills may come with a depth gauge attachment, it is not as accurate and reliable as using a depth gauge on a drill press.
How can I adjust the depth of the drill bit on a drill press?
To adjust the depth of the drill bit on a drill press, you can either adjust the stop collar or the depth gauge. Both of these methods allow you to set the drill bit to the desired depth accurately.
What tools do I need to use a depth gauge on a drill press?
You only need a depth gauge and a locking nut to use a depth gauge on a drill press. However, some drill presses may require additional attachments or accessories.
What happens if I drill too deep with a drill press?
If you drill too deep with a drill press, you risk damaging the workpiece, the drill bit, or the drill press. It is essential to use a depth gauge and set the stop collar to avoid drilling too deep.


