Have you ever encountered a situation where you need to know the voltage of a wire or an electronic device, but you don’t have a voltage tester on hand? It can be frustrating to not have the necessary tools when you need them the most, but don’t worry, as creating your own voltage tester is easier than you might think. All you need is a few basic materials and a little bit of patience. In this blog post, we’ll show you how to make your very own voltage tester from scratch.
This DIY project is perfect for anyone interested in electronics or DIY projects and can save you money in the long run, as you won’t have to purchase a voltage tester from the store. We’ll cover all the steps, including the necessary materials you’ll need, such as wires, a battery, and a resistor. We’ll also show you how to connect everything together and explain the function of each component.
By the end of this blog post, you’ll have your very own voltage tester that you can use anytime, anywhere. So, let’s get started and make your voltage tester today!
Introduction
Are you interested in making your own voltage tester? It can be a useful tool to have around the house, especially if you’re an avid DIYer. To make your own voltage tester, you’ll need a few basic tools and materials. First, gather a small incandescent light bulb, some insulated wire, and a couple of alligator clips.
Strip the insulation from the ends of the wire, and attach one end to the bulb and the other end to the alligator clips. Now, you’re ready to test your voltage. Simply attach the alligator clips to the two points you want to test, and if the bulb lights up, you have voltage! This simple yet effective tool can help you troubleshoot electrical problems and make DIY projects much easier.
So, next time you’re in need of a voltage tester, try making one yourself using these simple steps.
What is a Voltage Tester?
A voltage tester is an essential tool used to check for electrical currents in circuits. This versatile device can detect electrical charge and signal the user if there is voltage present, allowing them to safely work on any electrical equipment. The tool can be used to check outlets, cables, and wiring to ensure they are not energized.
A voltage tester is also used to troubleshoot issues with electrical connections, helping to quickly diagnose and resolve any problems. With the use of a voltage tester, you can guarantee your safety while working with electricity. Keep reading to understand how this tool works and the benefits it can bring to you.

Why Should You Make Your Own?
If you’re someone who loves to experiment with different flavors in the kitchen, then making your own food is a must. Not only is it more cost-effective than buying pre-made products, but it gives you complete control over the ingredients used. Making your own food allows you to customize it to your preferences, whether it’s adding extra spice or swapping out ingredients you don’t like.
By making your own meals, you can also avoid consuming preservatives, additives, and other harmful chemicals commonly found in processed foods. Ultimately, making food from scratch is a great way to have fun in the kitchen, hone your culinary skills, and create delicious, healthy meals that are tailor-made just for you.
Materials Needed
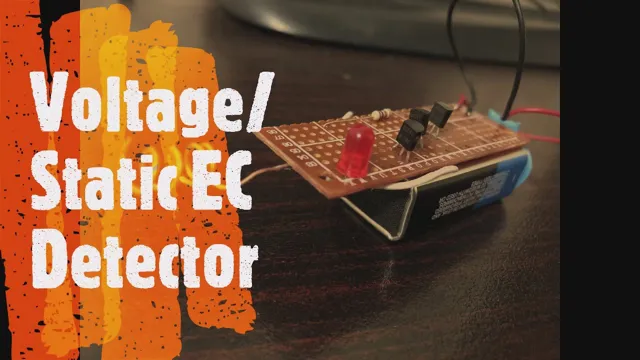
If you’re looking to make your own voltage tester, you’ll need a few materials to get started. First, you’ll need a battery. A 9V battery is typically used for this type of project.
You’ll also need a few small LED lights or bulbs. These will help you determine the voltage of the circuit you’re testing. To connect the components together, you’ll need some alligator clips or wires with clips on the ends.
Finally, you’ll need a resistor to prevent the LEDs from burning out. Once you have all of these materials, you can begin assembling your voltage tester. By building your own tester, you can gain a better understanding of how circuits work and save money on buying a pre-made tester.
So, let’s get started and see how easy it is to make your own voltage tester!
List of Materials
If you’re planning to start a new project or endeavor, then you might need to know what materials are needed to get the job done. Having a list of materials can help you prepare and ensure that you have everything you need to begin your work. The materials needed can vary depending on the project you’re working on.
For example, if you’re planning to paint a room, you would need paint, brushes, rollers, painter’s tape, drop cloths, and more. If you’re planning to build a bookshelf, you would need wood, screws, a saw, sandpaper, and other tools. It’s important to make sure you have all the necessary materials before you begin, as it can prevent delays and save you time in the long run.
Additionally, having a list of materials can help you budget and plan accordingly, ensuring that you have enough money to purchase everything you need.
Where to Buy Materials
When it comes to creating anything, it’s essential to have the right materials. When it comes to crafting, there are so many materials you may need, depending on the project you have in mind. From fabric to wood to glue and everything in between, it can be overwhelming to know which materials to purchase and from where.
One option is to check out your local arts and crafts store. These stores typically have a vast selection of materials and knowledgeable staff who can help you find what you need. Another option is to shop online.
With so many online retailers specializing in crafting materials, you can find just about anything you need and have it delivered right to your doorstep. Be sure to read reviews and check the return policy before making a purchase to ensure you’re getting what you need and are happy with your purchase.
Step-by-Step Instructions
Are you interested in learning how to make a voltage tester? It’s a useful tool that can help you determine whether or not an electrical current is flowing through a circuit. The good news is that making a voltage tester is a relatively simple and straightforward process. First, you’ll need to gather some supplies, including a battery, some wire, and a light bulb.
Next, you’ll need to connect the wire to the battery and the light bulb. Then, test the circuit by touching the wire to a source of electrical current. If the light bulb lights up, you’ve successfully made a voltage tester! Keep in mind, however, that working with electricity can be dangerous, so it’s essential to take all necessary precautions and seek guidance from an experienced electrician if you’re unsure about any aspect of the process.
Step 1: Assemble Materials
Before you start your project, you should assemble all the materials you need. Firstly, you’ll need to acquire the necessary tools. For example, if you’re building a birdhouse, you’ll need a saw, a hammer, and a drill.
Next, you’ll need to gather all the materials required for the project. In the case of the birdhouse, you’ll need wood, screws, nails, and paint. When buying your materials, make sure you get the right quantity of items required to complete the project.
It’s advisable to get a little extra material, just in case. Now, you’re ready to begin your project. By having all the necessary tools and materials on hand, you’ll be able to work efficiently, without any stops or distractions.
This will help you to achieve the desired results in a timely manner.
Step 2: Build the Circuit
Now that you have all the necessary components, it’s time to build the circuit! Let’s dive into the step-by-step instructions. First, grab your breadboard and place it on a flat surface. Next, take the LED and insert one leg into the positive rail of the breadboard and the other leg into a hole in the breadboard that is empty.
Make sure the longer leg of the LED is inserted into the positive rail. Then, grab your resistor and place it on the breadboard, connecting it to the same column as the shorter leg of the LED. The other end of the resistor should be connected to the negative rail of the breadboard.
Now, take the jumper wire and connect it from the same column as the longer leg of the LED to a hole in the breadboard that is directly across from it and along the same row as the resistor. Finally, connect the other end of the jumper wire to the positive terminal of the battery. Congratulations, you have successfully built your circuit!
Step 3: Add the LED Indicator
Adding an LED indicator to your circuit is an important step in many electronic projects. It can help you monitor the status of your device and indicate if there is any error or malfunctioning. Here’s how you can add an LED indicator to your circuit using a few simple steps.
Firstly, identify the positive and negative terminals of the LED. The longer leg is the positive terminal and the shorter leg is the negative terminal. Then connect the positive leg of the LED to a 220-ohm resistor that is then connected to the positive side of your power supply.
Next, connect the negative leg of the LED to the negative side of the power supply. Once you have made these connections, you can turn on the power supply and see the LED toggle on. The LED will indicate the status of your circuit and let you know if your circuit is working the way it’s supposed to.
Adding an LED indicator to your circuit is simple and can help you monitor your project’s performance.
Step 4: Test the Voltage Tester
When testing a voltage tester, it’s essential to follow the right steps to avoid any accidents. Start by testing the tester on a known live circuit to check its voltage detection capabilities. Place the tester’s probes on the circuit, ensuring they make good contact and read the voltage measurement on the tester.
If the reading is within the expected range, the tester is functioning correctly. But if it shows zero, there might be an issue with the tester, and it’s recommended to get a new one. Remember always to check the tester’s battery, and if it’s low, replace it right away.
In summary, testing the voltage tester is a simple process, but following every step the manufacturer provides ensures your safety while working with electrical appliances or circuits.
Safety Tips
If you’re working with electricity, a voltage tester can be an essential tool to ensure your safety. While there are commercially available voltage testers, you can also make your own. To make a simple voltage tester, you’ll need a few materials: a resistor, a diode, an LED, and a battery.
First, connect the resistor and diode in series with the LED. Then connect the battery to the other end of the resistor. Whenever there is voltage present, the LED will light up indicating live electricity.
Remember to always be cautious when working around electricity, and to use a voltage tester to ensure your safety. With a homemade voltage tester, you can economize, experiment, and do it yourself, but it’s essential to keep in mind that different electrical sources can require different types of testers, and not all homemade testers may be suited for high voltage work.
Precautions to Take When Working with Electricity
When working with electricity, it is important to take precautions to keep yourself safe. First and foremost, always shut off power at the breaker or fuse box before beginning any electrical work. This will prevent the risk of electrocution.
It is also important to wear rubber-soled shoes and dry clothing to prevent shock. Never touch electrical components with wet hands, and always use insulated tools and equipment when working with live circuits. If you need to work on a circuit that you are unsure of, use a voltage meter to test for live wires before touching anything.
Remember, electricity can be dangerous, so always prioritize safety when working with it. By following these safety tips, you can ensure that your electrical projects are completed safely and efficiently.
Conclusion
After this simple but effective DIY project, you’re now electricity’s BFF! By making your own voltage tester, you can now detect electricity’s whereabouts and power, and ensure that you’re always in the safe zone. With a few basic tools and materials, you’ve managed to create a handy tool that can save you from electrical hazards and give you the power to be in control. So go ahead, make one for yourself and be empowered!”
Final Thoughts and Additional Resources
When it comes to going out and traveling, safety should always be a top priority. To ensure that you have a safe and enjoyable trip, there are a few tips that you should keep in mind. Firstly, be aware of your surroundings and keep an eye out for any potential danger.
Secondly, make sure to carry a first aid kit and any necessary medication with you at all times. Additionally, it’s always a good idea to let someone know your itinerary and check in with them regularly. Lastly, familiarize yourself with local customs and laws to avoid any misunderstandings or potential conflicts.
By taking these simple precautions, you can minimize your risk and maximize your travel experience. For more information on staying safe while traveling, check out resources like the State Department’s travel advisories or travel blogs from experienced globetrotters.
FAQs
What materials are needed to make a voltage tester?
To make a voltage tester, you will need a 9-volt battery, a resistor, an LED, and two wires.
How do I assemble the voltage tester?
Connect one end of the resistor to the positive leg of the LED and the other end of the resistor to one wire. Then, connect the other wire to the negative leg of the LED. Finally, connect the wires to the battery.
How do I use the voltage tester?
Touch one wire to the positive terminal of the circuit you want to test, and touch the other wire to the negative terminal. The LED should light up if there’s voltage in the circuit.
What is the voltage range that this tester can measure?
This voltage tester can measure DC voltage within the range of 0-24V.
Can this voltage tester be used to test AC voltage?
No, this voltage tester is not designed to test AC voltage.
How accurate is this voltage tester?
This voltage tester is relatively accurate, but it’s not suitable for precise measurements.
Can I modify this voltage tester to measure higher voltage levels?
Yes, but you would need to use a higher value resistor and a different LED that can handle higher voltages. It’s not a recommended modification for beginners.
