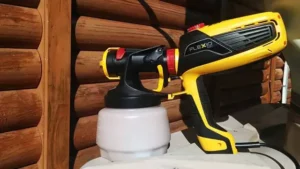
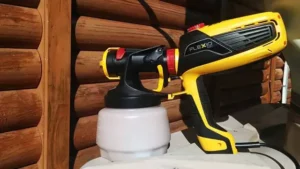
If you’re looking for a fast and efficient way to paint a large surface area, a pressure pot paint sprayer may be just what you need. This handy tool uses compressed air to push paint out of a pot, at a high pressure, for a more even and smooth finish. Whether you’re a professional painter or a DIY enthusiast, using a pressure pot paint sprayer can save you time and effort when it comes to painting everything from walls to furniture.
But how exactly does a pressure pot paint sprayer work, and what are the benefits of using one? In this blog post, we’ll take a closer look at this popular painting tool, and explore some tips and tricks for mastering the art of pressure pot painting. From understanding the different types of sprayers available, to selecting the right paint mixture for your project, we’ll cover everything you need to know to get the most out of your pressure pot paint sprayer. So let’s dive in and discover the power of pressure pot painting!
Preparing the Pressure Pot
If you’re wondering how to use a pressure pot paint sprayer, the first step is to prepare the pressure pot itself. This involves checking the air pressure gauge and adjusting it to the recommended level, which is usually between 50-60 PSI. You should also ensure that the lid is securely tightened and that the safety valve is closed.
Once you’ve checked these things, you can fill the pressure pot with your chosen paint or coating, making sure not to overfill it as this can cause the paint to spill out. It’s important to note that different types of paint require different dilution ratios, so be sure to follow the manufacturer’s instructions carefully. Finally, you should attach the spray gun to the pressure pot using the proper fittings, and then you’re ready to start spraying.
By following these simple steps, you can ensure that your pressure pot paint sprayer is ready to use and will provide you with excellent results.
Fill the pot with the paint and thinner
When it comes to preparing your pressure pot for painting, there are a few steps you need to take. The first step is to fill the pot with the paint and thinner. It’s important to use the right ratio of paint to thinner, as this will ensure that the paint sprays evenly and smoothly.
Typically, you’ll want to use about two parts paint to one part thinner, but this can vary depending on the type of paint you’re using. Once you have the right ratio of paint and thinner, pour it into the pot of your pressure pot. Be sure to use a funnel to avoid any spills or messes.
Once the pot is filled, you’re ready to attach the lid and begin pressurizing the pot. By taking these simple steps, you’ll ensure that your pressure pot is ready for a smooth and successful painting project.
Attach the spray gun to the pot
When it comes to painting larger surfaces like walls or furniture, a pressure pot can be a lifesaver. But to ensure that the pressure pot works effectively, it’s important to properly prepare it. The first step is to attach the spray gun to the pressure pot.
This is typically done by screwing the spray gun onto the air regulator, which should be attached to one of the pot’s ports. It’s important to make sure the connection is secure so that no air leaks out. Once you’ve attached the spray gun, you should also check the pot’s air pressure and adjust it to the right level for the type of paint you’re using.
Taking these steps ensures that your pressure pot is ready to go and that you’ll have a smooth and successful painting experience.
Check for any leaks or malfunctions
When it comes to pressure pot painting, ensuring the system is free of leaks and malfunctions is crucial. Before starting, it’s essential to prepare the pressure pot by inspecting all the parts, including the lid, gasket, and hoses, for any signs of wear and tear or damage. Often, leaks can occur due to inadequate sealing of the lid or a damaged gasket.
It’s recommended to replace the gasket periodically to prevent leaks. Additionally, it’s crucial to check all the components of the pressure pot, such as the air hose, gauge, and regulator, for any malfunctions. If any faults are detected, resolve them before moving forward with the painting process.
Taking the time to check for any leaks or malfunctions will ensure your painting process runs smoothly and that you don’t end up with a messy and flawed finished product.
Adjusting the Sprayer Settings
When using a pressure pot paint sprayer, adjusting the sprayer settings is crucial to achieving satisfactory results. These settings include the pressure, paint flow, and fan pattern. Pressure pots can handle varying levels of pressure, so it’s essential to check the manufacturer’s recommendation for the specific model you’re using.
Adapting the paint flow involves several factors, including the viscosity of the paint, the thickness of the surface, and the desired finish. Changing the fan pattern simply means adjusting the nozzle to disperse the paint in a horizontal, vertical, or round shape. If you’re using a pressure pot paint sprayer for the first time, take your time adjusting these settings and test spray onto a scrap piece of material before moving onto the final project.
Adjust the pressure on the pot
When it comes to spraying, adjusting the pressure on the pot is crucial. If you want to get the best results from your sprayer, then you need to get this right. If the pressure is too low, the sprayer won’t work effectively, and if it’s too high, you risk over-spraying and wasting chemicals.
You also need to make sure that the pressure is set appropriately for the type of nozzle you’re using. To adjust the pressure, you need to make sure that the sprayer is turned off and the pressure release valve is open. Then, turn the pressure adjust knob until the desired pressure is reached.
Too high or low pressure will affect the flow of your sprayer, so it’s important to make sure that you’ve adjusted it to the optimal setting. Adjusting the pressure correctly will give you the best possible results, so take some time to experiment with different settings until you find the one that works best for you and your crops.
Set the spray pattern and flow rate
Sprayer Settings Adjusting the sprayer settings is crucial to achieve an effective and efficient spray application. The first step is to set the spray pattern and flow rate. Spray patterns vary depending on the type of nozzle used, it can either be a fan, cone or flood.
The choice of spray pattern depends on the foliage size and target area. Once the spray pattern is set, adjusting the flow rate is next. This process sets the rate at which the liquid is discharged, which ultimately determines the coverage and uniformity of the application.
A higher flow rate will increase the coverage and reduce the time it takes to spray a given area. However, if the flow rate is too high, it can result in wastage, run-off and uneven coverage. Likewise, a low flow rate could result in inadequate coverage, leading to under-application.
It is therefore important to strike a balance between optimal coverage and efficiency. By adjusting the sprayer settings, you can achieve the desired outcome for your particular application, saving time, effort and valuable resources.
Wear appropriate personal protective equipment (PPE)
When it comes to adjusting the settings of your sprayer, it’s important to remember to wear appropriate personal protective equipment (PPE). While it may seem like a small detail, neglecting your safety gear can lead to serious consequences. PPE can include items like gloves, goggles, respirators, and even full-body suits, depending on the chemicals being sprayed.
Always read the labels on your products and ensure that you have the proper gear for the job. Adjusting your sprayer settings without wearing the necessary gear can expose you to harmful chemicals and put your health at risk. Remember that safety should always be a top priority when using any sort of sprayer.
So, take the time to outfit yourself in the appropriate PPE before you get to work and breathe easy knowing that you’re taking the necessary steps to stay safe.
Spray Painting with a Pressure Pot
If you’re looking for a quicker and easier way to spray paint, a pressure pot paint sprayer might be what you’re looking for. Using a pressure pot allows you to spray paint more efficiently than using a traditional spray gun, especially when it comes to larger projects. The pressure pot sprayer forces the paint out of the pot and through the air hose using compressed air, which makes it easier and faster to apply paint over larger surfaces.
Using a pressure pot paint sprayer is easy: simply fill the pot with paint, pressurize it using an air compressor, and pull the trigger on the spray gun. The paint will then be forced through the hose and onto the object you’re painting. With its ability to apply paint quickly and easily, the pressure pot paint sprayer is the perfect tool for both beginners and experienced painters alike.
With a little bit of practice, you’ll be able to achieve a professional finish on any paint job you tackle.
Test spray on a scrap surface
When it comes to spray painting with a pressure pot, it’s essential to test it out on a scrap surface before applying it to your desired object. This will help ensure that the nozzle and pressure are properly adjusted, and you achieve the desired finish without any flaws. The last thing you want is to ruin your project with an uneven coat or splatters of paint.
By testing your spray on a scrap surface, you’ll also have a chance to fine-tune your spraying technique, so you can achieve the perfect coverage and finish. Whether you’re working on a DIY project at home or painting a car in a professional setting, taking the time to test your spray beforehand can save you a lot of headaches in the long run. Remember, a little extra prep work can go a long way in achieving the perfect paint job.
Move the spray gun in a consistent sweeping motion
When it comes to spray painting with a pressure pot, it’s essential to move the spray gun in a consistent sweeping motion. This helps to ensure an even layer of paint across your surface, without any blotches or inconsistencies. Consistency is key when it comes to pressure pot spray painting, and mastering the sweeping motion takes some practice.
Ideally, you should move the gun in a smooth, side-to-side motion, without pausing or stopping at any point. It’s also important to maintain a consistent distance from the surface you’re painting, as this can affect the overall finish and coverage. With enough practice and attention to your technique, you can achieve a professional-quality result with pressure pot spray painting.
So, take your time, be patient and keep practicing until you get the hang of it!
Overlap each pass to ensure even coverage
When it comes to spray painting with a pressure pot, one of the most important things to keep in mind is to overlap each pass to ensure even coverage. This means that as you move the spray gun from side to side or up and down, you should aim to overlap each spray pass slightly with the previous one. This helps to prevent uneven coverage or missed spots on your surface.
Using a pressure pot for spray painting can provide excellent results, but it’s important to take the time to do it properly to avoid any issues. One key tip is to start with a clean and properly prepped surface. This can include sanding, cleaning, and masking off any areas you don’t want painted.
You’ll also want to make sure your paint is mixed well and at the right consistency for a smooth application. When you begin to spray, hold the nozzle about 6 to 8 inches away from the surface and move the spray gun in a consistent pattern, overlapping each pass slightly. You may need to adjust your air pressure or nozzle size to get the desired coverage.
Be sure to maintain an even speed and distance from the surface to avoid drips or splatters. Remember, practice makes perfect when it comes to spray painting with a pressure pot. Don’t be afraid to experiment with different techniques and adjust your approach as needed.
Whether you’re painting a car, a piece of furniture, or a large industrial surface, using a pressure pot can yield professional-looking results.
Cleaning and Maintenance
If you want to make sure your pressure pot paint sprayer lasts longer and continues to perform at its best, then keeping it clean and well-maintained is essential. The first step is to always clean your sprayer after each use, which involves flushing out any remaining paint or debris. To do this, simply fill the pot with warm water and run it through the sprayer until it runs clear.
You’ll also want to make sure the hose, gun, and nozzle are thoroughly cleaned and free of any clogs. Additionally, it’s important to regularly inspect and replace any worn parts, such as the hoses or nozzle tips, to avoid potential leaks or malfunctions. By taking the time to properly clean and maintain your pressure pot paint sprayer, you’ll be able to enjoy smooth, efficient painting for years to come.
Empty the remaining paint and clean the pot
Once you’ve finished your painting project, it’s essential to give your tools and equipment proper maintenance to keep them in good condition for the next use. One of the things you need to do is clean your paint pot and empty any remaining paint that you don’t need to use later. This step helps prevent the buildup of old paint that can affect the quality of your next project.
To empty your paint pot, carefully pour the remaining paint into a container, preferably one with a lid, for future use or disposal. You can also use rags or paper towels to absorb remaining paint. Once the pot is empty, rinse it thoroughly with water and let it dry.
Use a mild soap to remove any stubborn paint residue. If there’s still paint left, use a brush designed for cleaning paint pots to avoid scratching the surface. Proper cleaning and maintenance of your painting tools keep them in good working condition and extend their lifespan.
Remember, a clean and well-maintained paint pot produces better results and makes your painting experience more enjoyable.
Clean the spray gun thoroughly
One of the most important steps in maintaining the effectiveness of your spray gun is ensuring that it is thoroughly cleaned after each use. Not only will this help to prevent any clogs or blockages, but it will also help to prolong the lifespan of your equipment. To properly clean your spray gun, you will want to start by emptying any remaining paint or other materials from the container.
Next, you can disassemble the gun and use a brush or cleaning solution to remove any excess residue or build-up. Pay close attention to the nozzle and any other small crevices where paint can accumulate. Once you have finished cleaning, be sure to dry all parts thoroughly to prevent any rusting or damage.
By taking the time to properly clean your spray gun, you will ensure that it continues to function efficiently and effectively, allowing you to achieve high-quality results with every use.
Store the pressure pot and spray gun properly
When it comes to using a pressure pot and spray gun, it’s important to not only clean them properly, but to also store them correctly. One of the best things you can do is disassemble both the pressure pot and spray gun, and give them a thorough cleaning. Use a cleaning solution that’s safe for the type of material your equipment is made from, and pay close attention to all the nooks and crannies.
Once everything is cleaned and dried, you can reassemble and store the equipment. Make sure they’re stored in a dry and cool place, where they won’t be exposed to any extreme temperatures or direct sunlight. By taking these steps, you’ll be able to prolong the lifespan of your equipment and ensure that it’s always ready to use when you need it.
So, take the time to clean and maintain your pressure pot and spray gun, and you won’t be disappointed!
Conclusion
Using a pressure pot paint sprayer is like wielding a magic wand, transforming dull and worn surfaces into bright and beautiful ones with just a swipe of the nozzle. But like any tool, mastering its use takes practice and patience. So remember, with great power comes great responsibility – but when you’ve got the hang of it, you’ll be the Harry Potter of DIY painting projects!”
FAQs
What is a pressure pot paint sprayer?
A pressure pot paint sprayer is a device used in painting that works by releasing paint through high pressure.
What are the benefits of using a pressure pot paint sprayer?
The benefits of using a pressure pot paint sprayer include faster and more efficient application of paint, a smoother finish, and the ability to handle thicker coatings.
How do you set up a pressure pot paint sprayer?
To set up a pressure pot paint sprayer, first, assemble the components, then add paint to the pot, and attach the spray gun. Finally, adjust the pressure and test the sprayer.
How do you maintain a pressure pot paint sprayer?
To maintain a pressure pot paint sprayer, always clean it after use, check the hoses and connections for leaks and wear, and replace any damaged parts.
What precautions should you take when using a pressure pot paint sprayer?
When using a pressure pot paint sprayer, wear protective gear, work in a well-ventilated area, and follow the manufacturer’s instructions.
Can you use a pressure pot paint sprayer for different types of paints?
Yes, you can use a pressure pot paint sprayer for different types of paints, but you may need to adjust the pressure and use different nozzles.
How do you clean a pressure pot paint sprayer?
To clean a pressure pot paint sprayer, first, empty the remaining paint, then flush the sprayer with water or a cleaning solution, and finally, disassemble and clean the components thoroughly.

