Brake bleeding is a crucial aspect of maintaining your vehicle’s braking system. If not done on a regular basis, it can lead to a decrease in brake performance or even put you in danger on the road. One way to bleed your brakes on your own is by using a hand pump brake bleeder.
This tool can help you save a trip or two to the mechanic and also gives you the confidence to keep your brakes in top shape. In this blog post, we’ll provide you with a step-by-step guide on how to use a hand pump brake bleeder. We’ll talk about each step in detail and provide you with some tips and tricks along the way.
So, are you ready to take matters into your own hands and learn how to bleed your brakes? Let’s get started!
What is a Hand Pump Brake Bleeder?
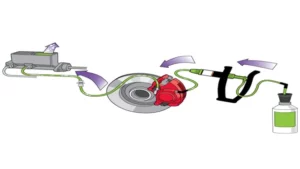
If you’re looking for a cost-effective way to bleed your brakes at home, a hand pump brake bleeder is the perfect tool for you. It’s a simple device that works by creating a vacuum in the brake system to remove air and replace it with new brake fluid. To use it, you’ll need to connect the hand pump to the brake fluid reservoir and attach the other end to the bleed valve on each brake caliper.
Then, pump the brake pedal several times to build pressure, open the bleed valve, and pump the hand pump until the old brake fluid (or air bubbles) are flushed out, and new brake fluid appears. Repeat this process on each brake caliper until all the air is removed from the brake system. Remember to keep an eye on the brake fluid level in the reservoir, and refill it as needed to prevent air from entering the brake system.
With a little bit of practice, anyone can use a hand pump brake bleeder in a short time to ensure proper brake function and a safe ride.
Definition
A hand pump brake bleeder is a tool used for removing air bubbles from the brake lines of a vehicle, ensuring that the braking system works properly. It is a simple yet effective tool that can be operated by hand to create a vacuum within the brake lines. This vacuum will then draw out any air bubbles or contaminants that may have built up in the system.
The hand pump brake bleeder can be used by both professionals and DIY enthusiasts, as it requires no special training or expertise. It is a cost-effective way to maintain your brake system and keep your vehicle safe and reliable on the road. Whether you’re a seasoned mechanic or just getting started, a hand pump brake bleeder is an essential tool for any toolbox.
Components
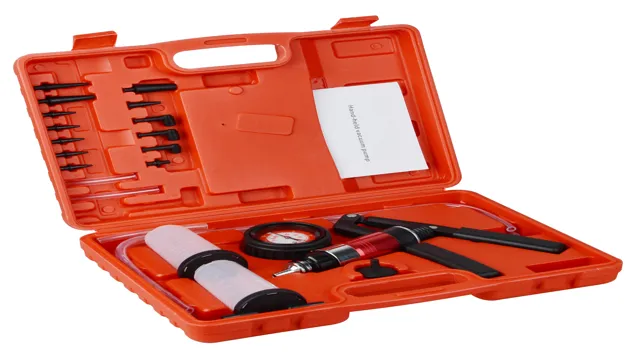
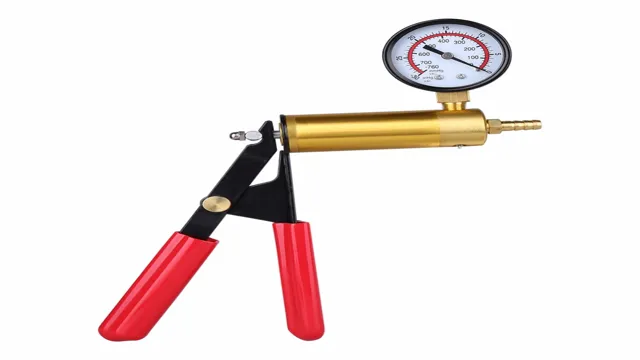
A hand pump brake bleeder is a brake bleeding device that uses a hand-operated pump to suck out old brake fluid from the brake lines and replace it with new fluid. This simple yet effective tool is commonly used by car mechanics to ensure that the brake system is working properly, especially after replacing brake components or making repairs. The hand pump brake bleeder consists of a vacuum pump, a fluid container, and a set of hoses and adapters to fit different brake systems.
Using this tool is easy, and it saves a lot of time and effort compared to the traditional method of pumping the brake pedal to bleed the brakes manually. With a hand pump brake bleeder, you can achieve a complete and thorough brake fluid exchange without the need for any specialized skills or knowledge. So, if you want to maintain your car’s brake system in top condition, a hand pump brake bleeder is a must-have tool in your arsenal.
How to Use a Hand Pump Brake Bleeder
If you’re looking for a quick and easy way to bleed your brakes, a hand pump brake bleeder is a great option. First, gather all the necessary tools such as the hand pump bleeder, a brake fluid catchment container, and a wrench to loosen the bleeder valves. Then, locate the brake caliper that needs to be bled and remove the rubber cap from the bleeder valve.
Next, position the catchment container below the bleeder valve to catch any fluid that is expelled during the process. Connect the hand pump bleeder to the valve and pump the handle until you see brake fluid flowing into the container. You may need to repeat this process until all the air bubbles have been removed from the brake line.
Once you’re satisfied, close the bleeder valve, replace the rubber cap, and refill the brake fluid reservoir. With a little bit of practice, you’ll be able to use a hand pump brake bleeder like a pro and keep your brakes in top shape.
Step 1: Prepping the Vehicle and Tools
Using a hand pump brake bleeder is a simple and efficient way to bleed the brakes of your vehicle. Before getting started, make sure the vehicle is parked on level ground and the wheels are securely chocked. Check all the hoses and connections of the brake bleeder to avoid any leaks that might cause disruptions.
Additionally, gather all the necessary tools needed for the process. These include safety glasses, hand pump brake bleeder, brake fluid, wrench, and a container to collect the old fluid. Once you have everything in place, begin by removing the master cylinder cap and filling it with new brake fluid to the recommended level.
This helps prevent air from entering the brake system during the bleeding process, making it more efficient. With your tools and vehicle prepped and ready to go, it’s time to get started with step two.
Step 2: Prepping the Brake Bleeder
To successfully use a hand pump brake bleeder, the second step is prepping the brake bleeder. This involves attaching the hose to the bleeder valve, making sure it is secure and tight. It’s important to check for any leaks and tighten as needed.
Next, the other end of the hose should be placed in a container to collect the old brake fluid. Make sure the container is placed at a level lower than the brake caliper to ensure proper fluid flow. Once the hose is secure and in the right position, pump the brake pedal a few times to pressurize the system.
This will make it easier to bleed the brakes and ensure that air bubbles are removed. By following these steps, using a hand pump brake bleeder can efficiently and effectively remove old brake fluid and ensure reliable brake performance.
Step 3: Opening the Bleeder Valve
Opening the bleeder valve is a crucial step when using a hand pump brake bleeder. Before beginning, it’s essential to ensure proper brake fluid levels and that the bleeder screw is accessible. Using a wrench, carefully loosen the bleeder screw, but avoid removing it entirely.
Attach the plastic hose from the bleeder valve to the hand pump, ensuring a secure connection. Begin pumping the brake pedal, so the pressure creates enough force to push the fluid through the system. As the fluid begins to flow, observe the color and consistency.
Repeat the process until the fluid runs clear. Remembering to tighten the bleeder screw firmly but not too tight is crucial in properly sealing the brake system. With the valve closed, dispose of waste from the bleeding process, fill the master cylinder with fresh brake fluid and remember to test your brakes before getting back on the road.
Step 4: Pumping the Pressure
Now it’s time to pump up the pressure! With your hand pump brake bleeder, you’ll want to use slow, consistent strokes to build up pressure in the system. This will push the air out through the bleed valve and into the catch can. Keep an eye on the fluid levels in both the master cylinder and catch can, making sure to add more if needed.
As you pump, you’ll also want to keep an ear out for any unusual sounds or sensations, as this could indicate a problem in the braking system. Once you’ve built up enough pressure, close the bleed valve and release the brake pedal. Then, repeat the process until all the air has been removed from the lines.
With a little patience and practice, you’ll have a fully-functioning braking system in no time! Remember to be careful and take your time to ensure a proper and safe bleeding process.
Step 5: Closing the Bleeder Valve
After successfully bleeding the brake system, it’s time to close the bleeder valve. This step is crucial to ensure that air doesn’t re-enter the system. To do this, tighten the bleeder valve using a wrench.
Don’t overtighten it though – just enough to create a tight seal. Once it’s closed, double-check that the brake pedal feels firm and doesn’t sink to the floor. If it does, it could be a sign of air still in the system and the bleeding process may need to be repeated.
Overall, closing the bleeder valve is a straightforward and vital step in the hand pump brake bleeding process to ensure efficient and safe braking.
Tips and Tricks for Using a Hand Pump Brake Bleeder
Learning how to use a hand pump brake bleeder can seem daunting at first, but with a few tips and tricks, it’s a straightforward process. Firstly, ensure your brake fluid is at the proper level, as having too little or too much can affect the bleeding process. Next, attach the hand pump brake bleeder to the brake bleeder screw and open it.
Pump the plunger several times until the brake fluid starts to flow steadily into your catch container. Keep an eye on the fluid level in your master cylinder, topping it up as needed to prevent it from falling too low. Once the brake fluid is flowing steadily, close the bleeder screw and move on to the next wheel in the same order as your car manual recommends.
After bleeding all four wheels, test your brake pedal by pressing it several times to ensure it’s firm and there’re no air bubbles left in the system. Remember to always work carefully and thoroughly, as brake systems are critical for your safety while driving.
Tip 1: Have Extra Brake Fluid on Hand
If you’re planning on using a hand pump brake bleeder, you may want to consider having some extra brake fluid on hand as a precautionary measure. While these devices are generally quite simple to use, there are always risks of a spill or leak during the process. If you don’t have enough brake fluid on hand to top up your system if necessary, you may find yourself in a bit of a bind.
So, it’s always best to have some extra fluid on hand, just in case. That way, if you do experience any issues, you can quickly add fluid and continue with the bleeder process. Plus, it’s always a good idea to keep a spare bottle of brake fluid around in case you need it for other tasks too.
Tip 2: Keep an Eye on the Fluid Level
When using a hand pump brake bleeder, it’s crucial to keep an eye on the fluid level. Running out of fluid while bleeding your brakes is a nightmare situation that you want to avoid at all costs. It can cause air to get into the system, making it much harder to bleed the brakes effectively.
Plus, it can cause damage to the brake system and lead to costly repairs. To prevent this from happening, make sure you fill up the fluid reservoir to the recommended level before you start. As you bleed the brakes, keep an eye on the fluid level and top up as needed.
Don’t wait until the fluid runs low to add more, as this can lead to air getting into the system. Keep your hand pump brake bleeder topped up and you’ll be able to bleed your brakes with confidence, without worrying about causing damage to your brake system.
Tip 3: Bleed the Brakes in the Correct Order
When using a hand pump brake bleeder, it’s crucial to bleed the brakes in the correct order. This will ensure that the brake fluid is properly circulated throughout the entire braking system and that no air pockets remain. Starting from the furthest wheel away from the master cylinder, work your way towards the closest wheel.
Typically, this means bleeding the brakes in the following order: right rear, left rear, right front, and left front. It’s vital to follow this sequence in order to avoid inadvertently pushing air further into the braking system and causing potential issues. Remember, safety is the foremost priority when it comes to brakes, so it’s important to take your time and ensure they are properly bled before taking your vehicle out onto the road.
Conclusion and Final Thoughts
In short, using a hand pump brake bleeder is a breeze! With just a few simple steps, you can easily remove air from your brake system and improve your car’s safety and performance. So why pay someone else to bleed your brakes when you can easily tackle this task yourself? Just remember to pump, open, close, and repeat! Happy bleeding!”
FAQs
What is a hand pump brake bleeder and how does it work?
A hand pump brake bleeder is a tool used to remove air bubbles from your brake system. It works by creating a vacuum that draws air out of the system, allowing you to bleed the brakes easily.
Can I use a hand pump brake bleeder on my own or do I need someone else to help me?
You can use a hand pump brake bleeder on your own. However, it’s always a good idea to have someone assist you to ensure that the process is done safely and effectively.
How often should I bleed my brakes using a hand pump brake bleeder?
It’s recommended that you bleed your brakes using a hand pump brake bleeder at least once a year. However, if you notice any issues with your brakes, such as sponginess or softness in the pedal, you may need to bleed them more frequently.
What kind of brake fluid should I use when bleeding my brakes with a hand pump brake bleeder?
You should use the type of brake fluid specified in your vehicle’s owner’s manual. Typically, this will be DOT 3 or DOT 4 brake fluid.
Is it safe to use a hand pump brake bleeder on ABS brakes?
Yes, it is safe to use a hand pump brake bleeder on ABS brakes. However, you should consult your vehicle’s owner’s manual to ensure that you follow the correct procedure for bleeding the brakes.
How long does it take to bleed brakes using a hand pump brake bleeder?
The time it takes to bleed brakes using a hand pump brake bleeder will depend on the size of your brake system and how much air is in the system. Typically, it takes between 30 minutes to an hour to complete the process.
Can a hand pump brake bleeder be used on all types of vehicles?
Yes, a hand pump brake bleeder can be used on most types of vehicles, including cars, trucks, and motorcycles. However, it’s important to follow the specific instructions for your vehicle to ensure that the process is done correctly.
