How to Use a Drywall Sander for Smooth Finish: A Step-by-Step Guide
Whether you’re a DIY enthusiast or a professional contractor, using a drywall sander is an essential part of any remodeling or construction project. But if you’re new to the tool, it can feel intimidating. Where do you start? How do you use it safely and effectively? Don’t worry – we’ve got you covered.
In this beginner’s guide to using a drywall sander, we’ll cover everything you need to know, from choosing the right tool for the job to proper technique and maintenance. So grab your safety gear and let’s get started!
What is a Drywall Sander?
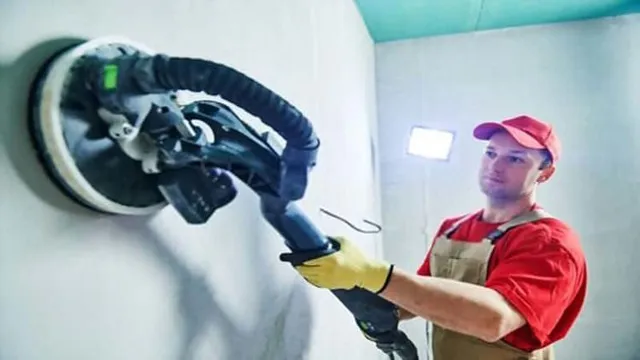
Looking to tackle some drywall projects at home but not sure how to use a drywall sander? A drywall sander is a power tool that’s used to smooth out rough patches on drywall surfaces. It’s perfect for removing imperfections such as bumps and ridges, giving your walls a smooth and professional finish. First, you need to choose the right sandpaper grit for the job; coarse grits are used to remove heavy paint, while fine grits are ideal for light sanding.
Next, you need to attach the sandpaper to the sander, making sure it’s secured tightly. Then, plug in the sander and start working on the wall, moving the sander in smooth and circular motions. Be careful not to apply too much pressure, as it can damage the surface or make the sandpaper wear out quickly.
Finally, use a vacuum cleaner to remove the dust that’s left behind, and wipe the surface clean with a damp cloth. With these simple steps, you can easily achieve a smooth and flawless finish with a drywall sander.
Description and Types of Drywall Sanders
A drywall sander is a specialized tool used to smooth out the rough surfaces of drywall after it has been installed. This is a crucial step to creating a polished and seamless finish, as rough surfaces can easily be seen through any paint or wallpaper applied over them. There are different types of drywall sanders on the market, each with its own unique features and benefits.
The most common types of drywall sanders include hand sanders, pole sanders, and power sanders. Hand sanders are the simplest type and are perfect for small projects or touch-ups. Pole sanders are ideal for larger areas and can be used with sandpaper or mesh screens.
Power sanders are the most powerful type, and they are equipped with a motor that makes it easier to sand large areas quickly. When choosing a drywall sander, it’s important to consider factors like the size of the job, the type of surface you’re working with, and your level of experience. With the right sander and a little bit of practice, you can achieve a professional-looking finish on all of your drywall projects.

Preparing for Sanding
If you’re wondering how to use a drywall sander, the first step is to prepare the surface you will be sanding. This means removing any loose debris or rough edges with a putty knife or sandpaper. Once the surface is smooth, make sure to cover any nearby furniture or floors with plastic or drop cloths to prevent dust and debris from settling on them.
It’s also important to wear protective gear such as a mask, goggles, and earplugs to avoid inhaling dust and to protect yourself from loud noise. When you’re ready to start sanding, adjust the sander to the appropriate speed and begin working in a circular or back-and-forth motion, depending on your preference. Keep the sander moving steadily to avoid creating low spots and always be sure to sand evenly across the entire surface.
With a little bit of practice, you’ll soon be a pro at using your drywall sander for all your home renovation needs!
Materials Needed
When it comes to sanding, preparation is key. To get started, you’ll need a few materials. First and foremost, you’ll need a sanding block or pad.
This is a tool that allows you to hold sandpaper securely and apply pressure evenly. Sandpapers come in different grits, so you’ll need to choose one that is appropriate for your project. For rough surfaces, a lower grit (around 60) is necessary, while a higher grit (around 220) is suitable for smoother finishes.
In addition to sandpaper, you’ll also need a dust mask, safety glasses, and ideally, a ventilated workspace. Sanding can create a lot of dust, which can be harmful to inhale, so it’s important to protect your lungs and eyes during the process. With the right materials, you’ll be well on your way to creating a perfectly sanded surface.
Safety Precautions to Take
When it comes to sanding, it’s important to take safety precautions seriously in order to avoid any potential accidents or injuries. Before even beginning your sanding project, it’s always a good idea to prepare by wearing protective gear like safety glasses, a respirator mask, and gloves. You should also make sure that your workspace is well-ventilated to prevent dust and debris from building up.
It’s also important to set up your tools and equipment properly, ensuring that everything is secure and in good working condition. When you’re ready to get started, be sure to take breaks frequently to prevent any strains or injuries from prolonged use. Overall, taking the time to prepare and take safety precautions can help to make your sanding project smooth and successful.
The main keyword used organically: sanding.
Sanding Techniques
When it comes to drywall sanding, there are a few key techniques that you’ll want to keep in mind in order to get a smooth and seamless finish. First and foremost, it’s important to choose the right type of sandpaper for your job. A fine-grit sandpaper is typically best for smoothing out rough spots, while a medium or coarse-grit paper can help you remove more significant imperfections.
In terms of technique, it’s generally best to start with light pressure and gradually increase it as needed. Using circular or back-and-forth motions can help you achieve an even sanding pattern. Additionally, consider using a sanding pole or other type of extension tool to help you reach higher or hard-to-reach areas without having to strain your arm or back.
By following these simple tips, you’ll be well on your way to achieving a flawless finish with your drywall sander.
How to Sand a Ceiling
Sanding a ceiling can be a tough task, especially if you don’t have the right techniques up your sleeve. The first and foremost thing to keep in mind is to use a sanding pole or a drywall sander to reach high ceilings. Next up, start sanding with a coarse-grit sandpaper, and gradually move to a finer-grit paper to get a smooth and even surface.
Make sure to use a vacuum or a dust extractor to suck in all the excess dust while sanding to avoid a mess. Another technique is to use a sanding sponge to reach the corners and edges of the ceiling. Remember, the key is to keep the sanding pole or sponge at a 45-degree angle towards the ceiling while sanding.
This will help you avoid grooves or scratches on the ceiling. Overall, sanding a ceiling can be a challenging task, but with the right techniques, you can achieve a smooth and flawless finish.
How to Sand a Wall
If you’re planning to apply a fresh coat of paint or wallpaper to a wall, it’s important to ensure that the surface is smooth and free of imperfections. Sanding is a crucial step in achieving a flawless finish, but it’s important to use the right technique to avoid damaging the wall. Start by selecting the correct grit sandpaper – coarse grit for rough surfaces, and fine grit for smoother walls.
Begin sanding in circular motions, applying even pressure and taking care not to over-sand one area. Remember to wear a dust mask and protect your eyes. For hard-to-reach corners and edges, use a sanding sponge or sandpaper wrapped around a block.
Once you’ve finished sanding, wipe down the wall with a damp cloth to remove any dust. With these techniques, you’ll be able to sand your walls effectively and achieve a smooth and perfect surface for your painting or wallpapering project.
After Sanding
Now that you’ve finished sanding your drywall, it’s time to use a drywall sander to achieve a smooth finish. To use a drywall sander, you’ll first need to attach a sanding pad to the bottom of the tool and insert a sandpaper disc onto the pad. Make sure your sander is plugged in and turned on before beginning.
Hold onto the sander with both hands and move it in circular motions across the surface of the drywall. Be sure to keep the sander moving at a consistent pace, applying equal pressure with both hands. As you work, periodically inspect the drywall to ensure it’s smooth and even throughout.
If you notice any rough patches, work to smooth them out with the sander. Remember to wear a dust mask and protective eyewear to avoid inhaling debris and to protect your eyes. Additionally, be sure to clean up the area afterwards to remove any dust and debris left behind.
With a little practice, you’ll be able to achieve a professional-looking finish on your drywall.
Cleaning Up
Once you’ve finished sanding your project, it’s important to take the time to thoroughly clean up any dust and debris left behind. Not only will this ensure a smooth finish, but it will also create a safer workspace. Start by using a vacuum with a brush attachment to suck up any loose particles.
Then, use a tack cloth to wipe down the surface, making sure to get into all the crevices and corners. If there are still stubborn spots, you can use a damp cloth or sponge to gently wipe them away. Don’t forget to also clean your tools and work area, as dust can accumulate in these areas as well.
By taking the time to properly clean up after sanding, you’ll be one step closer to achieving a beautiful, professional-looking finish.
Applying Paint and Finishing Touches
After sanding your surface, it’s time to apply paint and add the finishing touches to your project. It’s always best to apply a primer first to help the paint stick better and provide a smoother finish. Once the primer is dry, use a quality paintbrush or roller to apply your chosen paint color.
It’s important to apply thin coats and avoid drips or pooling. Allow each coat to fully dry before applying the next one. When you’re satisfied with the coverage, finish with a top coat to protect your paint and add shine if desired.
Don’t forget to touch up any areas that may need it and clean up any messes before enjoying your new painted surface. By following these steps, you’ll have a beautifully finished project that looks professional and lasts for years to come.
Conclusion
All in all, using a drywall sander is like sanding your way to perfection. With a steady hand and a smooth stroke, you can revamp any surface and make it look brand spankin’ new. But remember to take it slow and steady, no need to rush through the job.
Keep your safety gear on and use a vacuum to keep the dust at bay. If you follow these tips, you’ll have a beautifully sanded surface in no time. Go ahead, give it a try and sand away!”
FAQs
What is a drywall sander used for?
A drywall sander is used to smooth out and prepare walls and ceilings before painting.
How do I attach sandpaper to a drywall sander?
To attach sandpaper to a drywall sander, you should loosen the retaining clamp, slip the sandpaper over the pad, and then tighten the clamp.
Can I use any type of sandpaper with a drywall sander?
While you can use any type of sandpaper with a drywall sander, it’s recommended to use sandpaper specifically designed for drywall to avoid any damage or unevenness to the walls.
How do I prevent dust from spreading while using a drywall sander?
To prevent dust from spreading while using a drywall sander, you can attach a vacuum hose to the sander or use a drywall sanding vacuum attachment.
How often should I change the sandpaper on my drywall sander?
It’s recommended to change the sandpaper on your drywall sander frequently, especially when it starts to dull or clog with dust.
Can a beginner use a drywall sander?
Yes, a beginner can use a drywall sander with some basic training and safety precautions. It’s important to wear protective gear and practice on scrap materials before starting on walls and ceilings.
What are some common mistakes to avoid while using a drywall sander?
Some common mistakes to avoid while using a drywall sander include applying too much pressure, sanding too aggressively, and not using enough overlapping strokes. It’s also important to pay attention to your posture and avoid unnecessary strain on your back and arms.

