Picture this: You’re cruising down the road, enjoying a beautiful day and feeling as free as a bird. Suddenly, you press down on the brakes, but your car doesn’t seem to slow down as it should. This heart-stopping moment is a reminder of just how important it is to have properly functioning brakes.
One of the best ways to ensure this is by using a brake bleeder tool. If you’re not familiar with what a brake bleeder tool is, don’t fret. In simple terms, it’s a device that helps you remove air bubbles from your brake lines.
These pesky bubbles can compromise the effectiveness of your brakes, which is obviously not a good thing. Using a brake bleeder tool can help keep your brakes in tip-top condition, ensuring that you stop on a dime when you need to. But how do you use this tool? Is it difficult? Is it worth it? We’re here to answer these questions and more.
In this post, we’ll go over everything you need to know about using a brake bleeder tool. From step-by-step instructions to tips and tricks, we’ve got you covered. So, buckle up and get ready to learn how to keep your brakes in perfect shape!
What is a Brake Bleeder Tool?
A brake bleeder tool is an essential tool for any car owner. It is especially useful for those who tend to do their own car maintenance or who have an older car with a braking system that needs frequent bleeding. Essentially, it’s a small hand-held pump that is used to clear the brake lines of air and other contaminants, thereby improving the vehicle’s overall braking performance.
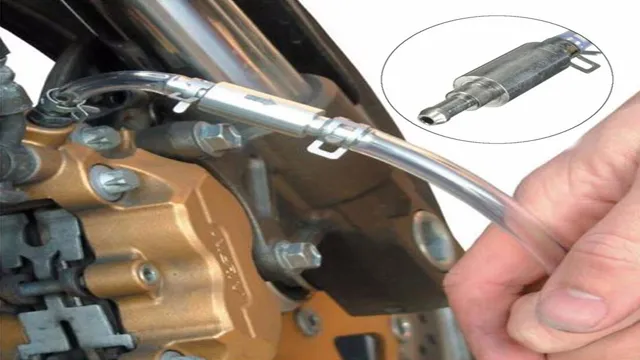
But how do you use a brake bleeder tool? First, locate the brake bleeder valve, which is typically located on the caliper or wheel cylinder. Then, attach the brake bleeder tool to the valve, making sure it is securely attached. Next, open the valve and begin to pump the brake bleeder tool until the brake fluid starts to come out.
Continue pumping until there are no more bubbles in the brake fluid. Lastly, close the valve and remove the tool, making sure to clean up any spilled brake fluid. With a little practice, you’ll soon be a pro at using a brake bleeder tool, and your car’s brakes will be in top shape.
Definition and Types
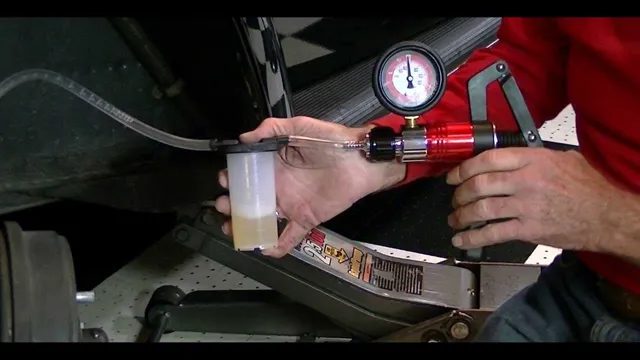
A brake bleeder tool is an essential device used in automotive repairs to help remove air from the brake system. It is specifically designed to simplify the process of bleeding brake lines, a necessary step when replacing or servicing brakes. Essentially, brake bleeders work by creating a vacuum or pressure to purge air bubbles trapped in the brake lines.
Depending on the type of tool used, there are two main categories of brake bleeders; vacuum brake bleeders and pressure brake bleeders. Vacuum bleeders use suction to draw out air from the brake system while pressure bleeders use air pressure to force brake fluid through the system to expel any air. Both types of brake bleeders are effective, but choosing the right tool for your brake system is crucial for successful brake maintenance.
Overall, a brake bleeder tool is an essential tool for any professional mechanic or do-it-yourself enthusiast looking to maintain optimal brake performance.
When to use a Brake Bleeder Tool?
If you’re experiencing spongy brakes or your brake pedal feels soft, it might be time to use a brake bleeder tool. This tool is used to remove air bubbles from the brake lines, which can cause brake failure if not addressed promptly. Before starting, ensure that the vehicle is on a level surface and the brake fluid is at the recommended level.
To use the tool, attach it to the brake bleeder valve and open the valve while applying pressure to the brake pedal to force the air out. Repeat this process until the brake pedal feels firm again and no air bubbles are present in the brake fluid. Remember to always use caution when working on your brakes and follow the manufacturer’s instructions for your specific brake bleeder tool.
Using a brake bleeder tool can help ensure your brakes are functioning properly and prevent potential accidents on the road.
Signs that you need to Bleed your Brakes
If you’ve noticed a spongy feeling in your brake pedal or it’s taking longer than usual to come to a complete stop, it might be time to bleed your brakes. It’s a crucial part of your vehicle’s maintenance that is often overlooked, but it’s essential for keeping your brakes in top condition. By bleeding your brakes, you remove any air bubbles that might be present in the system, which helps to restore the proper pressure and responsiveness to your brakes.
But when should you use a brake bleeder tool? Well, if you’re experiencing any of the symptoms mentioned above, then it’s time to invest in one. A brake bleeder tool makes it easy to remove any air bubbles from your brake lines, which will help your brakes perform better and prevent any potential accidents. So, if you’re noticing any issues with your brakes, don’t hesitate to invest in a brake bleeder tool and keep your brakes in top shape.
How to use a Brake Bleeder Tool?
Using a brake bleeder tool can seem intimidating at first, but it’s actually a relatively simple process. The first step is to locate the brake bleeder valve on your vehicle. This can usually be found near the brake caliper or wheel cylinder.
It’s important to keep in mind that different vehicles may have the valve in different locations. Once you’ve found the valve, you’ll need to attach your brake bleeder tool to it. This tool is designed to create a vacuum that will draw the air and old brake fluid out of the system.
Before you begin, it’s important to double-check that the reservoir is full of fresh brake fluid. Once you’re ready to begin, open the valve and begin pumping the brake pedal. This will create pressure that will push the old fluid out of the system and into the tool.
Keep pumping until you see clean, clear fluid coming through the tool. At that point, you’re ready to close the valve, remove the tool, and move on to the next wheel. With a little bit of practice, using a brake bleeder tool can become a quick and easy task that will help keep your brakes functioning properly.
Preparation
Preparation is key when it comes to using a brake bleeder tool. First, make sure you have all the necessary tools and materials, such as brake fluid, gloves, and safety glasses. It is also important to park your vehicle on a level surface and engage the parking brake to ensure safety during the bleeding process.
Next, consult your vehicle’s owner manual for specific instructions on how to access the bleeder valve. Locate the brake bleeder tool and attach it to the bleeder valve, ensuring a secure fit. Before starting, check the brake fluid level and top it off if necessary.
This will prevent air from entering the brake system during the bleeding process. Once everything is in place, start the bleeding process by following the manufacturer’s instructions for your particular brake bleeder tool. In general, you will need to pump the brake pedal several times while slowly loosening the bleeder valve.
This will allow air and old brake fluid to escape from the brake system. As the fluid begins to flow out, keep an eye on the brake fluid reservoir and continue pumping the pedal until clean fluid comes out. Once the fluid runs clear, tighten the bleeder valve and remove the brake bleeder tool.
Finally, check the brake fluid level once again and replace the brake fluid reservoir cap. With proper preparation and following these steps, your brakes will function smoothly and efficiently.
How to Bleed the Brakes
Brake Bleeder Tool If you’re someone who works on cars or bikes, then you know how important it is to have properly functioning brakes. And bleeding the brakes is a crucial part of that process, as it removes trapped air in the brake lines that can cause sponginess or failure of the brake system. Using a brake bleeder tool can make the job much easier.
First, make sure the vehicle is parked on level ground and the wheels are chocked. Then, locate the bleeder valve on the brake caliper or drum and attach the bleeder tool. Open the valve and begin pumping the brake pedal until all the air bubbles stop appearing.
Close the valve and repeat the process for the other wheels, starting with the one furthest from the master cylinder. Keep an eye on the brake fluid level and repeat the process until all the air is out of the system. Remember to test drive the vehicle afterwards to ensure the brakes are operating smoothly.
Using a brake bleeder tool can make this potentially frustrating task much simpler, and better brakes make for a safer ride.
Tips and Tricks for using a Brake Bleeder Tool
If you’re wondering how to use a brake bleeder tool, don’t worry, it’s not as complicated as it may seem. First, locate the bleeder valve on your brake caliper, typically found at the top. Then, attach the tool to the valve and pump it to create suction.
This will draw out any air or fluid trapped inside the system. Make sure to keep an eye on the level of brake fluid in the reservoir and top up as needed. Once you’ve flushed the old fluid, refill the system and pump the brake pedal a few times to help distribute the new fluid.
Repeat the process on each brake caliper and you’ll be all set. By using a brake bleeder tool, you can ensure your brakes are functioning properly and avoid any potential safety hazards on the road.
Safety Tips
Brake Bleeder Tool Using a brake bleeder tool is important in maintaining the braking system of your vehicle. However, safety should always come first when handling any type of tool. Before starting the brake bleeding process, ensure that your vehicle is on a level surface and that the parking brake is engaged.
To avoid injury, never operate the tool with bare hands and always wear protective gloves. It is also important to use the appropriate size of the bleeder wrench to avoid damaging the bleeder valve. Remember to always follow the manufacturer’s instructions on how to properly use and clean the brake bleeder tool.
With these tips and tricks, you can safely and effectively use a brake bleeder tool to maintain your vehicle’s braking system.
Common Mistakes to avoid
When it comes to using a brake bleeder tool, there are a few common mistakes that people tend to make. One of the most important tips to keep in mind is to always read the instructions carefully before using the tool. Another common mistake is not properly preparing the brake system before bleeding it.
This can lead to air getting trapped in the brake lines, which can cause problems down the line. Additionally, it’s important to make sure that the brake fluid is properly topped off before bleeding the brakes. This ensures that the system is properly primed and ready to go.
Overall, taking your time and being thorough with each step of the process is key to successfully using a brake bleeder tool and avoiding costly mistakes. So, whether you’re a seasoned mechanic or just starting out, always remember to take your time and follow the instructions carefully.
Conclusion
Brake bleeder tools may seem like tricky contraptions, but with a little practice and patience, anyone can master their use. Like a trusty sidekick, a brake bleeder tool can assist in keeping your brakes in tip-top shape and keeping you safe on the road. So, saddle up and give it a try – you’ll be stopping on a dime in no time!”
FAQs
What is a brake bleeder tool used for?
A brake bleeder tool is used to remove air bubbles from a car’s brake lines, which can cause spongy brakes or brake failure.
How do I use a brake bleeder tool?
First, locate the brake bleeder valve on the caliper or wheel cylinder. Next, attach the bleeder tool to the valve and open the valve by turning it counterclockwise. Pump the brake pedal until no more air bubbles come out of the valve, then close the valve and remove the bleeder tool.
What type of brake bleeder tool should I use?
There are several types of brake bleeder tools available, including vacuum pumps, pressure pumps, and gravity bleeders. The best type of tool to use depends on the make and model of your vehicle, as well as your personal preference.
Can I use a brake bleeder tool alone or do I need help?
It is possible to use a brake bleeder tool alone, but it is often easier and more efficient to have a helper pump the brakes while you operate the tool.
How often should I use a brake bleeder tool?
It is generally recommended to use a brake bleeder tool whenever the brake system has been opened or serviced, or if there are signs of spongy or uneven brake pedal feel.
What are some signs that I need to use a brake bleeder tool?
Signs that air bubbles may be present in your brake lines include a spongy or soft brake pedal, poor braking performance, and a brake warning light on your dashboard.
Is it safe to use a brake bleeder tool on my own?
Using a brake bleeder tool is generally safe as long as you follow the manufacturer’s instructions and take proper safety precautions, such as wearing gloves and eye protection and using a jack stand to secure the vehicle. However, if you are not comfortable performing the procedure on your own, it is recommended to seek professional assistance.
