Have you ever gone to change your brake pads only to find that the brake bleeder screw is rusted and seemingly impossible to remove? It can be frustrating and time-consuming, not to mention potentially dangerous if you are unable to properly bleed your brakes. Whether it’s due to the age of your vehicle or exposure to the elements, rusted brake bleeder screws are a common problem among car owners. But fear not, there are ways to remove these stubborn screws without damaging your brake system.
In this blog post, we’ll explore some of the most effective methods for removing rusted brake bleeder screws and getting your brakes back in working order.
Introduction
If you own a vehicle, you know that the upkeep can be a hassle at times, especially when dealing with rusted parts. One of the most common issues is rusted brake bleeder screws, which can be difficult to remove if you don’t have the right tools or know-how. However, with a little bit of patience and some elbow grease, you can get those rusted screws removed and back on the road in no time.
The key is to use penetrating oil to loosen up any rust and corrosion before attempting to remove the screw. You can also try using a screw extractor or heat to help loosen the screw. Whatever method you choose, just be sure to take your time and use caution to avoid damaging the surrounding parts or injuring yourself.
With these tips, you’ll have those rusted brake bleeder screws removed in no time!
What are brake bleeder screws?
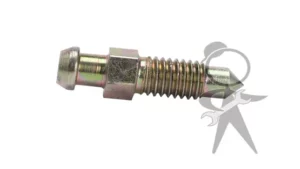
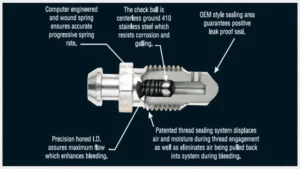
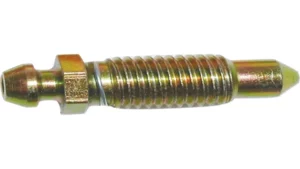
Brake bleeder screws are used in the brake system of a vehicle to remove air bubbles from the brake lines. These screws work by allowing the old brake fluid, which contains air bubbles, to escape from the brake lines. The screws themselves are small, hexagonal or square bolts, located at the top of the brake calipers or at the master cylinder.
They have a small hole drilled through them, which enables the air and old brake fluid to escape when opened. Brake bleeder screws are essential to the proper functioning of a car’s braking system and should be used whenever there are any issues with the brakes. They allow for the smooth and safe operation of a vehicle, giving drivers and passengers peace of mind when on the road.
Why do brake bleeder screws rust?
Brake bleeder screws are essential components of any braking system. They play a crucial role in regulating brake fluid pressure, which helps to slow down and stop your vehicle. However, brake bleeder screws can become stubborn and rust over time, making them difficult to remove and replace.
But why do they rust in the first place? Well, the answer lies in their exposure to moisture and oxygen, which can cause a chemical reaction that leads to corrosion. Additionally, brake fluid contains chemicals that can accelerate the rusting process, especially if left to accumulate on the screws for extended periods. Therefore, regular maintenance and cleaning of your brake bleeder screws is critical in ensuring your braking system’s optimal performance and longevity.
Importance of removing rusted brake bleeder screws
Brake Bleeder Screw Introduction: When it comes to our vehicles, it’s essential to ensure all its parts are functioning correctly, not only for our safety but also for the vehicle’s longevity. One part that is often overlooked on our vehicles is the brake bleeder screw. This small component plays a crucial role in our braking system, and if it becomes rusted, it can cause significant problems.
This blog will highlight the importance of removing rusted brake bleeder screws from your vehicle and the potential dangers of neglecting this simple maintenance task. Main Paragraph: Rusted brake bleeder screws can cause a wide range of problems and can compromise the safety of your vehicle. When they become corroded, it becomes difficult to open or close them, making it nearly impossible to change the brake fluid.
Brake fluid absorbs moisture over time, and if it’s not changed or maintained correctly, it can cause rust or air to enter the brake lines. This air can make your vehicle’s braking system less effective and increase the distance it takes your car to stop. Corroded bleeder screws can also lead to leaks in the brake system, which can cause a loss of brake pressure and, ultimately, an accident if not taken care of promptly.
Conclusion: In conclusion, ensuring that your vehicle’s brake bleeder screws are free from rust and debris is a crucial aspect of vehicle maintenance and safety. Regularly checking and changing your brake fluid will help keep your braking system functioning correctly and prevent costly repairs in the future. Next time you’re performing maintenance on your vehicle, take the time to inspect your brake bleeder screws and replace them if necessary.
Your vehicle and your safety will thank you for it.
Tools needed
Removing rusted brake bleeder screws can be a time-consuming and frustrating task, but with the right tools, you can get the job done. First and foremost, you’ll need a good set of wrenches, ideally ones that fit snugly around the screw. This will help prevent any slipping or rounding of the screw that could further damage it.
You’ll also need a penetrating oil, such as WD-40 or PB Blaster, to help loosen any rust and corrosion around the screw. A hand-held impact driver is another useful tool that can help apply extra force to the screw when turning it. If all else fails, you may need to resort to using a screw extractor, which is a specialized tool designed to bite into the screw and help turn it out.
Regardless of the method you use, always work carefully and steadily, and don’t be afraid to ask for help if needed. By using these tools and techniques, you can successfully remove rusted brake bleeder screws and keep your brakes working smoothly and safely.
Brake bleeder wrench
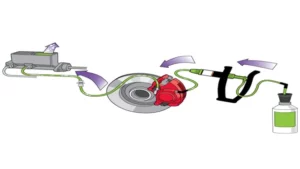
When it comes to brake bleeding, using a brake bleeder wrench can make all the difference. Before getting started, make sure you have the necessary tools on hand. Along with a brake bleeder wrench, you’ll need a clear plastic hose, a container for brake fluid, and a wrench to open the bleeder valve.
Once you have everything you need, start by loosening the bleeder valve with the wrench and attaching the plastic hose to the valve. Stick the other end of the hose in a container to catch any fluid that comes out. Pump the brake pedal a few times until you see the old fluid begin to flow out of the valve and into the container.
Keep pumping until the fluid runs clear, then tighten the valve and top off the brake fluid reservoir. A brake bleeder wrench may seem like a small thing, but it is an essential tool for anyone who wants to keep their brakes working properly.
Penetrating oil
Penetrating oil is a must-have in any toolbox if you want to deal with rust, stuck bolts, or squeaky hinges. But just having the oil bottle in your arsenal won’t do you any good if you don’t have the necessary tools to apply it correctly. Here are the tools you need to get the best results from penetrating oil.
First, you need a wire brush to remove any loose debris and rust from the surface you want to apply the oil to. The oil can’t penetrate a dirty or rusty surface, so it’s essential to clean it thoroughly before applying the oil. Secondly, a spray bottle is essential to apply the oil accurately.
Penetrating oil comes in a thin and runny form, and it’s easy to over-apply it if you’re using the bottle’s spout. A spray bottle allows you to control the amount of oil that you apply, reducing the waste and saving money in the long run. Thirdly, a set of pliers will help you tackle those stubborn bolts or nuts.
Penetrating oil will loosen them up, but if you can’t turn them with your fingers, you’ll need something to grip them with. Pliers come in handy in this situation, and they’ll quickly get the job done. In conclusion, if you have these tools in your toolbox, you’re all set to tackle any rust, squeaks, or stuck bolts.
You don’t need any fancy or expensive equipment, just these essential tools and some penetrating oil, and you’ll be amazed at what you can accomplish. So, grab your wire brush, spray bottle, and pliers, and get that penetrating oil flowing!
Pliers
When it comes to any sort of DIY project, having the right tools is essential for success. For any project that involves tightening or loosening nuts and bolts, a pair of pliers is a must-have in your toolbox. Pliers come in multiple shapes and sizes, with each one designed for specific tasks.
Some of the most commonly used types of pliers include slip-joint pliers, needle-nose pliers, locking pliers, and cutting pliers. Slip-joint pliers are versatile and can be used for different tasks such as holding objects or twisting wires. Needle-nose pliers are perfect for working in tight spaces and can be used for bending wires or opening split rings.
Locking pliers, also known as vise-grips, are suitable for tasks that require a firm grip, such as holding or clamping objects. Finally, cutting pliers are used to cut wires, cables, and other materials. Having a selection of pliers in your toolbox will ensure that you’ll have the right tool for the job and get the job done to your satisfaction.
Vice grips
When it comes to fixing things around your house or workspace, having the right tools is a must. One tool that should be in any handyman’s arsenal is a set of vice grips. These versatile pliers are designed to grip onto anything with a firm, locking grip that won’t slip or let go.
They’re perfect for holding onto nuts and bolts that are otherwise difficult to reach, and their adjustable jaws mean they can handle a wide variety of sizes and shapes. Whether you’re working on a car engine or just tightening some loose screws, vice grips are an essential tool that can help make any job easier. So the next time you’re looking to tackle a DIY project, make sure you have a set of vice grips on hand to help you get the job done right.
Preparation
Removing rusted brake bleeder screws is a task that can be frustrating, but with a little preparation, it can be done with ease. Firstly, make sure you have all the necessary tools at hand. You will need a wrench, a socket set, and a can of penetrating oil.
Start by spraying the penetrating oil onto the rusted screw and let it sit for about 10 minutes to allow it to break down the rust. Next, use a wrench or a socket to try and loosen the screw. If it doesn’t budge, use a hammer to gently tap the end of the wrench or socket to exert additional force while turning it.
If the screw still doesn’t move, apply more penetrating oil, and continue tapping and turning until the screw is loose enough to remove. Remember to be patient and take your time to avoid damaging the screw or the bleeder valve. With these preparation tips and tools, you can successfully remove rusted brake bleeder screws in no time.
Safety precautions
When it comes to safety precautions, preparation is key. Before embarking on any task, it’s important to identify potential hazards and take measures to prevent accidents from happening. This involves training yourself and your team on proper safety procedures and equipping everyone with the necessary protective gear and equipment.
For example, if you’re working in construction, you may need hard hats, safety glasses, and steel-toed boots to protect against falling debris and other hazards. It’s also important to inspect your tools and machinery regularly to ensure they’re in good working condition and won’t malfunction during use. By taking the time to prepare and plan ahead, you can reduce the risk of accidents on the job and create a safer workplace for everyone involved.
So, always stay vigilant and maintain a safety-first mindset whenever you’re working.
Preparation steps before removing rusted brake bleeder screws
If you are facing a rusted brake bleeder screw, don’t panic! There are a few preparation steps you can take to avoid making things worse. Firstly, spray the rusted area with a penetrating oil like WD-40 or Liquid Wrench. This helps loosen corroded parts and makes them easier to turn.
Give it some time to soak in before trying to remove the screw. Secondly, clean the surrounding area with a wire brush to remove excess debris and rust. This will provide better access and prevent contamination from entering the brake fluid system.
Finally, prepare a backup plan in case things go wrong. Have replacement parts on hand, such as a new bleeder screw and brake line if necessary. Taking these preparation steps can save you time and reduce frustration when dealing with rusted brake bleeder screws.
Remember to approach the situation with patience and caution to avoid causing further damage to the system.
Removing rusted brake bleeder screws
Rusted brake bleeder screws can pose a serious problem if you don’t know how to remove them properly. But with the right tools and techniques, it’s certainly possible to get them out without causing any damage to your brake system. Firstly, you’ll need a penetrating oil to break down the rust and corrosion that’s binding the screw in place.
Once you apply this, let it sit for around 30 minutes before attempting to remove the screw. Secondly, use a wrench or pliers that are the correct size and grip tightly onto the screw. If you’re still struggling to get it out, try applying heat to the surrounding area, as this can help to expand the metal and loosen the screw.
It’s worth noting that if the screw is too badly rusted or damaged, you may need to replace the entire brake caliper to avoid any future issues. Nonetheless, by taking the right steps and persevering through the task, you’ll be able to remove those stubborn brake bleeder screws and have a safe driving experience once again.
Steps on how to remove rusted brake bleeder screws
If you’re dealing with rusted brake bleeder screws, don’t panic, as there are steps you can take to remove them without causing any additional damage. Firstly, you might need to soak the screws in penetrating oil for a few hours or overnight before attempting to loosen them. You can then use a brake bleeder wrench to try and turn the screw counterclockwise gently.
Applying too much force can cause the screw to break and create a bigger problem. Applying heat to the area around the bleed screw may also help in loosening it. If all else fails, you may need to use a screw extractor to remove the rusted screw.
Ultimately, you want to be patient and apply steady pressure to prevent causing any unwanted damage that can be costly to repair. By taking these steps, you’ll be able to remove a stubborn rusted brake bleeder screw and get back on the road safely.
Alternative methods if the screws won’t budge
If you’re facing a problem where the screws won’t budge, it can be frustrating. One common issue is when rusted brake bleeder screws refuse to move. However, don’t worry – there are alternative methods you can try.
One option is to use a penetrating oil to loosen the rust buildup. Another option is to use a torch to apply heat to the area around the screw to loosen it up. Be careful when using these methods, and make sure to take appropriate safety precautions.
If neither of these methods work, you may need to seek professional assistance. Remember, it’s important to address rusted brake bleeder screws as they can cause issues with your vehicle’s brake system and compromise your safety on the road.
Conclusion
When it comes to removing rusted brake bleeder screws, the key is perseverance and the right tools. Don’t let a stubborn screw be the brake on your DIY repair efforts. Arm yourself with penetrating oils, vise-grips, and a little know-how, and you’ll soon be unscrewing that rusted culprit like a pro.
Remember: with a little elbow grease and a lot of determination, any challenge can be unthreaded.”
Importance of regular brake maintenance to prevent rusted bleeder screws
Regular brake maintenance is crucial to prevent rusted bleeder screws, which can make future repairs more difficult and costly. If the bleeder screws become rusted, they may not open or close properly, resulting in brake fluid leaks, decreased braking power, and potential brake failures. Removing rusted brake bleeder screws can be a challenge, as they can be difficult to turn and may break during removal.
It’s important to address rusted bleeder screws as soon as possible to avoid further damage to the brake system. To prevent rusted bleeder screws, it’s important to have regular brake maintenance, including flushing and changing the brake fluid, inspecting the brake lines and hoses, and lubricating all brake components. This will help to keep the brake system in good condition and prevent rust from forming on the bleeder screws.
Regular brake maintenance is a small investment that can save you from costly repairs and potentially dangerous situations. Trust a trained mechanic to perform routine brake maintenance to ensure your vehicle’s safety on the road.
FAQs
What causes brake bleeder screws to rust?
Brake bleeder screws rust due to exposure to moisture and other elements. They can also rust due to corrosion caused by contact with brake fluid.
How do I know if my brake bleeder screws are rusted?
You can tell if your brake bleeder screws are rusted by inspecting them visually. If they appear corroded or rusted, then they need to be replaced.
Can I remove rusted brake bleeder screws myself?
Yes, you can remove rusted brake bleeder screws yourself, but it requires some specialized tools and techniques. It is better to take the car to a professional mechanic if you are not comfortable doing it yourself.
What tools do I need to remove rusted brake bleeder screws?
To remove rusted brake bleeder screws, you will need a brake caliper piston retractor tool, a set of sockets, a wrench, and a hammer.
How do I prevent brake bleeder screws from rusting in the future?
You can prevent brake bleeder screws from rusting by applying a corrosion inhibitor to the threads of the screw. Alternatively, you can use stainless steel brake bleeder screws that are not susceptible to rust.
Can I reuse rusted brake bleeder screws?
It is not recommended to reuse rusted brake bleeder screws as they may be weakened and prone to further corrosion. Replace rusted brake bleeder screws with new ones.
What can I do if the rusted brake bleeder screw breaks during removal?
If the rusted brake bleeder screw breaks during removal, you will need to extract the remaining part of the screw using an extraction tool. A professional mechanic will have the necessary tools to complete this task successfully.
