Got a dent on your car that’s bothering you? Fret not, because with a dent puller and some glue, you can easily fix it at home. However, once you’ve successfully pulled the dent out, you might be left with some residue glue that’s just as difficult to remove. But don’t worry, we’ve got you covered on how to remove dent puller glue without damaging your car’s paintwork.
In this blog, we’ll share some easy-to-follow steps on how to remove glue without causing any further damage to your car’s exterior. So, let’s get started.
Understanding Dent Puller Glue
If you’ve used a dent puller glue to remove a dent from your car, you’ll know that removing the glue residue can be a challenge. The glue used in these devices is typically a special formula that is designed to adhere strongly to both the car surface and the puller stud. While this is great for pulling out dents effectively, it can make removing the glue challenging.
However, there are a few methods that can help make the process easier. One option is to use a heat gun to melt the glue, which will make it easier to scrape off with a plastic scraper. Another option is to use a citrus-based solvent or adhesive remover to dissolve the glue before scraping it off.
Whatever method you choose, be sure to work carefully to avoid damaging the car’s paint. With patience and a little effort, you can remove the dent puller glue and get your car looking great once again.
What is Dent Puller Glue?
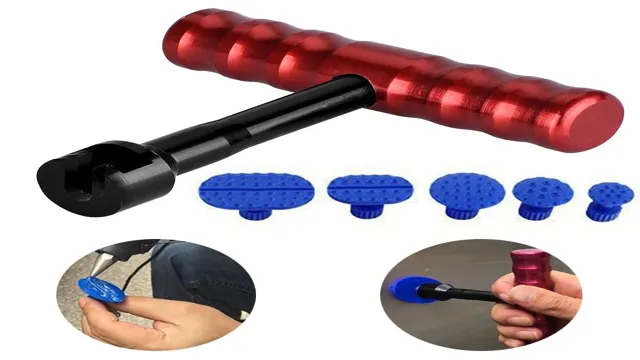
Dent puller glue has become a popular tool in the world of automotive repairs. This type of glue is specially formulated to adhere to the surface of a car and help remove dents and dings without damaging the paint. It works by pulling the dent outwards, allowing it to pop back into place.
The glue is strong enough to hold the pulling device in place, yet flexible enough to release once the dent is removed. One of the best things about dent puller glue is that it is easy to use and doesn’t require any special tools or equipment. All you need is the glue itself, a dent puller, and a few basic instructions and you’re ready to go.
So, whether you’re a professional mechanic or a do-it-yourselfer, dent puller glue is a great option for repairing those unsightly dents and dings on your car’s exterior.
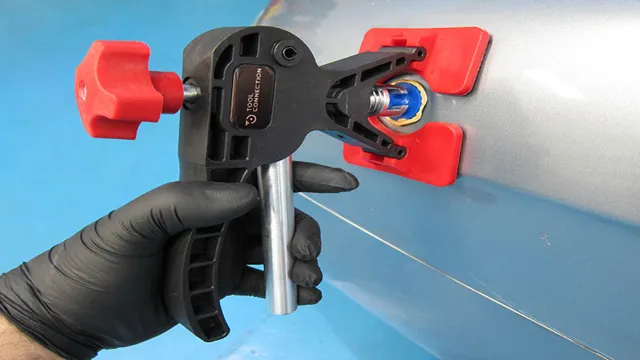
Types of Dent Puller Glue
Dent puller glue is a crucial component of any DIY dent repair toolkit. But did you know that there are actually different types of glue designed for different types of dents? Understanding these different types can help you choose the best glue for your specific needs and ensure that your repairs are as effective as possible. Some of the most common types of dent puller glue include black glue, transparent glue, and high-temperature glue.
Black glue is typically the strongest and best suited for larger dents, while transparent glue is ideal for smaller dents or working on thin metal. High-temperature glue is designed to withstand extreme heat, making it a good choice for repairs in warmer climates or environments. By considering the specifics of your dent and the properties of the different types of glue available, you can select the right glue for the job and get your vehicle looking as good as new in no time.
Tools and Materials You Need
If you’re looking to remove dent puller glue, you’ll need a few tools and materials to get the job done. First, you’ll need a heat gun or a hair dryer to warm up the glue so that it becomes pliable and easier to remove. You’ll also need a plastic scraper or a soft-bristled brush to gently scrape away any excess glue.
Make sure to avoid using metal tools, as they can scratch the surface of your car and cause more damage. Another tool that can be helpful is a solvent, such as rubbing alcohol, WD-40, or Goo Gone. These solvents can dissolve the glue and make it easier to remove with your scraper or brush.
Finally, you’ll need a microfiber cloth to wipe away any residue once the glue has been removed. With these tools and materials, you’ll be able to remove dent puller glue quickly and easily, leaving your car looking as good as new.
Heat Gun or Hair Dryer
When it comes to DIY projects, having the right tools and materials is critical to achieve your desired outcome. If you’re planning to work with heat, you may be wondering whether you should use a heat gun or a hair dryer. While both can produce hot air, they’re quite different in terms of their performance and suitability.
For instance, a hair dryer is better for drying wet hair, while a heat gun is more powerful and versatile, making it ideal for home improvement tasks like removing paint, thawing pipes, or bending PVC pipes. Moreover, heat guns come with adjustable temperature settings and various nozzle attachments, which enable you to control the heat and airflow and direct it to specific areas. On the other hand, hair dryers typically don’t have adjustable temperature or nozzle options, and they may not get hot enough for some DIY jobs.
Overall, your choice between a heat gun or a hair dryer will depend on your project’s requirements, safety precautions, and personal preferences.
Glue Solvent
Glue Solvent When it comes to fixing or assembling various objects, glue is a commonly used adhesive. However, sometimes, glue needs to be removed, and this is where a glue solvent comes in handy. A glue solvent is a chemical solution that effectively dissolves glue, making it easier to remove.
If you want to use a glue solvent, here are the tools and materials you need. Firstly, you need safety gloves to protect your hands from the solvent’s harsh chemicals. Secondly, acquire a scraper or putty knife to scrape off the softened glue, and thirdly, a soft brush comes in handy to remove the remaining residue.
Additionally, a solvent-compatible solvent-resistant container to store your glue solvent and a rag to clean up any spillage. Ultimately, using a solvent enables you to effectively remove glue or adhesive residue from surfaces without damaging the material underneath.
Scraper or Plastic Spatula
When it comes to baking, having the right tools and materials makes all the difference. Two essential items you’ll need are a scraper and a plastic spatula. While both may seem similar and can often be used interchangeably, there are some differences to keep in mind.
A scraper, also known as a bench scraper, is a flat, rectangular tool with a handle that’s used to scrape dough or batter off surfaces like countertops or mixing bowls. It’s also great for dividing dough or cutting butter into small pieces. Scrapers can be made of metal or plastic, but the latter is more common due to its flexibility and ease of use.
On the other hand, a plastic spatula is a thin, flexible, and curved tool that’s perfect for getting every last bit of batter out of a bowl or spreading frosting evenly on a cake. They come in different sizes and shapes, but the most common are the straight and angled spatulas. These can also be used to flip cookies, pancakes, or burgers on a griddle or skillet.
While both a scraper and a plastic spatula are indispensable in any baker’s toolbox, they have different purposes. A scraper is excellent for cutting and scraping, while a plastic spatula is the go-to tool for spreading and smoothing. Having both on hand will help you achieve a perfect bake every time, so why not get both? With the right tools and materials, you can take your baking to the next level!
Step-by-Step Guide
If you’ve used a dent puller to remove a dent from your car, you may have been left with stubborn glue residue. Don’t worry – removing the glue isn’t as daunting as it may seem. The first step is to gather your materials: you’ll need a heat gun or hair dryer, rubbing alcohol, a plastic scraper or credit card, and a microfiber towel.
Begin by heating the glue with the heat gun or hair dryer on the lowest setting for a few minutes. Then, soak a microfiber towel in rubbing alcohol and apply it to the glue residue until it softens. Use a plastic scraper or credit card to gently scrape away the residue, taking care not to scratch the car’s paint.
Repeat the process until all the glue is removed. You can also use a commercial adhesive remover, but make sure to follow the instructions carefully and test it on a small, inconspicuous area first. With these steps, you’ll have your car looking as good as new in no time!
Step 1: Heat the Glue
If you’re working on a DIY project that involves glue, the first step is to heat the glue. This is especially important if you’re using a heat-activated adhesive. To do this, you can use a glue gun or a heat gun depending on the type of glue you’re working with.
If you’re using a glue gun, simply plug it in and wait for it to heat up. The glue will melt and become easier to work with. If you’re using a heat gun, be sure to hold it a safe distance away from your project so you don’t accidentally burn it.
Once the glue has been heated, you can begin to apply it to your project. Just be sure to work quickly, as the glue will start to set as it cools. With a little bit of patience and practice, you’ll be able to get the hang of heating and applying glue like a pro.
Step 2: Apply Glue Solvent
When it comes to removing glue from a surface, applying a glue solvent is an essential step. This powerful chemical can dissolve the bond created by the glue, effectively breaking it down and making it easier to remove. However, it’s important to remember that glue solvents can be dangerous if not handled correctly.
Make sure to wear protective gloves and work in a well-ventilated area when using a glue solvent. When applying the solvent, use a brush or sponge to generously coat the glue. Let it sit for several minutes to ensure the solvent has time to work its magic.
After enough time has passed, use a scraper or rag to gently remove the glue from the surface. With the right techniques and safety precautions, using a glue solvent can be an effective and safe method for removing stubborn adhesive.
Step 3: Scrape the Glue
Scraping the glue off your surfaces might seem like a daunting task, but it’s actually quite simple once you know how to do it. The first step is to identify the type of glue you’re dealing with and choose the right solvent to loosen it up. Next, you’ll need to grab a scraper or putty knife and start removing the glue from the surface.
Be careful not to damage the surface underneath, especially if it’s delicate or easily scratched. Once you’ve gotten the bulk of the glue off, you’ll need to get into the nooks and crannies with a little elbow grease. A brush or toothbrush and a small amount of solvent should do the trick.
Finally, wipe down the surface with a clean cloth and inspect for any remaining glue residue. If there’s still some glue left over, repeat the process until it’s completely removed. With a little patience and persistence, you can easily scrape off glue and get your surfaces looking like new again.
Additional Tips
If you’ve used a dent puller to remove a dent from your car, you may have found that the glue used to attach the puller can be difficult to remove. The good news is that there are a few tips you can use to easily remove the glue without damaging your car’s paint. One effective method is to use heat.
You can use a hair dryer or heat gun to warm up the glue and make it easier to remove. Another option is to use rubbing alcohol or acetone to dissolve the glue. Simply apply the substance to a clean cloth or cotton ball and rub it on the affected area until the glue is gone.
Additionally, you may want to use a plastic scraper or credit card to gently scrape away any leftover glue. With these tips, you can easily remove the glue from your car and restore it to its original condition.
Protect Your Skin
When it comes to protecting your skin, there are plenty of additional tips to keep in mind beyond the basics of using sunscreen and avoiding prolonged sun exposure. One important factor that can impact your skin health is your diet. Incorporating more antioxidant-rich foods into your meals, such as berries and leafy greens, can help defend against UV damage.
Another tip is to wear protective clothing, such as long-sleeved shirts and hats, when you will be spending prolonged periods of time outside. Additionally, be mindful of other potential sources of skin damage, such as pollution and cigarette smoke, which can contribute to premature aging and skin cancer. By taking a comprehensive approach to protecting your skin, you can reduce your risk of harm and maintain a healthy complexion for years to come.
Use Protective Gear
When it comes to sports and high-intensity activities, using protective gear should never be overlooked. Even professional athletes, who may seem invincible, swear by it. After all, protective gear is designed to prevent injuries that can occur during sports or other strenuous activities.
It can range from helmets, mouthguards, knee and elbow pads, wrist guards, and even specialized shoes. Investing in proper protective gear might seem like a nuisance, but it’s a small price to pay for your safety and well-being. Plus, wearing protective gear can give you more confidence, allowing you to perform better and maximize your potential on the field.
So, if you’re serious about your sports performance or just want to stay safe, incorporating protective gear into your routine should be a top priority.
Work in a Well-Ventilated Area
When it comes to completing DIY projects, it’s important to work in a well-ventilated area to ensure your safety. This means ensuring that there is proper ventilation to remove any fumes or chemicals that may be used during the project. Opening a window or using a fan can go a long way in helping to prevent any health issues that may arise from inhaling fumes or chemicals.
If you’re painting, staining, or using any other type of chemical during your project, it’s important to take the necessary precautions to protect yourself. You can also consider investing in a respirator or face mask to provide additional protection against fumes and harmful particles. Overall, taking the time to ensure that you’re working in a well-ventilated area can go a long way in keeping you safe and healthy while completing your DIY project.
Conclusion
In the end, removing dent puller glue is a bit like solving a puzzle or playing a game of Operation. You need the right tools, a steady hand, and a willingness to experiment a little. But with a little patience and persistence, you can remove even the most stubborn glue residue and have your car looking shiny and new again.
And who knows, you might even discover a hidden talent for auto body repair in the process!”
FAQs
What is dent puller glue and how does it work to remove dents?
Dent puller glue is a specially formulated adhesive used to remove dents from a vehicle’s body. It works by bonding to the surface of the dent, allowing it to be pulled out using a suction cup or other tool.
Can dent puller glue damage the paint on my car?
If used improperly, dent puller glue can damage the paint on your car. It’s important to carefully follow the instructions and use only a small amount of glue to avoid any potential damage.
How do I prepare my car’s surface before using dent puller glue?
Before using dent puller glue, it’s important to thoroughly clean the surface of your car’s body. Use a gentle soap and water to remove any dirt or debris and dry it completely. You may also want to apply a small amount of rubbing alcohol to the area to ensure a strong bond.
Can I remove dents without using dent puller glue?
Yes, there are other methods for removing dents from a car’s body, such as using a plunger or suction cup. However, dent puller glue tends to deliver the best results and is a highly effective method.
How long does it take for dent puller glue to dry?
The drying time for dent puller glue can vary depending on the brand and environmental conditions. Typically, it takes around 30 minutes to an hour for the glue to completely dry and bond to the surface of the dent.
Is it safe to use dent puller glue on all types of car paint?
Dent puller glue is safe to use on most types of car paint, but it’s always important to check the label and follow the manufacturer’s instructions. If you have any doubts, you can always test the glue on a small, inconspicuous area first.
Can I use dent puller glue to remove dents from other types of surfaces?
Yes, dent puller glue can be used on a variety of surfaces, such as metal, plastic, and fiberglass. However, it’s important to use the appropriate glue and tools for each specific surface and to follow the manufacturer’s instructions carefully.
