Looking to create a spot welding machine, but not sure where to start? Look no further! Spot welding is a handy technique for joining metal pieces together by applying heat and pressure to the spot that needs to be joined. While commercial spot welders can be quite expensive, building one yourself can be relatively easy and cost-effective. Not only will you save money, but you’ll also have the satisfaction of creating something with your own hands.
In this blog, we’ll cover the basics of how to build a spot welding machine, so you can get started on your own DIY project. From choosing the right components to assembling the machine, we’ve got you covered. So put on your safety goggles, grab your soldering iron, and let’s get started!
Introduction
If you want to know how to make a spot welding machine, you’ve come to the right place. Spot welding is a cost-effective and reliable method for joining metal pieces together. While many ready-made spot welding machines are readily available in the market, building one from scratch can be a fun, satisfying, and cost-effective project.
First, you’ll need to gather the necessary components, such as a transformer, timer, electrodes, and a power supply. These components can be purchased from online stores or salvaged from old equipment. Once you have all the components, you’ll need to assemble them, following the schematics and instructions carefully.
Safety measures such as wearing protective gear like goggles and gloves should always be followed. With a little bit of technical know-how and some patience, you can successfully build your very own spot welding machine at home.
Explanation of Spot Welding and Its Benefits
Spot welding is a type of resistance welding that is commonly used in the manufacturing industry. This welding method involves applying pressure and heat to two or more metal surfaces to join them together. The heat is generated by passing an electric current through the metal, which creates resistance and heats up the surfaces.
The pressure is applied by electrodes that hold the metal together as the current flows through them. This process creates a strong, durable weld that is ideal for joining thin sheets of metal. The benefits of spot welding include its speed, efficiency, and cost-effectiveness.
It is also a highly automated process, which means that it can be easily integrated into large-scale manufacturing operations. With spot welding, manufacturers can quickly and easily join metal components together, leading to faster production times and lower costs.
Materials Required to Build a Spot Welding Machine
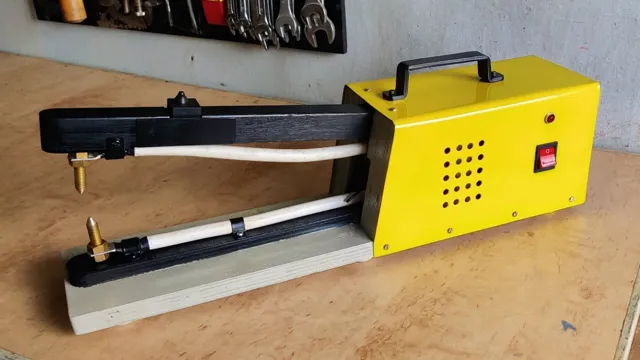
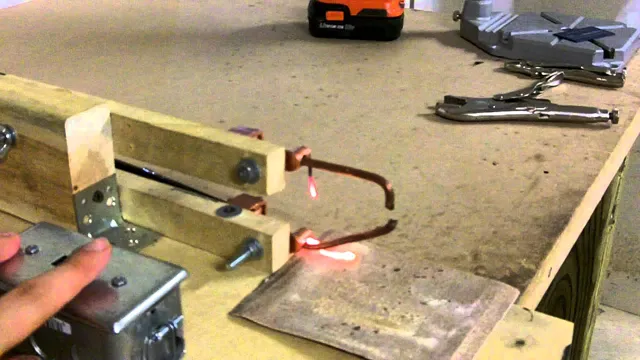
Spot Welding Machine Spot welding machines are widely used in various industries such as automotive, electrical and construction. If you’re planning to build your own spot welding machine, you’ll need some specific materials to complete the task. The materials required for building a spot welding machine include a transformer, a rectifier, an electrode holder, copper cables, and a welding gun.
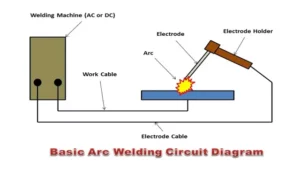
The transformer is the most important component as it steps up the voltage to a suitable level for welding. The rectifier is responsible for converting AC power to DC power, which is required for the welding process. The electrode holder is used to hold the welding electrode in place while welding.
Copper cables are used to conduct the electric current from the transformer to the welding gun while the welding gun is used to strike an arc and complete the welds. Building a spot welding machine requires expertise and attention to detail. However, with the right materials and proper instructions, anyone can build their own spot welding machine.
Step 1: Designing Your Spot Welding Machine
If you want to learn how to make a spot welding machine, designing it is the first step. Designing your own spot welding machine depends on the size and thickness of the metal you are welding. You will need to determine the power rating needed and choose an appropriate transformer, electrode holder, and timer.
The transformer is responsible for stepping up the power voltage and the electrode holder holds the electrodes together during welding. The timer regulates the welding time according to the thickness of the metal. You may also want to build a cooling system for the electrodes to prevent overheating during use.
Once you have designed your spot welding machine, you will need to gather all of the necessary components and carefully assemble them according to your design. With your own homemade spot welding machine, you can enjoy the ability to weld small metal pieces together with precision and accuracy.
Choosing a Power Source and Transformer
When designing your spot welding machine, the first step is to choose a power source and transformer. This is a vital decision because it will ultimately determine the quality of your welds and the efficiency of your machine. It’s essential to select a power source and transformer that will provide the right amount of energy to your spot welding machine.
The power source is the device that generates the electricity needed for your welding operation, while the transformer is responsible for converting the voltage levels so you can use it effectively. Choosing the right power source and transformer is not always an easy task. You need to consider factors such as the thickness of the material to be welded, the welding cycle times, and the type of material being used.
The power source should be able to deliver sufficient energy to the welds, while the transformer should be efficient enough to reduce energy loss and minimize heat build-up. In general, you have two options when it comes to power sources: AC (alternating current) or DC (direct current). AC power sources are more affordable and offer better control over the welding current, making them ideal for thinner materials.
On the other hand, DC power sources provide smoother and more stable welding arcs, making them suitable for thicker materials. In conclusion, the choice of power source and transformer plays a crucial role in the performance of your spot welding machine. Carefully consider the factors involved and choose the appropriate equipment that will work best for your specific welding needs.
With the right combination of power source and transformer, you can achieve precise and efficient welds that will help you achieve your welding goals.
Selecting Your Electrodes and Clamps
When it comes to designing your spot welding machine, selecting the right electrodes and clamps is an essential first step. The electrodes you choose will depend on the material you’re welding and the thickness of the metal. Electrodes come in a variety of sizes and shapes, and each one has a specific purpose.
Flat electrodes are best for welding flat surfaces, while pointed electrodes are better suited for welding tight corners and crevices. Clamps, on the other hand, are used to hold the metal in place while it’s being welded. They come in a range of sizes and strengths and should be selected based on the thickness and shape of the metal being welded.
Choosing the correct electrodes and clamps is critical to the success of your welding project. By selecting the right equipment, you can ensure that your welds are strong and long-lasting.
Determining Your Welding Settings
When determining your welding settings, the first step is designing your spot welding machine. Understanding the basics of welding and the materials you will be working with is essential in designing a machine that can deliver the right amount of current, time, and pressure to produce a strong weld. This can be accomplished by choosing the appropriate type of welding machine, selecting the right electrode size and shape, and adjusting the current and time settings to match the thickness and type of material being welded.
It’s important to note that designing a welding machine is not a one-size-fits-all process. The settings and design will vary depending on the specific application and materials you’ll be working with. Therefore, it’s important to thoroughly research and analyze the materials and project requirements to determine the optimal welding settings for your machine.
By taking the time to design your spot welding machine properly, you can ensure that you’ll achieve strong and reliable welds every time.
Step 2: Gathering Materials and Tools
When it comes to building your own spot welding machine, gathering the necessary materials and tools is the next step after determining the type of machine you want to create. Some essential materials you’ll need include copper strips, metal plates, nichrome wires, and some screws and bolts. You’ll also need a power source, which varies depending on the type of machine you’re building.
As for tools, a soldering iron, wire cutters, pliers, and a multimeter are all necessary items to have on hand. It’s important to make sure all materials and tools are of good quality and suitable for the job at hand. Don’t forget to factor in safety measures and personal protective equipment, such as gloves and goggles.
With the right materials and tools in hand, you’ll be one step closer to building your very own spot welding machine.
Sourcing Components for Your Machine
Now that you have designed your machine and created a list of required components, it’s time to gather the necessary materials and tools. Being organized at this stage of the process will help you streamline the assembly process later on. It’s important to consider not only the components themselves but also any additional tools you may need, such as screwdrivers, pliers, and wire cutters.
When sourcing the materials, keep in mind the quality and durability of each component. Low-quality materials may result in malfunction or frequent replacements in the long run, which could be costly. Ensure that you purchase components from a reputable vendor to guarantee reliability and performance.
By being fully prepared with all the necessary materials and tools, you can move onto the construction phase without any hiccups, saving you time and money in the long run.
Tools Needed for Assembly
When it comes to assembling anything, it’s important to have the right tools. For this project, you’ll need a few things before you dive in. First, make sure you have a Phillips screwdriver on hand.
You’ll also need a wrench, a measuring tape, and some pliers. Don’t forget about the hardware that comes with the product – you’ll need to have those pieces, too. It’s a good idea to lay everything out and make sure you have all the necessary tools and materials before you start, so you don’t have to stop and hunt for something halfway through.
With the right tools, you’ll be able to assemble whatever you need with ease.
Step 3: Building Your Spot Welding Machine
Making your own spot welding machine can seem daunting, but it’s actually quite simple. Once you’ve gathered all the necessary materials and components, it’s time to build the machine itself. Begin by assembling the power supply.
This will most likely involve wiring up capacitors, transformers and diodes to create a powerful current. Once you’ve got the power supply sorted, it’s time to move onto the actual welding mechanism. This will usually involve creating a set of electrodes that can be adjusted and controlled.
Make sure your electrodes are the right distance apart and can deliver an appropriate amount of heat to the materials you’ll be welding. Finally, assemble the control circuitry that will allow you to adjust and monitor the welding process. This should include an on/off switch, a weld timing circuit and a current regulator.
With all these elements in place, you’ll be well on your way to creating your very own spot welding machine in no time!
Assembling the Frame and Base
Building a spot welding machine can seem daunting, but following the right steps and having the right tools can make the process much easier. Assembling the frame and base of your welding machine requires precise measurements and alignment. It’s important to ensure that all the pieces fit together snugly and securely to provide a stable foundation for your welding machine.
One helpful tip is to use corner clamps while assembling the frame to keep everything in place. Additionally, be sure to use a level to ensure that the base is flat and stable. Once the frame and base are assembled, you can move on to the next step in building your spot welding machine.
With patience and attention to detail, you’ll have a sturdy and reliable machine for all your welding needs.
Mounting the Power Supply and Transformer
Mounting the power supply and transformer for your DIY spot welding machine is a crucial step that requires careful attention to detail. Without the proper power supply and transformer, your machine won’t function optimally, if at all. Start by finding a suitable spot to mount your power supply, ensuring it’s close enough to your wiring but not too close that it poses a safety hazard.
Next, you’ll need to find a stable location to mount your transformer, making sure it’s isolated from any other components to avoid electrical interference. Once you have secured your power supply and transformer in their respective locations, you can start wiring them up with the help of your circuit diagram. Make sure your connections are secure and that your wiring is organized to prevent any accidental short circuits.
With your power supply and transformer mounted, you’re one step closer to having a functional spot welding machine, ready to take on your next welding project with ease.
Installing the Electrodes and Clamps
The final step in building your spot welding machine is installing the electrodes and clamps. Before installing, make sure that the electrodes and clamps are dry, clean, and free from rust and corrosion. Once cleaned, align the electrodes on top of the anvil and tighten them securely into place.
The electrode tips should be in close proximity to each other, but not touching. To ensure a secure hold, use clamps to connect the workpieces to the welding electrodes. The clamps should be positioned on opposite sides of the electrode tips to improve stability and accuracy.
Assemble the remaining components of the machine and test the equipment thoroughly to ensure its functionality. If everything is in place, you are now ready to start spot welding with your newly built machine. Congratulations, you have successfully completed the building process!
Wiring and Testing Your Machine
When it comes to building your spot welding machine, wiring and testing are crucial steps to ensure its functionality and safety. First, you’ll need to gather all the necessary wires and connectors, as well as a power switch, a timer, and a foot pedal for activation. Begin by connecting the power switch to the power source and the transformer.
Then, attach the timer and foot pedal to the switch, following the manufacturer’s instructions carefully. Once everything is wired up, it’s time to test your machine. Double-check all your connections, and turn it on.
Use a multimeter to ensure that everything is working correctly and that there are no shorts or sudden voltage spikes. Once you’re sure everything is in order, you can begin practicing your spot welding technique. It’s critical to test your machine fully before using it to join any real materials.
With proper testing and preparation, you can build a spot welding machine that meets your specific needs and ensures your safety when using it.
Conclusion
In conclusion, making a spot welding machine is a task that requires patience, precision, and a little bit of creativity. By following these steps and working with the right materials, you can create your very own compact and efficient welding machine that will help you bring your DIY projects to life. Who knows, with your new spot welding machine, you might just find yourself making sparks fly in the world of welding.
So get your tools ready, put on your welding mask, and let’s get to work! Remember – safety first, but sass always.
Safety Considerations When Using a Spot Welding Machine
When building your own spot welding machine, it’s crucial to prioritize safety to avoid any accidents or injuries. Before starting, make sure to wear proper protection such as goggles and gloves. When choosing your materials, opt for non-conductive and heat-resistant ones to prevent electrocution and fires.
It’s also essential to have a safe and stable working surface and ensure that the machine is properly grounded. Always double-check all wiring and connections before turning on the machine and starting to weld. And lastly, never leave the machine unattended when in use.
By following these safety considerations, you can ensure a safe and successful DIY spot welding machine.
Final Thoughts and Next Steps
Now that we’ve covered the basics of spot welding and the necessary components required for building your own spot welding machine, it’s time to dive into the final and most exciting step – actually building the machine itself! However, before jumping headfirst into the construction process, it’s important to ensure that all safety measures are in place and that you have a solid understanding of the wiring and electrical components involved. Don’t hesitate to seek the guidance of a professional or fellow DIY welding enthusiast if you feel uncertain about anything. Once you’ve got all your ducks in a row, it’s time to start piecing together your machine! Remember, this is a fun and exciting project that will require a bit of patience and elbow grease, but the end result will be well worth it.
So, let’s get started and create a top-notch DIY spot welding machine that will take your metalworking game to the next level!
FAQs
What materials are required to build a spot welding machine?
To build a spot welding machine, you will need copper wires, electrode tongs, transformer, electrodes, and steel sheets.
What is the difference between spot welding and seam welding?
Spot welding involves joining two sheets of metal by applying a localized heat input, whereas seam welding involves joining two metal sheets continuously.
What is the maximum thickness of metal that can be spot welded using a spot welding machine?
This varies depending on the machine’s power and the size of the electrodes, but typically ranges from 0.5mm to 5mm.
Can a spot welding machine be used for welding aluminum and other non-ferrous materials?
Yes, but the machine must be specifically designed for welding non-ferrous materials and use the appropriate electrodes.
How can I ensure the welds produced by my spot welding machine are of good quality?
Properly clean the metal surfaces being welded, use the appropriate amount of pressure and heat, and check electrodes’ sharpness, condition, and alignment regularly.
What safety precautions should I take when operating a spot welding machine?
Wear protective clothing and gloves and make sure there is enough ventilation to prevent harmful fumes from accumulating.
How can I troubleshoot issues with my spot welding machine?
Check the electrodes, transformer, and electrical connections for damage or loose connections and contact the manufacturer for further assistance if needed.
