How to Make a Belt Sander from a Bench Grinder – A Step-by-Step Guide
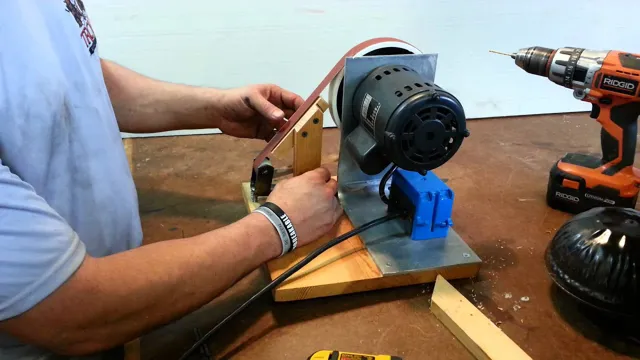
Have you ever considered repurposing your old bench grinder into a belt sander? If you have some basic DIY skills, you can easily transform your grinder into a belt sander that can be used for a variety of tasks, from sanding wood to sharpening knives. Not only will this save you money on buying a new sander, but it will also give you the satisfaction of creating something with your own hands. With just a few simple modifications, you can turn your bench grinder into a versatile and effective belt sander.
You can use different grits of belts to achieve the desired level of smoothness or sharpness, depending on the job you need to do. Whether you’re a DIY enthusiast or a professional woodworker, a homemade belt sander is a great addition to your tool collection and can be used for everything from sanding down rough edges to polishing metal surfaces. In this article, we’ll walk you through the key steps involved in creating a belt sander from a bench grinder.
From removing the wheels and attaching the belt, to adjusting the tracking and tensioning the belt, we’ll cover everything you need to know to get the most out of your new grinder-turned-sander. So put on your DIY hat and let’s get started!
Introduction
If you’re looking for an affordable way to make a belt sander, then look no further than your bench grinder! Yes, that’s right, with a bit of tinkering you can transform your bench grinder into a multi-purpose sander that can handle various materials. Making a belt sander from a bench grinder requires several modifications, but the end result is well worth it. You’ll need to attach a sanding belt, add a dust collection mechanism, and adjust the speed of the machine.
The main advantage of making a belt sander from a bench grinder is that it allows you to save money on buying a separate sander. Plus, it doesn’t take up much space in your workshop as opposed to having multiple machines. So why not give it a try? With a few simple adjustments, you can have a versatile belt sander that meets all your sanding needs.
Why Make Your Own Belt Sander?
If you’re an avid DIYer or have a specific project in mind that requires a belt sander, you might be wondering why it’s worth the effort to make your own. Well, there are a few reasons to consider. First, building your own belt sander can be a more affordable option than purchasing one, especially if you already have some of the necessary materials on hand.
Additionally, by customizing your sander to your specific needs, you can ensure it has all the features you want and will work exactly the way you need it to. Finally, making your own tools can be a rewarding and satisfying experience, allowing you to feel a sense of pride and accomplishment as you complete your project. So, if you’re up for the challenge, making your own belt sander could be a fun and practical undertaking.
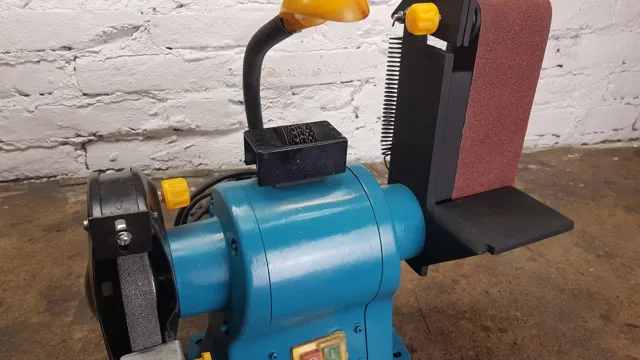
Benefits and Advantages of Building a Belt Sander
If you’re a woodworking enthusiast, building a DIY belt sander can be a game-changer. Belt sanders are used to level surfaces, remove rough edges, and smooth out rough wood surfaces. They are versatile tools that can be used to sand a variety of woodworking projects with ease.
By building your own belt sander, you can save money, customize the sander to your needs, and gain an in-depth understanding of how the tool works. Not to mention, with a DIY belt sander, you have the satisfaction of creating something with your own hands. By using the right materials and following the proper steps, building a belt sander can be a fulfilling and practical project for any woodworking enthusiast.
Materials and Tools
Are you looking to make a belt sander from a bench grinder? It’s a great way to repurpose an old tool and save money on a new one. To get started, you’ll need a few materials and tools. First, you’ll need a bench grinder with a disc diameter of 6-8 inches.
You’ll also need a bolt, a nut, and a washer that fit the grinder’s shaft. These items will be used to attach the sanding belt. For the sanding belt, choose a suitable grit for your project, usually between 80 and 120.
Additionally, you’ll need a metal-cutting blade, a drill, a screwdriver, a wrench, and safety goggles. Before you start, make sure to clear your workspace and turn off the power source for the grinder. Overall, with the right tools and materials, making a belt sander from a bench grinder can be a simple and cost-effective solution for your sanding needs.
Required Tools for Building a Belt Sander from a Bench Grinder
When it comes to building a belt sander, having the right tools and materials is essential for a successful project. To begin with, you will need a bench grinder that will serve as the foundation of your belt sander. Additionally, you will need a piece of plywood or metal surface to attach the grinder to and provide stability when using it.
Other necessary tools include nuts and bolts to secure the grinder to the surface, a drill and drill bit for creating holes in the plywood or metal, as well as a belt tensioner to hold the sanding belt in place. It is also important to have safety equipment such as goggles, gloves, and a dust mask to protect yourself during use. With the right materials and tools in hand, building a belt sander from a bench grinder becomes an achievable and rewarding project.
Materials Needed for Building a Belt Sander from a Bench Grinder
When it comes to building a belt sander from a bench grinder, you’ll need a handful of materials and tools to get started. First and foremost, you’ll need a bench grinder with a disc sander on the side. You’ll also need a sturdy piece of metal for the base, as well as a flat piece of metal for the sanding surface.
Other necessary materials include bolts, washers, nuts, and a belt tensioner. For tools, you’ll need a drill, a wrench and socket set, a metal saw, a metal file, and a belt sander attachment. Don’t forget safety gear like gloves, goggles, and a dust mask! With these materials and tools, you’ll be able to build your very own belt sander in no time.
Just make sure to carefully follow instructions and take safety precautions, as working with power tools can be dangerous.
Building the Belt Sander
If you’re looking for a budget-friendly way to create a belt sander, then transforming a bench grinder is a great option. This DIY project is not only cost-effective but also allows you to create a custom tool tailored to your specific needs. To start, gather all the necessary materials such as a bench grinder, metal fabrications, and a sanding belt.
Remove the existing grinding stone from the grinder and set it aside. Then, design and cut a metal frame that will fit around the grinder body. Fix the frame in place, ensuring it is secure enough to hold the weight of the sanding belt.
Finally, attach the sanding belt to the frame and grinder, and voila, you have transformed your bench grinder into a belt sander. This tool is perfect for sanding down rough surfaces and provides a uniform finish in no time. With a little creativity and the right tools, building a belt sander from a bench grinder is easy, and you can customize it to meet all your DIY needs!
Step One: Detach the Bench Grinder
The first step in building a belt sander is to detach the bench grinder from its base. This may seem like a daunting task, but it’s actually quite simple. Depending on the model of your bench grinder, you may need to loosen a few screws or bolts in order to free it from its base.
Once you’ve done this, you can begin to prepare the components you’ll need for your belt sander. This includes obtaining a belt, a pulley, and a motor, among other things. With all of your materials at the ready, you can proceed to assemble your belt sander, inching closer to bringing your project to life.
By taking your time and being methodical in your approach, you can have a fully functional belt sander in no time at all.
Step Two: Determine How to Mount the Grinder
When it comes to building a belt sander, one of the important steps is determining how to mount the grinder. There are different ways to do this, and the choice will depend on the specific design of your sander. Some builders prefer to use a hinge or a pivot arm to attach the grinder, while others use a bolt-on system or a clamp.
Whatever method you choose, it’s crucial to make sure that the grinder is securely fastened to the sander’s frame and that there is enough clearance for the sanding belt to move freely. Additionally, you may want to consider the angle and height of the grinder in relation to the belt, to ensure that the sanding process is efficient and effective. With careful planning and attention to detail, you can create a belt sander that meets your needs and provides results that you can be proud of.
Step Three: Attach the Sanding Belt
Now that the base and motor are attached, it’s time to attach the sanding belt to the pulley wheel. Make sure to select the appropriate grit of sandpaper for the task at hand. To attach the sanding belt, first, loosen the tension of the belt by turning the adjustment knob counterclockwise.
Next, slide the sanding belt onto the pulley wheel, ensuring it is properly seated. Finally, tighten the tension back up by turning the adjustment knob clockwise. You should now have a functional belt sander ready to tackle any sanding job you throw its way.
Don’t forget to always wear protective gear like eye and ear protection when operating power tools. With a little practice, you’ll be sanding like a pro in no time.
Step Four: Add Dust Collection Mechanism
Now that we’ve covered the first three steps of building our own belt sander, it’s finally time to focus on the dust collection mechanism. A well-built dust collection system is essential for a belt sander because sanding generates a significant amount of dust that can cause respiratory problems and make a mess in your workspace. The most effective way to collect the dust is to create a vacuum with a dust collector by attaching it to the sander’s dust port.
You can use an orbital sander’s vacuum adapter as a dust port and add a hose to connect it to the dust collector. Make sure to use a hose that’s the same size as the vacuum adapter to get a tight fit. It’s also crucial to position the dust collector close to the sander to prevent the dust from spreading and to have good suction power.
By following these steps, you’ll be able to create a simple and efficient dust collection mechanism for your belt sander, making sanding a lot more manageable, clean, and healthy.
Using the Belt Sander
If you’re looking to make a belt sander from a bench grinder, the first thing you’ll need to do is remove the guard from your grinder. This will allow you to attach the belt sander mechanism. You’ll then need to attach the mechanism to the bench grinder, making sure it’s secure and aligned properly.
Once that’s done, you’re ready to start sanding! Begin by adjusting the belt tension to ensure it’s not too tight or too loose. You’ll also want to adjust the tracking, which ensures the belt stays centered. Finally, be sure to wear protective gear like gloves, goggles, and a mask to prevent injury and keep dust from getting in your eyes and lungs.
Using a belt sander can be a great way to quickly and efficiently sand and shape a variety of materials. With a little bit of know-how and some safety precautions, you can create professional-quality results in no time.
Safety Precautions
When it comes to using a belt sander, safety should always be the number one priority. Before starting the machine, you should ensure that you are wearing the appropriate safety gear, including gloves and eye and ear protection. It’s also essential to utilize the dust collection system to avoid breathing in any harmful particles.
When operating the belt sander, it’s crucial to maintain a firm grip on the tool and to always keep your hands and fingers away from the sanding belt. Never force the material through the machine, as this could result in kickback. Instead, allow the belt sander to do the work and simply guide the material through.
By following these safety precautions, you can ensure that you are using the belt sander safely and effectively, without putting yourself or others at risk of injury.
Tips for Optimal Usage
One of the most essential woodworking tools is the belt sander, but it can be intimidating to use for the first time. A belt sander can help you sand large areas quickly and efficiently, but if you don’t use it properly, it can ruin your project. First, make sure to fasten the tool securely to your workbench.
This will prevent it from moving around and making unwanted marks. Then, adjust the belt tension, and turn the sander on. Keep your fingers clear of the moving parts and apply gentle pressure to the workpiece, moving the sander back and forth along the surface.
When you’re finished sanding, turn off the sander and use a vacuum to clean up any leftover dust. With a little practice, using a belt sander can be a breeze, and before you know it, you’ll be a pro at creating smooth and beautiful surfaces on your woodworking projects.
Conclusion
In conclusion, turning a bench grinder into a belt sander is not only a cost-effective way to expand your DIY arsenal, but it also provides a fun challenge for those who enjoy tinkering with their tools. With a few materials and some basic knowledge, you can take your old bench grinder and make it into a versatile tool that can handle a variety of sanding tasks. So next time you find yourself in need of a belt sander, why not see if you can’t create one from what you already have? Who knows, you might just be surprised at what kind of one-of-a-kind creation you can come up with!”
FAQs
What supplies are needed to make a belt sander from a bench grinder?
Supplies needed include a bench grinder, belt sander attachment, sanding belts, safety goggles, and gloves.
Is it safe to make a belt sander from a bench grinder?
Making a belt sander from a bench grinder can be safe if you take proper safety precautions, such as wearing gloves and safety goggles.
What are some benefits of making your own belt sander from a bench grinder?
Benefits include the ability to customize the sander to your specific needs, saving money compared to purchasing a pre-made belt sander, and the satisfaction of DIY achievement.
How does a bench grinder belt sander attachment work?
The bench grinder belt sander attachment utilizes the power of the bench grinder to turn a belt of sandpaper, allowing for efficient sanding of materials.
Can any bench grinder be used to make a belt sander attachment?
Not all bench grinders are compatible with belt sander attachments, so it’s important to check the specifications of your bench grinder before attempting to attach a belt sander.
Can a belt sander attachment be used for other materials besides wood?
Yes, a belt sander attachment can also be used for sanding metal, plastic, and other materials.
Is it necessary to have experience with power tools to make a belt sander from a bench grinder?
While having experience with power tools can be helpful, it is not necessary as long as proper safety measures are taken and instructions are followed carefully.

