How to Install Wire Wheel on Bench Grinder: A Step-by-Step Guide
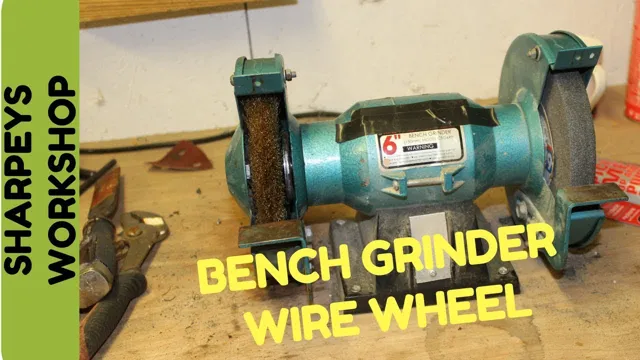
Have you ever found the need to use a wire wheel on your bench grinder? Maybe you want to clean rust off metal surfaces, polish aluminum, or even sharpen gardening tools. Whatever your reason may be, installing a wire wheel on your bench grinder is a simple and effective solution. With a bit of know-how and the right tools, you can have your wire wheel up and running in no time.
As with all DIY projects, safety should be your top priority. Before you begin, make sure you’re wearing eye protection and work gloves. You should also unplug your grinder to prevent any mishaps during the installation process.
Once you’ve taken the necessary precautions, it’s time to move on to the next step. Installing a wire wheel on your bench grinder requires a bit of mechanical expertise, but it’s nothing that can’t be learned. You’ll need to remove the guard and flange from your bench grinder’s spindle, and then replace it with the appropriate wire wheel attachment.
Once that’s done, you’ll need to reattach the guard and flange, making sure that everything is secured tightly. With your wire wheel attached and securely fastened, you’re ready to get to work. You’ll be amazed at how effortless it is to clean rust and polish metal surfaces.
Not only will you save time and money, but the results will be as good as, if not better than, what you’d get from a professional. So, go ahead and give it a shot. You’ll be glad you did.
Gather Necessary Tools and Safety Equipment
When it comes to installing a wire wheel on a bench grinder, it’s important to start by gathering all the necessary tools and safety equipment. You’ll need a pair of gloves to protect your hands from the sharp wires on the wheel, as well as safety glasses to shield your eyes from any flying debris. It’s also a good idea to wear a dust mask to avoid inhaling any particles that may be released during the installation process.
As for tools, you’ll need a wrench to loosen and tighten the nut that holds the wheel in place, as well as a wire brush to clean the spindle of the grinder before you start. Once you have all your equipment, you can begin the installation process with confidence, knowing that you have taken all the necessary precautions to avoid injury. With the right tools and safety gear at your disposal, you’ll be able to successfully install your wire wheel and get back to grinding in no time.
Tools: Bench grinder, Wire wheel (with correct arbor size), Wrenches
When it comes to sharpening tools, having the right equipment is essential. To sharpen a tool such as a chisel or drill bit, you’ll need a bench grinder, wire wheel with the correct arbor size, and wrenches to make adjustments. These tools will help you sharpen the tool’s edge and remove any rust or debris that may have built up over time.
However, it’s important to always wear safety gear when using a bench grinder or wire wheel. This includes eye protection and gloves to prevent any debris from flying into your eyes or causing injury to your hands. With the right tools and safety equipment, you’ll be able to sharpen your tools with ease and precision.
Just remember to always take your time and work in a well-lit and ventilated area to ensure your safety.
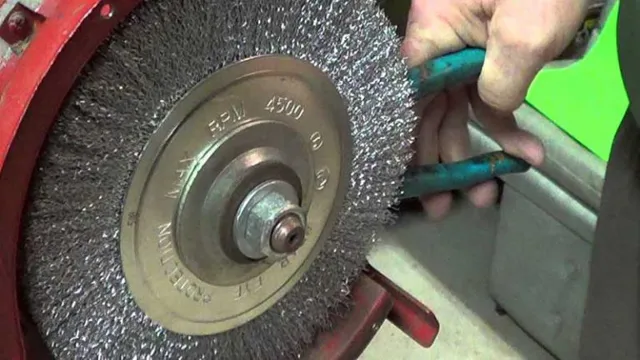
Safety: Eye protection, Gloves, Respirator mask
When it comes to tackling any project, it’s crucial to ensure that you have all the necessary tools and safety equipment at hand. This is especially true when it comes to renovations or DIY projects that involve hazardous materials or equipment. Eye protection, gloves, and a respirator mask are just a few of the safety essentials that you’ll want to keep close at hand.
Protecting your eyes is particularly crucial, as a stray piece of debris or particle could cause serious damage. Gloves can help keep your hands safe from sharp edges or chemicals, while a respirator mask can protect your lungs from harmful fumes or dust. Don’t skimp on safety – make sure you have all the equipment you need before starting any project.
Remember, safety isn’t just an afterthought – it should be your first priority. Use protective gear whenever necessary and stay safe while tackling your next big project.
Prepare the Bench Grinder
If you’re looking to install a wire wheel on your bench grinder, there are a few steps you need to take to prepare the machine. Firstly, you’ll need to ensure that the grinder is unplugged and fully powered down before beginning any work. Next, check the user manual for your specific model to ensure that it’s compatible with wire wheels (some models may not be).
Once you’ve confirmed that your bench grinder is ready, you can begin the installation process. Start by removing any existing grinding wheels or attachments from the machine. Then, attach the wire wheel onto the shaft and tighten it securely according to the manufacturer’s instructions.
Finally, check that the wire wheel is running smoothly and spin it a few times before using it for the first time to ensure that it’s properly secured. With these steps in mind, you should be good to go and ready to tackle any wire brushing project that comes your way!
Unplug the bench grinder from its power source
One of the first things you should do when preparing a bench grinder for use is to unplug it from its power source. As with any power tool, it is crucial to exercise caution to prevent accidents or injury. Once the grinder is unplugged, you can proceed with inspecting the tool for any damage or wear that may have occurred since the last use.
Take note of any worn or damaged parts that need replacing before you proceed. Additionally, clean the grinder’s surfaces from any debris or build-up, as dirt can affect the tool’s performance and longevity. Lastly, verify that all safety guards and shields are in place and properly secured before operating the bench grinder.
Remember that taking the time to properly prepare your bench grinder for use will help ensure its longevity, enhance its safety, and result in a more efficient, effective tool.
Remove any existing grinding wheel and flanges
Before using a bench grinder, it is important to prepare it for use by removing any existing grinding wheel and flanges. To do this, start by unplugging the grinder and positioning it in a clear and well-lit work area. Next, loosen the nuts that hold the grinding wheel and flanges in place using a wrench, being careful not to damage the threads.
Once the nuts are loose, remove the flanges and grinding wheel and inspect them for any damage or wear. If the grinding wheel is damaged, cracked, or worn down, it should be replaced immediately to prevent accidents while operating the grinder. Finally, wipe down the bench grinder with a clean cloth to remove any debris or dust that may have accumulated, and you are ready to install a new grinding wheel and flanges and begin your work.
By taking the time to properly prepare your bench grinder, you can ensure safe and efficient use of your tool.
Clean the arbor and threads thoroughly
Before you start using your bench grinder, it is essential to prepare it properly. One of the first steps in this process is cleaning the arbor and threads thoroughly. This step is necessary because any debris or dirt on the arbor or threads can cause wobbling or grinding imbalances, which can seriously damage your tools.
To clean the arbor and threads, you can use a wire brush and a cleaning solvent. The solvent should be suitable for removing grease, oil, and other contaminants that might have accumulated on the arbor and threads. You should also make sure that the arbor and threads are completely dry before proceeding to the next step.
Once you have cleaned and dried the arbor and threads, you should inspect them to make sure they are in good condition. Look for signs of wear or damage, and replace any damaged parts before using the grinder. It’s also a good idea to lubricate the arbor and threads with a light oil to reduce friction and wear.
By following these simple steps, you can prepare your bench grinder and ensure that it works efficiently and safely. Don’t forget to clean the arbor and threads thoroughly before using the grinder to avoid any potential problems and to keep your tools in optimal condition.
Install the Wire Wheel
If you’re looking to add a wire wheel to your bench grinder, it’s actually a fairly simple process. First, make sure your bench grinder is unplugged and turned off. Then, locate the arbor nut on the shaft of the grinder.
Use a wrench to loosen and remove this nut. Next, slide the wire wheel onto the shaft, making sure to align the arbor hole with the shaft. Finally, replace and tighten the arbor nut back onto the shaft.
And that’s it! Your wire wheel should now be securely attached to your bench grinder. Remember, always follow the manufacturer’s instructions and safety guidelines when installing and using any type of tool accessory.
Insert the wire wheel onto the arbor, making sure it’s seated firmly
When it comes to installing a wire wheel onto an arbor, it’s important to take the necessary precautions to ensure the process is done correctly and safely. Start by selecting the correct size wire wheel for the task at hand, and then insert it onto the arbor, ensuring it’s seated firmly. You don’t want the wheel to come loose during use, which could result in injury or damage to your workpiece.
Make sure to tighten the nut or screw securely while avoiding over-tightening, as this can cause the wheel to become unbalanced. If the wire wheel is too loose, it can wobble or even detach from the arbor during use, which poses a significant safety hazard. So, always double-check the seating and tightness of the wire wheel before you start working and throughout the process as needed.
Taking these simple but crucial steps can ensure a smooth installation and a safe, productive outcome.
Use the wrenches to tighten the flanges, alternating sides
Before we get started on installing the wire wheel, it’s essential to ensure that the flanges are tightly secured. Using the wrenches, tighten the flanges by alternating sides to ensure that they are evenly tightened. This step is crucial as loose flanges can cause the wire wheel to wobble and become detached from the grinder while in use, which can be incredibly dangerous.
Once you have double-checked that the flanges are in place, it’s time to move on to installing the wire wheel. Make sure that you select the correct size wire wheel for your grinder and attach it carefully, following the manufacturer’s instructions. Remember to always wear protective gear such as safety glasses and gloves when working with power tools such as grinders.
By taking these necessary precautions and ensuring that your wire wheel is correctly installed, you can use it safely for a long time to come.
Safety Precautions When Using the Wire Wheel
If you’re looking to install a wire wheel on your bench grinder, it’s important to take the necessary safety precautions. First and foremost, ensure that the bench grinder is turned off and unplugged before attempting to install the wire wheel. When installing the wire wheel, make sure to follow the manufacturer’s instructions carefully, ensuring that all components are properly secured.
It’s also recommended to wear protective gear such as safety glasses and gloves to prevent any accidental injuries. Once the wire wheel is installed, it’s important to check it regularly for any signs of wear and tear and replace it if necessary. By taking these safety precautions, you can reduce the risk of accidents and injuries when using a wire wheel on your bench grinder.
Wear eye protection at all times, as wire wheels can throw off dangerous debris
Wire wheel safety precautions are crucial to keep in mind when using this powerful tool. One of the most important safety measures is wearing eye protection at all times. The wire wheel spins at high speeds and can release sharp debris, which can cause serious eye injuries.
Therefore, it is critical to wear appropriate protective eyewear to avoid eye infections or even permanent eye damage. It’s always better to be safe than sorry, so make sure you invest in good protective gear before you start using a wire wheel. Remember that safety should be your top priority whenever you are working with any type of power tool, and this rule applies to wire wheels too.
Wear gloves to protect your hands from any sharp wires or burrs
When using a wire wheel, it’s important to take safety precautions to avoid injury. One of the easiest things you can do is wearing gloves to protect your hands from any sharp wires or burrs. These can easily cause cuts and scrapes, which can lead to infections or other complications.
Additionally, be careful to hold the wire wheel securely, as it can easily catch on loose clothing or jewelry. It’s also a good idea to wear eye protection to avoid any flying debris and to avoid inhaling any dust or debris that may come off of the wheel. With the right precautions in place, you can safely clean and polish a variety of materials with a wire wheel.
Just be sure to take your time and use proper technique to avoid any accidents.
If grinding metal, use a respirator mask to avoid inhaling harmful particles
When using a wire wheel for cleaning or polishing, it’s important to take safety precautions to avoid accidents and injury. One of the most important measures you can take is to use a respirator mask if you’re grinding metal. This will prevent you from inhaling harmful particles that can cause lung damage and other health problems.
It’s also a good idea to wear safety goggles to protect your eyes from flying debris. Make sure to secure your workpiece well before using the wire wheel, and never use too much pressure on the wheel as it can cause it to break or shatter. Always use the appropriate type and size of wire wheel for the job at hand, and be aware of the speed and rotation of the wheel to ensure your safety.
By following these simple tips, you can enjoy using your wire wheel while keeping yourself safe and protected.
Conclusion
In conclusion, installing a wire wheel on your bench grinder is like giving your grinder a makeover. Just like a new outfit can enhance your appearance and boost your confidence, a wire wheel can spruce up your grinder and make it more effective in removing rust, paint, and other stubborn debris from your workpieces. So, don’t be afraid to take on this DIY project and showcase your handy skills.
With these easy steps and a bit of elbow grease, you’ll have a grin on your face as your wire wheel spins on your bench grinder, ready to tackle any task thrown its way!”
FAQs
What tools do I need to install a wire wheel on a bench grinder?
You will need a wrench, pliers, and possibly a screwdriver to attach the wire wheel.
Can any wire wheel fit on a bench grinder?
No, wire wheels come in different sizes and arbor sizes, so make sure to choose a wheel that fits your bench grinder’s arbor.
How do I remove the old grinding wheel from my bench grinder before installing the wire wheel?
Use a wrench to loosen the nut holding the old wheel in place, then remove the wheel and the washers behind it.
Where can I purchase a wire wheel for my bench grinder?
Wire wheels are available at most hardware stores and online retailers.
How do I install the wire wheel on my bench grinder?
Place the washer onto the bench grinder’s arbor, then place the wire wheel onto the washer. Secure the wheel in place with the nut and tighten it using the wrench.
What precautions should I take when installing a wire wheel on my bench grinder?
Wear eye protection and gloves when installing the wire wheel to prevent injury from flying wires. Make sure the bench grinder is unplugged before installing the wheel.
How often should I replace the wire wheel on my bench grinder?
It depends on the amount of use, but generally, wire wheels should be replaced when the wire bristles become worn down, or every 6-12 months with regular use.

